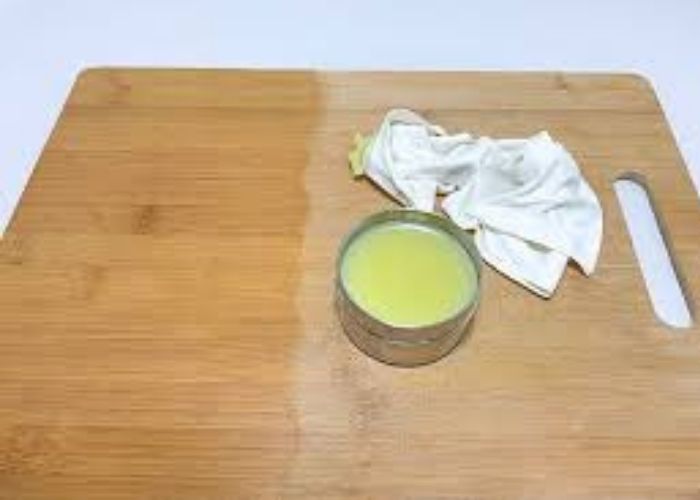
Beeswax furniture polish is a natural and classic product used for protecting furniture while giving it a luxurious luster. In this blog post, I’ll show you how to apply Beeswax to wood.
Beeswax is the easiest to use on furniture; it applies perfectly to finished and unfinished furniture. In addition, this wax isn’t toxic, and anyone can pull off a perfectly waxed surface.
Keep reading to learn how to use Beeswax on wood and all the expert tips about waxing wood.
What is Beeswax Wood Polish?
Beeswax wood polish is a natural and safe protective finish that brings out the true beauty of wooden utensils and furniture. This beeswax polish for wood is made by mixing beeswax from honey bees with natural oils like coconut oil and essential oils.
How to make Beeswax Furniture Polish
This method shows you how to make 100% natural beeswax polishes for wood furniture. Since Beeswax is food-safe, there’re several oils you can mix with the wax for a wonderful smell, different hues, or other purposes.
These oils include; olive oil, jojoba oil, linseed oil, coconut oil, walnut oil, essential oil, and mineral oil. Coconut oil will make the mixture lighter, while olive oil will give it a greenish tint. If you choose to use coconut oil, make sure it is liquid.
We’re making this wax polish in the ratio of one part beeswax to three parts of oil. This ratio will give us a buttery texture. If you prefer soft wax, add more oil. Still, if you want harder wax, then you’d use more Beeswax in the ratio.
If you are finishing an unfinished wood, you can go for the yellow wax to add a pop of color to the surface.
Ingredients and materials you will need
- Solid Beeswax
- Oil of your choice (jojoba, olive, walnut, coconut, mineral oil, etc.)
- Double boiler
- Stirrer spoon
- Glass or tin container with a lid
- Essential oils (optional)
Steps by step process
Step 1: Get your batch of Beeswax online, from retailer stores, or a local beekeeper. Just a little bit will be enough.
Step 2: Grate or crush the Beeswax and put it in a ceramic bowl.
Step 3: Heat water in a double boiler and place the ceramic bowl on the hot water bath. This will melt the wax slowly but evenly. As it melts, you can add more solid wax until the melted amount fits the desired ratio.
Step 4: Add the three parts of the oil to the melted wax and stir gently. Keep stirring until you’re sure all the products are sufficiently mixed together.
Step 5: Switch off the stove and transfer the melted mixture into a glass jar with a wide mouth –for easy access to the wax polish. You can add scented oil and mix well before pouring it into the container.
Step 6: Set it aside to cool and solidify for two to three hours. Once the wax polish cools down, this natural material is ready for use.
How to Apply Beeswax to Wood
Here’s a straightforward guide for applying the best wax polish for wooden furniture and other surfaces in general. You can’t go wrong following these steps, but first, assemble the necessary tools and materials.
Tool & Materials for finishing wood with Beeswax
- Orbital sander
- Intensive wood cleaner
- Lint-free cloths
- Beeswax wood polish
- Various grit sandpaper (100-180)
- Cotton rag
The Procedure for Applying Beeswax to Wood
Step 1: Clean the wooden surface thoroughly
It’s a rule of thumb to always clean the surface thoroughly before refinishing. However, if the surface is relatively clean and your concern is the debris, clean it using warm soapy water and gentle scrubbing.
Rinse the surface thoroughly and let it air dry. However, if you want a completely new surface to work on, you will need to strip all the old paint, waxes, varnishes, or other finishes.
In which case, using a heat gun and a paint scraper or paint thinner may not be enough. Consider using Citristrip stripping gel on furniture on the surface in question, and then let it sit for 30 minutes to an hour.
Scrape the loosened finish and then repeat the process if necessary. Finally, wash the surface thoroughly with an intensive wood cleaner with enough water.
Wipe off excess water and let the surface air dry thoroughly. Depending on the weather in your region, this could take anywhere between two to three hours or more if need be.
Step 2: Sand the cleaned wood surface
Sanding is another crucial step in this process. It helps smooth out the surface, which aids in absorbing the wax polish.
Start sanding using 100 grit sandpaper and work in the direction of the wood grain. You can use a sanding machine or a sanding block, depending on the size of the wooden surface. Ensure that you sand every inch of the wood furniture that will be polished.
Go over the final round of sanding using 180-grit sandpaper. This will give you a smooth and even surface that will pop under the wax. If you plan to apply wax over a finished surface, you still need to scuff sand, so the wax applies well without running off.
Vacuum the sanding dust and run a dry cloth or tack cloth to eliminate every grain of dust on the wood surface.
Step 3: Apply the first layer of beeswax wood polish
Once you have a clean surface, get a clean lint-free cloth for the application process. The secret here is using just a little bit of wax -not too little, not too much.
Scoop a little from the jar using the cloth and apply the wax to the furniture using long sweeping strokes –along the wood grain. Repeat the same process over the entire surface of the wood furniture. Ensure the wax layer remains light and uniform.
Step 4: Wait for the first layer of beeswax polish to dry
Allow the first layer of beeswax furniture polish to dry for 15 to 20 minutes. Note that this time allowance can vary depending on the temperature and humidity in your region and the porosity of the wood.
The idea is to allow the wood enough time to absorb the wax. This time frame will also provide an ample surface for the next layer to adhere to without smudging.
Test if the wax is dry enough by pressing the tip of your finger on an inconspicuous spot. If it’s sticky or takes on your fingerprint, give it more time. It’s ready for re-waxing once it is fairly hard to the touch.
Step 5: Reapply another layer of Beeswax
Reapply another layer of the wax in the same fashion as the first coat—light amounts with gentle, long strokes. Again, use a clean spot on the lint-free cloth you’re using.
Raw or unfinished wood requires at least three layers of beeswax wood polish. While an already finished wooden surface is good enough with two layers of wax, you can add more layers depending on the traffic exposed to the furniture.
If the wax gets blotchy or doesn’t turn out as expected, read our article for tips on fixing blotchy wax.
Step 6: Repeat steps 5 and 6 as necessary
Once you’re done waxing, let it dry to the touch. Then, repeat the process for the third or more wax layers. Once you’ve applied all the beeswax layers you desired for your project, let the last coat dry thoroughly in preparation for buffing.
Step 7: Buff the finished wood surface
Get a clean rag or cloth and rub it on the waxed surface in a circular motion. Buffing removes excess polish and smooths out any build-up wax in corners and crannies. In the process, the finished product develops a shine.
Keep buffing the wooden furniture using a clean cloth going from the top, sides, and every inch. Repeat the process until you are satisfied with the gloss level on your wood furniture.
Set aside the finished furniture to dry fully for 24 hours before using it or moving it around. Ensure that it dries in a warm room.
Read also: How to remove furniture wax from wood.
What to Look for when Purchasing Beeswax Polish
When buying beeswax polish for your furniture, look for a smooth and consistent texture. In addition, it shouldn’t have any visible dirt particles or impurities.
Look at the color and luster: If it is yellowish but with a matte appearance, it’s all-natural. But if it is clear and appears glossy, chances are it’s mixed with other stuff like turpentine.
Pros and Cons of Beeswax on Wood
Compare the advantages and disadvantages of beeswax finish while deciding if it satisfies your needs.
What We Liked Most
- Eco-friendly – Beeswax is made of purely natural ingredients that don’t threaten the environment and its people.
- Food Safe- You can safely consume it; use it to finish wooden utensils and surfaces that come into contact with food.
- Affordable – This product is economical since it can be used pure or mixed with other available natural ingredients.
What Could Be Improved
- High maintenance- Beeswax polish on wood requires regular reapplication to keep it in the best shape –say thrice or four times a year.
- Zero resistance to heat- A waxed surface will easily melt and get ruined if exposed to temperatures above 70 degrees Fahrenheit.
Beeswax Wood Finish FAQs
How to use solid Beeswax on the wood
- Clean the wooden surface thoroughly.
- Sand the cleaned wood surface.
- Apply the first layer of beeswax wood polish
- Wait for the first layer of beeswax polish to dry.
- Reapply another layer of Beeswax.
- Repeat steps 5 and 6 as necessary.
- Buff the finished wooden surface.
Where can I buy Beeswax for furniture?
You can buy Beeswax polish for furniture from established hardware stores, several supermarkets, furniture stores, or online retailers like Amazon.
How long does it take for Beeswax to dry?
Beeswax can take anywhere between five minutes to one hour to dry. This time frame depends on temperature and humidity in the region and the number of wax layers applied. The first coat can take five to 10 minutes, while the third or fourth can take 30 minutes or more.
Can you use pure Beeswax on wood?
Yes, you can use pure Beeswax on wood. Melt it on a double boiler and apply it as a polish to finished furniture or unfinished wood. You can also apply it on squeaky or stuck wooden parts to help them glide smoothly.
Can I use Beeswax on bare wood?
Yes, you can use Beeswax on bare or unfinished wooden surfaces. Bare wood is often predisposed to staining, cracking, or splitting damage. That’s why using beeswax polish provides the needed protection.
Is Beeswax good for furniture?
Absolutely! Beeswax furniture polish is an effective, natural, and safe way to breathe new life into wooden furniture. You can use this polish on cutting boards, as a finish on bare wood, and add sheen to finished furniture.
For cutting boards, combining it with cutting board wood glue can provide both a decorative touch and functional durability.
What is Beeswax used for on wood?
Beeswax is used for coating and protecting bare wooden surfaces, oiled, painted, and varnished surfaces alike. The wax seals and preserves various wood surfaces, giving them a durable and natural-looking luster.
How many coats of Beeswax should I use?
You should use at least two to three coats of Beeswax. Use this approximation, particularly if you’re applying Beeswax to wood furniture for the first time. Ensure you allow adequate drying time before applying subsequent coats.
How often do you have to apply Beeswax to wood?
Apply Beeswax to wood three to four times a year to keep it in the best state possible. Furniture made of hardwood such as Oak, Mahogany, Teak, and Walnut, among others, requires such regular treatment.
What does Beeswax do to wood?
Beeswax cleans wood, polishes it, and protects it from damage by spills and stains. Beeswax’s purpose can be classified as general wooden furniture restoration: it helps maintain the wood in good condition.
Can I use Beeswax on varnished wood?
Yes, you can. That’s because Beeswax is applied to all types of finished wooden surfaces –varnished, painted, oiled, or stained. The wax polish on either of these surfaces is an added shine and protective layer.
How does Beeswax waterproof wood?
Beeswax penetrates the wood grain and creates a gorgeous, polished finish. Also, since the wood pores are filled with wax and glossy surface, any water landing on the surface will naturally bead up and slide off.
What is the difference between Beeswax Polish and Wood Wax & Polish?
The difference between the two is that Beeswax polish is pure form while wax and polish have a bit of oil mixed with them.
Also, Beeswax polish will protect and enhance appearance without altering the wood color, while Wax and polish mixture will soak into wood pores and slightly darken in color.
Related read: Can you polyurethane over wax?
Is beeswax furniture polish better than using spray polishes?
Yes, beeswax furniture polish is a natural product that guarantees a clean and evenly polished surface. In contrast, spray polishes contain silicones that build up on the surface after multiple applications.
This silicone build-up on furniture ends up looking streaky and feeling smeary to the touch.
Conclusion
Now that you know how to apply Beeswax to wood, polishing dull wooden surfaces has never been easier. Plus, it helps you know how to whip up your batch of beeswax furniture polish.
Before using beeswax wood polish, ensure the surface is clean and perfectly sanded. Then, apply a little wax, spread it evenly, wait for it to dry, and buff it to bring the desired amount of sheen.
If you found this guide insightful, feel free to share it with your networks. See you in the next one!