Several ways of applying wood stains exist. You can typically use a clean rag, paintbrush, foam brush, or pad to apply wood stain, but can you apply stain with a roller?
Well, using a roller is one of the least common methods of applying wood stain. Much as using the roller to apply stain is less common than the other methods, it is one of the easiest.
However, you can only use a roller with certain types of wood stains, not all types. Read along to learn everything you need to know about using a roller to apply wood stain.
Can you stain a deck with a roller?
Yes, using a roller is one of the greatest and easiest ways to stain your deck. The method is also fast, especially if you must complete the project quickly. However, it may be hard to reach hidden areas, so make sure you have a brush as well to apply stain on such areas.
In the next section, you will learn the techniques to use when staining a deck with a roller. This guide will also show you the right type of roller for staining. Read on.
But first, should you stain or paint a deck? Find out.
How to Stain a Deck with a Roller
Staining a deck means that you also have railings, handrails, and any garden accessories like benches to plan for.
So, start by picturing your exterior décor and how you want your outdoor space to look, as this will significantly determine how much stain you need and the materials you must use.
Tools and materials
- Deck stain (exterior-grade transparent stain)
- Foam roller
- Paintbrush
- Paint tray
- Power sander and sandpaper
- Sanding block
- Plastic sheeting
- Painter’s tape
- Protective clothing
- A pair of hand gloves
Procedure for staining a deck with a roller
Once you have determined how you want your outdoor space to look, you can proceed to the actual work of staining your deck.
Preliminary Step 1: Choose your applicator and deck stain
You will require two types of applicators: a paintbrush and a roller.
While you will use a roller to apply the stain on the flat surfaces on your deck, you will require a paintbrush to feed the stain into the gaps between decking boards and the hard-to-reach areas at the corners of the deck.
Ideally, get yourself a synthetic brush if your deck stain is water-based and natural bristled paintbrush for an oil-based deck stain.
We recommend a 4-inch paintbrush to get the job done appropriately. Regarding the deck stain, the rule is to go for a high-quality product if you want the best results.
That means spending a little bit higher on your purchase. Often, buying your stain from an established brand may work in your favor. You can also always check user reviews for an idea of what stain works best.
Preliminary Step 2: Choose a day when no rain is forecast
The first thing you want to do when planning the stain job is to check with the weatherman to ensure there will be no rain on the day of your work and after.
Most wood stains require 24 to 48 hours of drying. Any event of rainfall before this drying time elapses may damage the finish, leaving you with redoing the entire work as your only viable option.
To avoid such costly repercussions, check the weather forecast and plan your work on a day when no rain has been forecast for the entire duration of your stain’s drying time.
If the stain dries in 48 hours, you will want to work on a day when no rain has been forecast for two days, and so on.
Here is a detailed guide on how long does stain need to dry before rain to help you out.
Step 1: Fix any damages on the deck
Here, you want to inspect the deck to ensure that every board is sound before you apply the stain on it. Refinishing a damaged deck can be costly in the long run as you will have to redo the work after fixing it in the near future.
To avoid that, check the deck for any damaged wood that needs fixing. Look for cracks and dents in the boards. If any, fill them up with a suitable wood filler.
Also, check for missing pieces, broken boards, loose nails, or splinters on the railings. Ensure you replace anything that has outlived its usefulness, tighten anything loose, and fix anything that is broken.
Step 2: Clean the deck
For a new deck, a mild soap and water solution should get the dirt out of its surface.
However, an older deck may have a significant amount of dirt and debris accumulated on its surface. Such a deck will require a pressure washer to scour away the layer of accumulated dirt and debris.
In either case, start by sweeping the deck to remove any loose debris and simplify deep cleaning. After washing the deck with a deck cleaner, let it dry completely before continuing.
Step 3: Sand the wood
An important part of staining a deck is sanding the wood. In this case, you must use a random orbital sander or your favorite power sander.
We recommend sanding it to 150 grit for the final sanding. That will smoothen the surface you prepare to take the oil based stain properly.
For the parts where you cannot use the power sander, a sanding block should be handy.
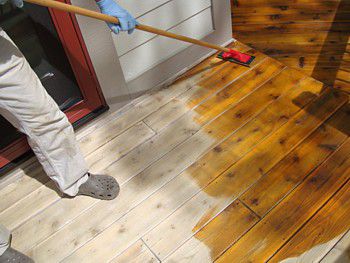
Step 4: Apply deck stain.
After sanding and wiping the wood dust, it’s time to stain the deck. Transfer the stain you intend to use into an open container that can freely accommodate your roller. In this case, the ideal container is a paint tray.
If there are adjoining parts that you do not wish to stain, this is the time to apply a painter’s tape to them.
Start by staining the top of the handrail down. The idea is to work from the top to the bottom when you apply deck stain to avoid any splatters ruining your stained deck.
Also, remember the importance of applying stain between deck boards, as this meticulous step ensures thorough protection and a cohesive finish for your entire deck.
After finishing these parts, proceed to the deck. Apply the stain with your roller using long, even strokes. Start working from the edge of the house towards the stairs. Also, stain the stairs to help in making your wood stairs less slippery.
Consider working in small sections at a time to keep a wet edge and have adequate time to spread the stain evenly before it hardens.
Watch out for any pooling stain while you spread it on the wood. This helps you achieve an even finish.
After finishing the entire deck, leave it to dry for a minimum of 24 hours without walking or placing any objects on it. Here’s more on how long before you can walk on a stained deck.
Surfaces You Can Stain With a Roller.
As a rule of thumb, you can stain any flat surface with a roller. More specifically, here are some common surfaces you can stain with a roller.
–Decks
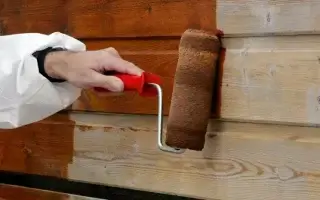
Decks are made of flat boards, making them ideal candidates for staining with a roller. Additionally, deck stains usually contain a sealer, so you don’t have to wipe the excess after applying it with a roller.
–Hardwood floors
Like wood decks, hardwood floors are made of flat boards, which can accommodate paint rollers. However, staining a hardwood floor with a roller may not be the fastest method.
What are the Advantages of Using a Roller for Staining?
Depending on the type of stain used, using a roller can have these advantages:
- Using a roller is a fast way of applying wood stain.
- Rollers can be an excellent way of avoiding brush marks on the stained surface.
- A roller can cover a larger area than a brush, making it a more effective application method.
- Rollers can do an excellent job distributing the stain evenly with a little practice.
What are the Disadvantages of Staining with a Roller?
- A roller can cause the stain to pool on the wood surface, leading to an uneven finish. But we got you covered. Check out our solution for bad wood stain jobs.
- A roller cannot stain curved surfaces.
Interesting read: Best sealer for redwood fence.
Spraying Stain vs. Using a Roller
Using a spray gun is one of the more popular methods of applying wood stain. So, how does it compare to using a roller?
| Spraying | Using a roller |
| 1. Effective in tight and hard-to-reach areas | 1. Effective on flat surfaces |
| 2. It is a faster method of applying stain. | 2. It is about two times slower than spraying. |
| 3. It works better for penetrating strains. | 3. It works better for thick, film-forming stains. |
What is the Best Roller for Staining a Deck?
The standard 9-inch napped paint roller is the best roller for staining deck. It works much like the more popular lambswool pad, except it is more efficient than the pad.
Because you are staining a wood deck, you need to attack this roller to extension poles to allow you to work upright. Working from such an upright position is good for your back and allows you to work faster.
Related: 3/8 vs 1/2 nap roller
Can You Apply Solid Stain with a Roller?
Absolutely. You can apply a solid wood stain with a roller, even though it is a relatively slow method.
Solid stains require wiping the excess stain after application. As such, using a roller can significantly slow you down and increase the chances of the stain getting tacky before you wipe the excess.
When working with a solid stain, consider using a rag to wipe it onto the wood and off, helping you avoid switching from one tool to another during the project. Here are the best cloths for staining wood you can choose from.
FAQs
Is it better to brush or roll on the stain?
It depends on the surface. However, many painters advise it’s better to roll, especially on deck and flat surfaces to cover a large surface area within a short time. Besides the wide area coverage, rollers are also efficient and easy to use. Using a brush is perfect for hidden areas a roller cannot access.
What kind of roller do you use for stain?
Foam rollers are the best to use when applying wood stain. These kinds of rollers are more likely to leave a smooth, stained surface with no brush marks or unsightly streaks.
Can you roll the stain on with a roller?
Yes, you can use a roller to apply wood stain as long as you are staining a flat piece of wood or surface. Curved or hard-to-reach areas are challenging to stain with a roller due to its shape.
For such areas, always have a paintbrush to supplement the roller for a successful project.
Conclusion-Can You Apply Stain with a Roller
So, can you apply stain with a roller? Staining a wood deck or other pieces of wood with a roller has its share of advantages. If you didn’t know you could use a roller to stain a deck, consider using this tutorial as your reference for your next stain job.
When used correctly, a roller should give you a more satisfactory coverage and faster project time with your deck stain.
Did we cover everything you needed to know about staining wood with a roller? Please leave a comment to let us know your thoughts.