Lacquer often has the finish quality of being shiny, glassy, high gloss and/or with an orange peel texture. The problem with lacquer is when it wears down over time, it tends to get dull-looking without any shine left in its appearance.
This post will discuss;
- Can you paint over lacquer furniture
- What kind of paint can go over lacquer
- How to Paint over Lacquered Wood
- How to Paint over Lacquer Without Sanding
Can You Paint Over Lacquered Wood?
Yes, it’s possible to paint over an existing finish after prepping the surface. Start by wiping it with a dry cloth if it is noticeably dusty, then sand it within the grain using 150-grit then 300-grit sandpaper. After that, wipe away the sanding dust and apply a latex or oil-based primer before painting it.
How to Paint Lacquered Furniture?
Lacquers cure into a slid, slick topcoat. Unfortunately, this glossiness can make it challenging for the modern paint to adhere to if you paint over it without proper surface preparation. Painting on a varnished wood surface requires thorough preparation to ensure proper adhesion and a successful finish.
Thankfully, this post helps walk you through the process of prepping the surface so that you can paint over lacquered wood.
The supplies you will need to paint lacquered wood
- Safety goggles
- Protective face mask
- Gloves
- 150-grit sandpaper
- 300-grit sandpaper
- Latex or oil-based primer
- Paint
- Lint-free cloth or rag
- Power sander (optional)
- Paintbrush or spray gun
- Drop cloth
Steps to follow when painting over lacquered wood
Here are the simplified steps to follow when painting over lacquer furniture.
Step 1: Prepare your working space
Whenever sanding is part of your woodwork project, it’s essential to work in a well-ventilated space. For example, you could carry out the project outside in a carport or the garage if possible.
If you must work indoors within your main living spaces, ensure you open the windows and doors to create better airflow. You don’t want to have sanding dust hanging around your indoor air and risk inhaling it.
Next, cover the floor and any nearby objects you don’t want the wood dust and chemicals on. You can use plastic sheeting or drop cloth for this purpose.
Finally, protect yourself from sanding dust, primer, and paint. Some primers and paint could have a relatively strong odor. If this is the case, you could wear a face mask to cover your nose and keep you from feeling the odor.
In any case, consider wearing a pair of gloves and a face mask before you start sanding.
Step 2: Sand the glossy lacquered surfaces
Start by touching the surface you want to paint. Touching will let you feel the texture and gauge the amount of sanding required to prep the surface for painting.
If the surface is slick to the touch with a noticeably shiny appearance, the chances are, it has a hi-gloss or semi-gloss finish. On the other hand, a surface that feels rough and looks natural probably has a flat finish.
Sand a glossy surface with 150-grit sandpaper
A glossy lacquered surface will require sanding with medium-grit sandpaper to scuff it and stimulate adhesion. For such a lacquered piece, use 150-grit sandpaper to texture it accordingly.
Sand a flat-finished surface with 300-grit sandpaper
If the surface has a flat or eggshell sheen, use fine-grit sandpaper to prep it for painting. Ensure you sand along the direction of the wood grain in each case, not against the grain.
The latter direction could cause scratches on the lacquered surfaces, which beats the purpose of sanding in the first place. You can use a palm sander for a standard project or an electric sander for a relatively large project.
Whichever direction you choose, be sure to sand lightly and evenly across the entire surfaces you wish to paint. The objective is to scuff up the surface to let the new coat grip it and not cause additional abrasion to the wood surface.
Step 3: Wipe away the sanding dust with a tack cloth followed by a damp rag
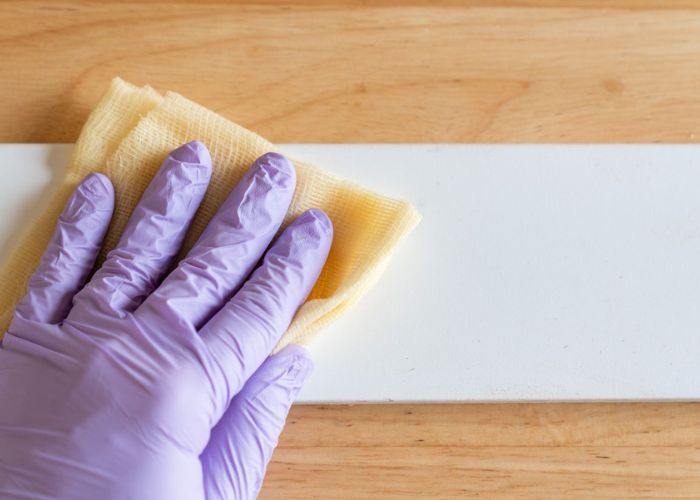
Once you finish sanding, use a tack cloth to wipe the entire work area to remove dust. After that, saturate a clean lint-free cloth with clean water and remove every drop of the excess water by wringing it.
Then, use the damp cloth to wipe down the remaining wood dust from the sanded surface. It’s crucial not to use a soaking rag because you don’t want to wet the wood.
Doing so would raise the grain and roughen the texture. Allow the wood a few minutes to dry thoroughly before proceeding to the next step.
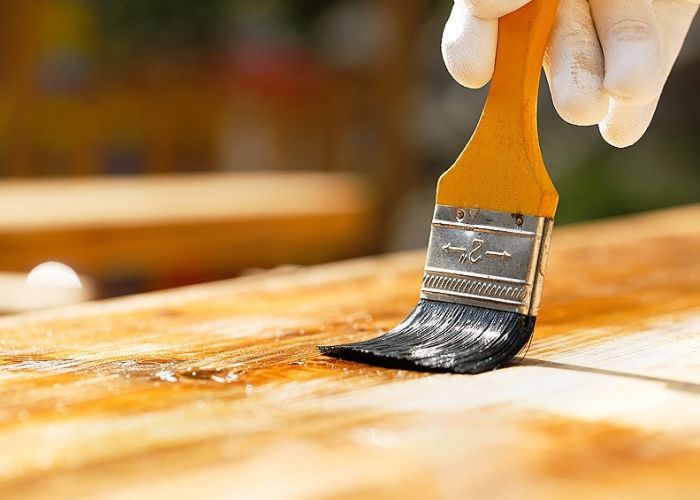
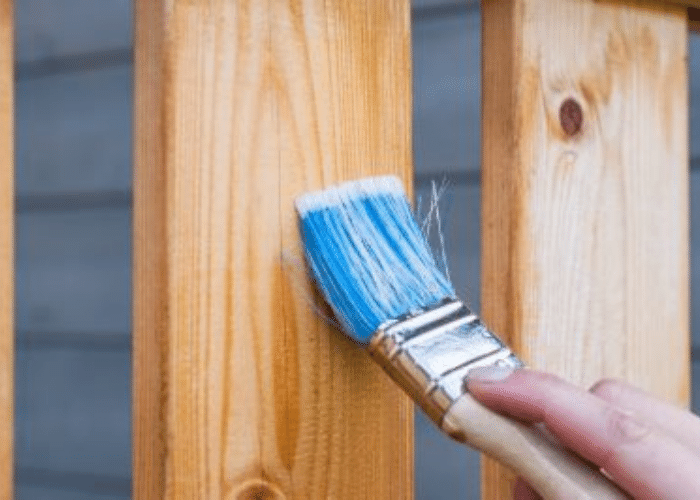
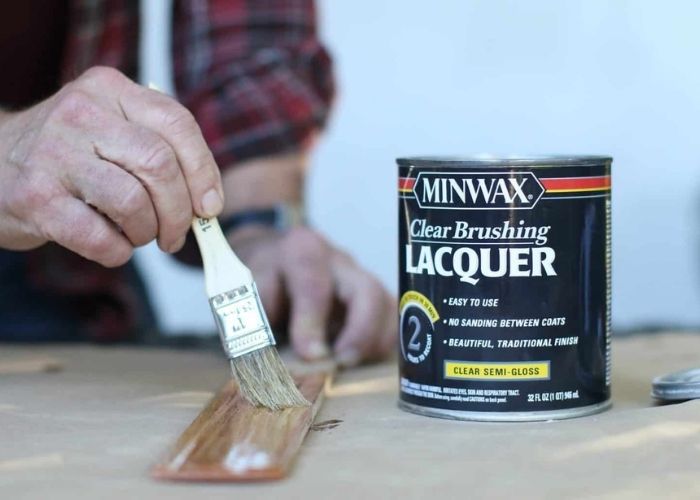
Step 4: Apply Oil based primer
Once you have a dry and clean surface, apply an oil-based or latex primer (Kilz or Zinsser) to seal your wood using a latex paintbrush. The brush can be two to four inches in size, depending on what you have or prefer. Importantly, ensure you keep the coats of primer thin.
Apply the primer in the direction of the wood grain for the best results. Don’t overwhelm the surface with thick coats of sealer, as doing so could lead to delayed drying or undesired runs.
Let the first coat of primer dry for two hours, then go over it with a second coat for better coverage. Allow the second coat to dry for a further two to four hours, depending on the weather.
Pro tip: Some woods—particularly coniferous ones like cedar—tend to release tannins over time. Tannins are natural stains from lumber that can bleed through regular wood primers and spoil a paint job. So consider using stain-blocking primers whenever you can. If you are okay doing the job repeatedly, make sure to use a primer paint remover to clean the surface first.
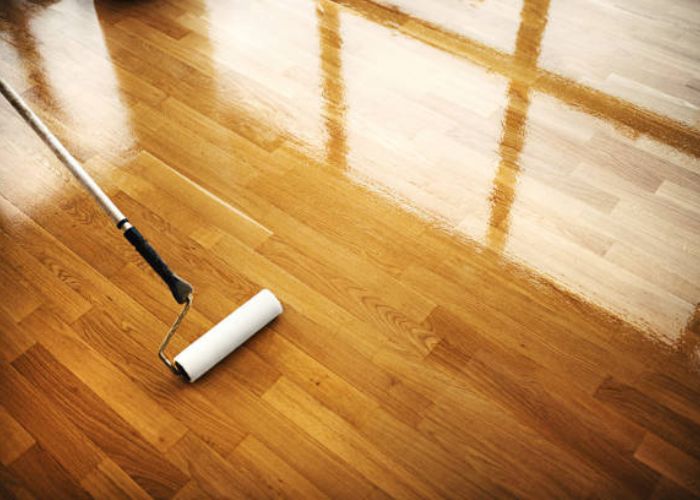
Step 5: Apply paint
After priming, allow the wood to dry, you can proceed to the central part of your paint job—applying the paint.
What kind of paint can go over lacquer
Use latex or oil-based paint of any sheen because Lacquer is often glossy and other paints won’t adhere well. Oil-based enamel is tough as it dries quickly and adheres well to the smooth lacquer surface.
You can use a paintbrush or roller to apply the paint in the direction of the wood grain, just as you did the primer. Notice the direction of the brush strokes relative to the wood grain isn’t important when painting.
Paint generally covers the wood, completely blocking out the grain. So you don’t need to align the brush strokes with any direction other than the one you prefer.
Nonetheless, ensure your brush strokes are consistent and following the same direction for uniformity. Also, apply the paint evenly for better coverage.
Step 6: Let it dry
While you can apply one or two layers of paint, the latter will usually produce a more durable coverage even though the application may take more time.
You will need to wait for about four hours for the paint to dry before applying the second coat. Then let the paint dry completely before putting the furniture or item to use.
How to Paint over Lacquer Without Sanding
We all know that sanding is messy and time-consuming. But we don’t recommend you paint lacquer furniture without sanding because the lacquered surface is so smooth and slick that paint can’t usually adhere to it well.
However, if you cringe at sanding, here are a few ways of painting lacquer furniture without sanding.
1. Apply Chalk Paint over Lacquer
Chalk paint is a mixture of chalk, low-VOC or water-based pigments and an emulsifier. This is the most common way to paint furniture without sanding or doing much prep work.
However, many people complain that chalky paint is not as durable and easy to work with, so it has recently been replaced by Milk Paint. I recommend using a primer first when painting with chalk paint.
2. Apply Milk Paint plus Boding Agent
Milk Paint is an all-natural and non-toxic water-based alternative to traditional paints that uses casein (a milk protein) as a binder instead of synthetic resins or chemicals found in regular latexes, oil/alkyds, and acrylic paints.
A bonding agent is a secret sauce that makes milk paint stick to furniture without sanding or priming! Bonding agents are typically made of acrylic resins, but this one doesn’t have harsh chemicals like methyl methacrylate (MMA) in it.
Add an equal amount of milk paint and bonding agent. Mix the two ingredients together in a small bowl to make sure they are fully combined.
Use latex gloves if necessary, but avoid using plastic mixing bowls as the chemicals could leach into your mixture over time.
Paint on the surface with a foam brush or roller. Remember to only use the bonding agent when applying the first only.
3. Use Lacquer Primer for Wood
B.I.N, Kilz or Zinnser are examples of high-performance bonding primers that boast a “no sanding required” claim and have excellent binding power.
Use Zinsser B-I-N Shellac-Base Primer for bleeding prevention.
KILZ Adhesion High Bonding Interior Latex Prime is always my favorite bonding primer because it is super fast and easy to apply, and gets the job done with great results.
Go for ZINSSER Cover Stain Interior & Exterior Primer if you want greater adhesion and a more durable finish.
4. Use a liquid sander or deglosser to remove the fine scratches
If you are looking for an alternative to sanding, consider using a liquid deglosser. Liquid Sanders/Deglossers work well on glossy surfaces because they remove lacquer from wood without scratching or damaging it.
Liquid sandpaper is safe and easy to use with no mask required! You can apply these products by hand or machine and the finish will dry in minutes.
The chemical reaction of liquid sandpaper works by removing the finish from any surface, including lacquer.
Liquid Sander/Deglossers are a great option for novice painters or professionals looking to save some time on their next project! Some of my favorite brand is the 2-Pack Klean-Strip Quart Easy Liquid Sander Deglosser.
Apply Mineral Paint
Mineral paint is easy-to-use, environmentally friendly and available in a wide range of colors. Mineral paints do not require sanding before painting like traditional paint.
They can be used right on drywall, plaster or even stucco! Mineral paint is non-toxic and free of fumes that some latex/acrylics cause as well.
It is also water-based and can be cleaned up with soap and warm water. No need to use harsh chemicals or solvents that may affect your health/environment.
What is Lacquer?
Lacquer refers to a specific liquid comprising shellac and alcohol or synthetic substances, forming a solid, durable finish when dry. Like varnish, it can be used as a protective coating for metal, wood, and more.
Since lacquer dries into a highly durable hard finish, it’s popular for coating and waterproofing wood and furniture. Both do-it-yourself enthusiasts and professionals frequently use lacquer paint in various woodworking projects.
Types of lacquer Paint
If you intend to paint on lacquer, you may want to understand the product well to know how best to work with it. Understanding lacquer can help you get a more precise knowledge of why you should use one type of paint and not the other when painting over lacquered finishes.
That said, here is a look at the common types of lacquer you are likely to come across.
Acrylic Lacquers
Acrylic lacquers are some of the most popular types of lacquer. This group of lacquers was first developed in the 1950s for use on automobiles due to its fast-drying property.
Acrylic lacquers dry to form highly durable clear coats formulated to be non-yellowing. As such, acrylic lacquers are the best choice if you wish to clear the cost of a light-coloured wood.
Water-based lacquer
This category of lacquers is a popular choice for refinishing kitchen cabinets. The widespread use quickly gaining momentum is mainly due to its eco-friendliness.
Water-based lacquer is the most environmentally friendly of all lacquer types because it contains no toxic chemicals found in most lacquer types. Despite being water-based, the lacquer still boasts the same durability and scratch resistance as any lacquer.
Nitrocellulose Lacquer
Nitrocellulose lacquer is the most common type of lacquer. It is comprised of solvents in its formula and is relatively sensitive to heat. It is fast-drying and is most commonly used on wooden products, furniture, and musical instruments.
Like acrylic lacquer, nitrocellulose lacquer was once a popular option for coating automobiles due to its quick-drying characteristic. However, its use of vehicles has since diminished.
Perhaps the only significant downside of this type of lacquer is its yellowing that happens over time. This yellowing characteristic also means you don’t want to use this lacquer type on lightly colored wood.
Urushiol-based lacquer
These are slow-drying lacquers that produce strong, durable finishes when they fully cure. In addition, the urushiol-based lacquered finish is typically elegant and highly resistant to water damage, alkali, acids, and scratching.
Pros and Cons of Lacquer
There’re various topcoats to choose from when you want to waterproof and protect your wooden items.
Each product has its strengths and limitations that directly affect the quality of protection it provides. This section looks at the pro and cons of lacquer.
Pros
Lacquer is a popular finish because of the following reasons.
It has a high-gloss texture
Lacquer dries to a glossy finish that tends to enhance a surface’s aesthetic appeal. If you clear coat a piece of furniture with lacquer, for instance, the topcoat will make the wood grain pop while preserving its color.
A lacquered woodwork would retain its color and appear new for longer.
Additionally, the glossy coat is often scratch-resistant, preventing unsightly lines from appearing on the surface of your wood or wooden furniture.
Lacquer is highly durable
This product forms a robust, solid topcoat that can last for many years without needing recoating. If applied correctly, lacquer is one of the most durable topcoats and is resistant to chipping and flaking.
Also, most types of lacquer remain clear or retain their original color without yellowing, unlike most other coating products.
Lacquer offers UV protection
One of the most damaging weather elements is UV light. Lacquer protects the surface against the sun’s harmful UV light, preventing the coated item from fading.
Most types of lacquer dry quickly
Lacquer can be quick to apply because the coats dry quickly, allowing you to finish the project within a short time.
Cons
While this product has significant strengths, it has its share of limitations.
A sharp object can scratch a lacquered surface
Despite its apparent durability, a lacquered surface is still susceptible to scratching if the object is sharp. This can lead to greying of the scratched surface. Such a problem is rare with a more robust topcoat such as varnish.
If you’re not sure whether to pick lacquer or polyurethane when it comes to durability, go for polyurethane.
But is it possible to use polyurethane over acrylic paint? Find out in our article.
FAQs
Can you paint over Lacquer without Sanding?
No, sanding is essential if you want to paint over a lacquered surface. It helps texture the surface to allow the paint to stick better—failure to sand a lacquered item or furniture before painting will cause serious adhesion problems.
Can you paint on lacquer furniture?
Yes, it is possible to paint over lacquered furniture so long as you prep the surface accordingly before applying the paint.
Can you spray lacquer over latex paint?
Yes, laquer can be sprayed over latex paint. Ensure you sand the surface and prime it accordingly for the lacquer to adhere.
See: How to paint over latex paint
Can you put lacquer over acrylic paint?
Applying lacquer over acrylic paint isn’t recommended. As the paint gets older, it renders the lacquer less effective at finishing the wood or furniture. So, putting lacquer over acrylic paint may cause more visible damage than good.
Can you spray paint over the lacquer?
Yes, you can spray paint over a lacquered surface once you have prepped it. To prepare the lacquered surface for painting, sand it and apply a suitable primer before spraying the paint.
Can you paint enamel over lacquer?
Yes. you can paint enamel over a lacquer substrate like any painted surface once you have sanded and cleaned it of dirt, dust, and grease.
Can you spray lacquer over water-based acrylic paint?
Yes, it is possible to spray lacquer over water-based acrylic paint, but it is not recommended. While lacquer and the paint layers will bond well, the layer of lacquer will likely crack with fluctuations in humidity and temperature.
Can you paint lacquer over enamel?
Yes, you can paint lacquer over enamel, but it isn’t advisable because lacquers tend to lift enamel surfaces. However, lacquers should work all right over most fully cured enamels with good film integrity. So, we recommend testing thoroughly in an inconspicuous area before going all in.
Read also: Can you paint timbertech decking?
How to paint over black lacquer furniture
Can You Paint Over Lacquer Furniture Summary
Sure, you can paint over lacquer furniture if you want to change the color or update a piece for your home decorating needs.
But as with any DIY project, there are risks involved and steps that must be taken beforehand to protect both yourself and the finished product from damage.
In order to avoid ruining your hard work in addition to spending money on new furnishings, it’s important to follow the steps outline in this guide.
If you are trying to change the color or style of your woodwork without stripping down all previous coats, this article on “can I put polyurethane over lacquer” may be helpful for you.
Hi David,
Love your page, it is so informative and the best I have found online for information that actually makes sense.
Just a quick q if you could help me out please..
I recently acquired some second hand Ikea rattan (wicker-like) furniture which is painted with a clear Acrylic Laquer topcoat.
Due to the nature of the wicker, I would have a tough job sanding, so was going to skip that step and paint with an oil-based primer, then paint the new colour using a latex water based paint, but I’m at a bit of a loss as to what to finish it with..
should I finish it with a: lacquer, water based Polycrylic, or water based Polyurethane? Does it not matter which one I use?
They will be living outside (with covers on for when it rains).
Many thanks
I used lacquer but that was in-door, an exterior poly or varnish should work. spray all the coat layers thinned and thin coverage, to prevent checking cracks…edit, catalyzed and with retarder to allow moisture escape.