Painting your trusty old furniture pieces can give them a refreshed look and make them appear several years younger.
Unfortunately, these pieces are likely to have a hard-wearing top coat like polyurethane on their surfaces. So, can you paint over polyurethane or any clear coat, for that matter?
Stripping down the existing polyurethane finish is an option, but it can be time-consuming. Learning how to paint over polyurethane saves you from striping down the old finish and starting afresh.
Can You Paint Over Polyurethane?
Yes, you can paint over polyurethane with nearly any paint type, as long as you clean, sand, and prime the surface properly. However, applying the paint without prior surface preparation will typically result in peeling and chipping of the paint from the glossy polyurethane surface.
Priming is also essential because no paint type will properly adhere to the sanded polyurethane surface. The primer helps bridge the paint with the sanded poly, creating a durable and reliable finish.
While you can use any paint type on a polyurethane finished surface, acrylic and oil-based paints provide the best results.
However, notice that oil paints come with the limitation of strong fumes that may harm your health, even though they are among the most durable.
So you will want to wear proper protection consisting of a respirator or facemask and safety goggles during the project.
On the other hand, acrylic paint is slightly less durable than its oil-based cousins, but it is more eco-friendly and lacks strong fumes. So you can consider these aspects when deciding your pick.
Read: Can polyurethane be used over paint?
First Things First: What is Polyurethane?
Polyurethane is a form of liquid plastic commonly used as a protective topcoat for woods and other materials. It dries to form a highly durable layer.
Poly protects surfaces from damaging scratches, water, moisture, and other wear and tear aspects.
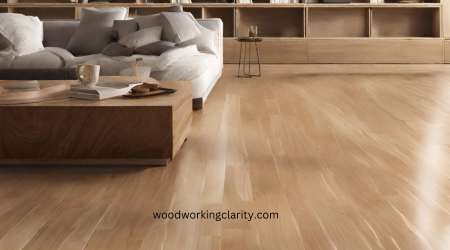
Polyurethane is a popular finish for furniture and hardwood floors due to its strong and durable nature.
Polyurethane finishes are clear, glossy, and sturdy. And you can get it in water-based and oil-based options. The finish is also available in various sheen levels, from high-gloss, through satin, to matte variants.
Related read: Is there a specific waiting period between applying polyurethane coats on hardwood floors?
How to Paint Over Polyurethane Wood
Before starting to paint over polyurethane, assess the condition of the finish to determine the best way to paint it.
Ideally, you want to ensure the clear coat you are painting over is secure and not damaged. If the polyurethane-treated piece has been neglected, the surface may sustain dents, scratches, and gouges.
Such a neglected piece requires more preliminary work. You must thoroughly sand the surface and apply wood filler to the gouges and scratches to fill them up before proceeding.
Painting over the polyurethane is not recommended for a badly damaged piece whose polyurethane finish is peeling off. Instead, you must remove the entire coating with a paint stripper and start the refinishing work from scratch.
Suppose you have a good polyurethane finish on your piece; the painting process is straightforward. All you need to do is follow the steps in this guide to paint over it successfully.
But first, here are the supplies you will need to complete this task.
Materials & Tools for Painting Polyurethane
- Orbital sander or sanding block
- Fine grade sandpaper
- Liquid sandpaper (optional)
- Clean lint-free rags
- Wood filler (if necessary)
- Safety eyewear
- Respirator or safety mask
- Rubber gloves
- Protective clothing
- Mineral spirits
- Cleaning solution
- Oil-based primer
- Acrylic urethane or oil-based paint
- Paintbrushes
- Tack cloth
How to Paint on Polyurethane (step by Step)
Notice that these steps will apply to both water-based and oil-based polyurethane-coated surfaces. So here’s how to paint polyurethane to achieve the best results.
Step 1: Prepare the wood surface
Cleaning is the first step in this process. Coated surfaces may accumulate grime, grease, dust, dirt, and even molds and mildew over time.
You will be sanding the surface afterward, but it is essential to clean it first to eliminate all the dirt and grime accumulated over time.
In this step, you will need to use a suitable cleaning solution depending on the level of dirt involved. If the polyurethane surface is barely dirty, simply saturate a clean cloth with mineral spirits and wipe the piece with it.
Take the time to ensure you cover every inch to remove all the dirt. Once done, switch to a separate clean, dry rag and wipe the debris and dry the surface with it.
You could also mix one tablespoon of dishwashing detergent with a gallon of water in a bucket and use it for the cleaning. Ensure you rinse well afterward and let the wooden piece dry before proceeding to the next step.
If the surface is covered in many stubborn stains, you may have to use a stronger cleaning solution such as Trisodium Phosphate (TSP).
In this case, ensure you wear rubber gloves, a face mask, and safety goggles because the solution is pretty strong. You may also wear protective clothing if you want to be too careful.
Working in a well-ventilated area is also essential, such as in a carport outdoors or the garage with any windows open.
Mix a quarter cup of TSP with a gallon of water in a bucket. Then, saturate a hand sponge with the solution and rub the entire surface with it. Ensure you cover every inch, nooks, and crannies where dirt could hide.
You may swap the hand sponge with a bristle scrubbing brush if you have areas with stubborn stains.
Once done, allow the piece to dry completely before continuing. You can get a clean, dry cloth to wipe it dry after rinsing to speed up the drying.
Step 2: Fix any surface imperfections
Once the polyurethane surface is dry, inspect it for any significant scratches and dents. If the surface has dents, use a putty knife to fill the grooves and holes with wood filler and let it dry completely before sanding.
Fixing these imperfections is essential in creating a smooth and even painted surface.
Step 3: Sand the wood
After cleaning and patching up any imperfections in your project, you can proceed to sand it. This step is vital in ensuring the paint and primer adhere to the polyurethane surface better.
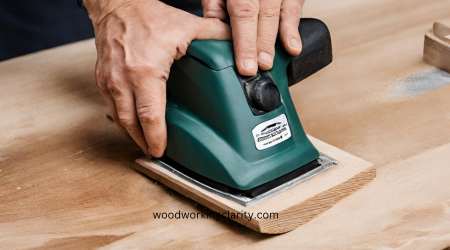
It scuffs up the otherwise smooth surface to give the paint something to grip on. Sanding also smoothens the surface to make your paint job is even and nice, especially if you patch up holes and dents with a wood filler.
Start by wearing a safety mask to protect you from inhaling the sanding dust. You may also take extra precautions by wearing a pair of safety goggles to prevent any debris from entering your eyes.
You don’t want to remove the entire polyurethane coat, so do not sand too deep. We recommend using fine grade sandpaper on a sanding block or orbital sander to scuff up the glossy topcoat carefully.
An oscillating sander may be a quick way to complete the task, especially if the project is big. A sanding sponge can be ideal for those intricate sections that an electrical sander cannot reach or sand effectively.
If you have a very large area to paint and you need to complete it quickly, you may use liquid sandpaper (deglosser). This is a powerful chemical that scuffs up the surface, removing its smooth sheen to allow the paint to stick.
Ensure you wear protective rubber gloves, a mask, and eye protection when handling such a strong chemical. And follow the application instructions on the product label.
In any case, this should involve saturating a clean, lint-free cloth with the product and wiping the entire surface with it.
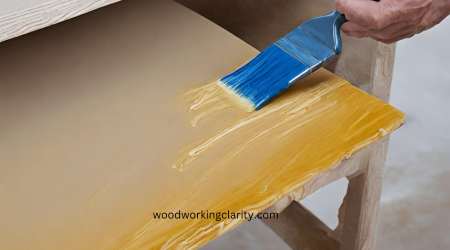
Step 4: Apply the primer
Before applying your first coat of paint, the surface needs a thin coat of primer to promote paint adhesion.
Use long, even strokes to apply an oil-based primer to the wood surface with a brush or roller. You could use a natural bristled brush to cover curved areas and a paint roller for the broad, flat surfaces.
We recommend an oil-based primer because it is the only type compatible with a polyurethane finish. Consider a high-quality bonding primer for the best results with fewer coats of the product.
Ensure you keep the layer of primer even but thin to dry faster. The product label should show you the recommended drying time; ensure you abide by it and allow each coat to dry completely.
One to two coats should provide adequate coverage.
Step 5: Apply the final top coat of paint
Once the primer has dried completely, use fine grade sandpaper to sand down the brush strokes visible on the surface.
Applying the paint without sanding the brush marks can allow the marks to be visible on your final paint coat. Sanding will help even them out and create a smooth surface.
After following these steps correctly, the final topcoat should stick without a problem. Next, use a high-quality roller to paint large surfaces or flat areas and a natural bristled paintbrush to cover small areas with nooks and crevices.
You could also use a spray gun to apply the paint to your polyurethane surface. The gun can better control your application, ensuring better coverage and a more precise, even coat of paint.
Allow each coat to dry for at least an hour or the recommended dry time before recoating. Then, you can apply two to three coats of primer for the best coverage, allowing each coat to dry completely before adding the second coat.
Will Paint Stick to Polyurethane?
Paint will not properly stick to polyurethane-treated surfaces without a primer. Therefore, painting polyurethane-treated surfaces requires an oil-based primer before applying the topcoat.
You also need to avoid acrylic latex and water-based latex primers since they will not work properly. After priming, water based paint and any other type should stick without a problem.
What Paint Will Stick to Polyurethane?
Any type of paint will stick to a primed polyurethane wood. The important thing is to prepare the surface by cleaning and sanding before applying a good quality primer to enable the new paint to stick.
No paint will stick to polyurethane without these crucial preliminary steps.
Read also: What kind of paint do you use on trex decking?
Can You Spray Paint Over Polyurethane?
Yes, spray paint forms a perfect coat over polyurethane as long as the wooden surface has a primer on it. Oil-based primer is always recommended whenever painting over a polyurethane coating.
After cleaning and sanding the poly, you can successfully spray the paint evenly across the piece. Good news! Stripping spray paint from wood is possible, and there are various methods you can use depending on the type of spray paint and the wood’s condition.
Can I Use Latex Paint Over Polyurethane?
While latex paint is not always the preferred paint for a polyurethane treated surface, it will stick if you clean, sand, and prime the surface before applying the paint. Priming is crucial as it directly influences the paint’s adhesion to the polyurethane.
Read our post on painting over latex paint if you have water based paint on the surface already.
Can You Use Acrylic Paint Over Polyurethane?
Absolutely. Acrylic paint is one of the preferred paint types for use over polyurethane coatings. Once you prepare the surface properly, acrylic paint will stick and form a durable finish that is also non-toxic.
Can You Paint Over Polyurethane with Chalk Paint?
Yes, you can paint over polyurethane with chalk paint. Just like all other paint options, chalk paint sticks to polyurethane. However, proper surface preparation is vital in ensuring the paint sticks and stays on the poly.
Start by cleaning the surface to remove any dirt or grime, then sand it with fine 200-grain sandpaper. After that, apply a primer before coating the wooden item with your chalk paint. If you follow this procedure, you can be sure of success.
How to Prep Polyurethane for Paint
To prepare polyurethane for painting, start by cleaning the surface with a damp cloth. You can wipe it with a lint-free rag dampened with mineral spirits or soap and water solution.
Once you have removed all the dirt, dry the surface, sand it down, and then apply a primer. Following these steps in that order will ensure any paint you apply on the polyurethane will stick and form a durable coat.
Otherwise, skipping the priming part will be akin to preparing for imminent failure. If there is no primer, the paint job will peel off and spoil the look soon after curing.
Precautionary Tips when Painting Over Polyurethane Wood
Here are a few things to keep in mind when painting over polyurethane. They are safety tips to help maximize your success in this painting project.
1. Wear protective equipment
Painting over polyurethane involves sanding and sometimes using chemicals likely to release strong fumes.
Always consider wearing eye protection and a mask when sanding, and read the properties of every chemical to determine the best way to handle it safely. It will be essential to wear rubber gloves when handling these chemicals in most cases.
2. Work in a well-ventilated space
It is always advisable to work outdoors when handling chemicals that release fumes. However, if you must remain indoors during your project, ensure you open windows to provide better air circulation.
3. Plan your work in moderate weather
The weather directly influences the drying and curing process of any finish. If you work in inclement weather, the coat may take forever to dry and cure.
Even worse, you will have to wait for longer between cots, which can amount to prolonged project time. You might also be tempted to recoat before drying properly, leading to poor results.
4. Dispose of any material correctly
The paints, primers, and some cleaning solutions are considered hazardous materials that you do not just throw in the garbage. Excess of some of these products must be taken to hazardous waste facilities.
So, always read the product label for proper disposal and follow the instructions provided.
4. Avoid smoking near your paints or primers
Many of these products contain flammable solvents making them flammable and combustible. It is safe to avoid smoking near such products to reduce the risk of fire.
See Also: Lacquer vs polyurethane finish
Can You Paint Over Polyurethane without Sanding?
Yes, you can paint over polyurethane without sanding if you use a deglosser instead. Deglosser is a liquid that etches the smooth varnished surface and roughens it up much like sandpaper, giving it the required texture to paint on.
Because deglosser removes the glossy sheen and leaves the surface textured and ready for painting, it is usually referred to as liquid sandpaper.
This product can work well for items such as pieces of furniture with intricate details that may be difficult to sand. The deglosser will access the tightest spots and roughen them up for refinishing since it is a liquid.
In any case, we do not recommend using deglosser over sandpaper when painting over polyurethane. You should only go in the direction of liquid sandpaper when it is the only viable alternative available.
Read also: How to apply Minwax polycrylic.
How to Paint Over Polyurethane without Sanding
To paint over polyurethane without sanding, you need to apply a deglosser after cleaning the surface to roughen it up, much like sandpaper. Then you can apply the primer and paint afterwards. But, can primer be mixed with paint?
Here’s a step-by-step procedure to follow:
Step 1: Clean and dry the surface
Step 2: Apply an even coat of the deglosser across the entire surface and leave it on for the recommended time. The label should guide you on this.
Step 3: Apply the primer
Step 4: Apply the paint
Note that each product label contains the specific use instructions to follow. Ensure you observe each of these, especially the drying times and application methods, for the best results.
FAQs
Can you paint over polyurethane cabinets?
Painting over polyurethane cabinets is perfectly possible. Start by removing any items in and around the kitchen cabinets, then clean them up with mineral spirits or soap and water solution. Once the surfaces are clean and dry, scuff up all the areas you wish to paint, and then apply a primer before painting.
You may need a stepladder for this project to reach all the heights of your kitchen cabinets. And you could use a roller to apply the primer and paint on the flat surfaces and paintbrush for those shaped areas.
Can you paint over urethane?
Yes, you can paint over urethane if you prepare the surface properly. Remove any and all residual dirt, dust, or grease from the surface before painting. This can be done by using a degreasing agent or a good-quality primer.
The Best primer for painting over polyurethane?
The best paint primer over polyurethane is oil-based. While polyurethane can be water-based or oil-based, non-oil-based primers never seem to do a good job when used over polyurethane-treated surfaces.
They never form a durable coat, which will affect your paint job’s overall quality. We have tried a few different options and found INSL-X Prime Lock Plus Alkyd Primer our leading choice. It is fast-drying, with an excellent ability to adhere to glossy surfaces. This property makes it ideal for polyurethane surfaces.
Can you paint over water-based polyurethane?
You can paint over any polyurethane, water-based, or oil-based with proper preparation. The crucial part of painting over water-based polyurethane is the surface preparation, which involves cleaning, sanding, and priming the wood.
Can you whitewash over polyurethane?
In this case, the answer is no. You cannot whitewash over a pre-existing finish since the original finish or stain will create a barrier, keeping the whitewash from penetrating the wood. This is the case when whitewashing over polyurethane.
What happens if you paint over polyurethane?
Polyurethane forms a glossy finish, so the paint will peel off if you apply it directly over the poly. You could also experience issues like cracking, bubbling and chipping if you paint directly over the glossy polyurethane surface. However, you can sand the polyurethane and prime it to promote adhesion and make the paint stick.
Can you paint over clear coat wood?
You can paint over clear coat wood if you prepare it properly. Adhesion is usually the biggest challenge when painting over clear coats like polyurethane and varnished wood.
Most house paints are designed to bond onto porous surfaces like drywall, plaster, and wood. A clear coat like a varnished wood has a glossy surface with no pores for the paint to grab, which causes adhesion issues.
However, you can roughen up such a surface by sanding to give the paint something to grab.
Applying a primer before the paint is also essential to promote adhesion and create a durable finish.
So, can you paint over varnished wood? Yes, read our guide to find out more.
Can you paint over polyurethane sealant/caulk?
Yes, you can paint over polyurethane sealant with high-quality acrylic latex paints once cured. Such high-performance polyurethane sealants are formulated to provide a tenacious bond with great tear resistance while maintaining their elastic properties.
Can you Paint on Top of Polyurethane Summary
While polyurethane is a designated topcoat for woods and other projects, it is perfectly possible to paint over it. Nearly every paint type should work, but acrylic and oil-based paints provide the best results of painting over poly.
The important part of painting over polyurethane is surface preparation. You must clean the piece with a damp rag to remove any dirt or grime, then scuff sand it with fine-grit paper.
After that, apply a primer and finally the paint with long, even strokes for the best results. We hope this tutorial was useful. Please let us know your thoughts in the comments section.
I painted a 4 piece bedroom set with water base primer then chalk paint and top coat of oil based polyuthane. I am sick to see the poly yellowing but determined to fix it. I have read many different fixes and not sure what to do.
If you were me would you a do light sanding, 1 coat of oil based primer and final coat of the same chalk paint used on my redo? Your help would be appreciated as I am not redoing all this furniture again! Thank you