When it comes to external use, nothing beats the versatility and beauty of red cedar wood. Cedar looks great for siding, gazebo, hot tub, patio, fence, and almost any project.
Best of all, it can take a serious pounding from mother nature and still remain solid. Sadly, the one thing that won’t last is its color, which is why you need to apply a finish often.
However, if you don’t want to paint it, can you stain cedar wood? This article will look at ways to keep red cedar looking stunning for longer and how.
Can You Stain Cedar Wood?
Yes, you can and, in most cases, should stain cedar. While cedar is one of the most resilient woods to weathering, it will eventually buckle to UV light and turn gray. It is also vulnerable to mildew and, over time, may crack. Unless you want the weathered look, you should stain cedar at least once every two years.
How Durable is Western Red Cedar without stain?
The general rule of thumb in construction is to apply a finish to all wooden projects. So, why is there even a debate as to whether you should stain red cedar or not? That’s because of the undying properties of the mighty red cedar.
Western red cedar is one of the toughest trees in the world. They grow to be over 200 feet tall and can live for over a thousand years.
One reason for their longevity is that the tree produces a unique blend of oils and acids called polyoxyphenols. These oils protect the tree from heat, humidity, and fungi, and as a fun bonus, they make it smell good.
That is why even when lumbered, cedar is remarkably resistant to weathering. As a result, your cedar fence or patio can stay strong for years without a finish, even after the color fades.
On average, an untreated cedar fence will last for roughly 20 years. In rare cases, they can go as long as 40 years. So, while the cedar will last a long time without wood stain, its color won’t last a month.
What Happens if You Don’t Stain Cedar?
Cedar has significant advantages over other types of wood, such as its resistance to warping, its gorgeous color, and its weather-resistance properties. That means you can leave cedar untreated, and it will still last for decades.
The first downside to not staining cedar (or any outdoor wood, for that matter) is that it turns gray due to UV light. While the graying effect can be charming, the problem is that it weathers unevenly, so the color looks blotchy and tacky.
Another common problem with untreated cedar is mildew. Western red cedar can resist fungi in the wild, but not when it’s lumbered. Once humidity picks up, you can expect to see moss, mildew, and mold.
The first problem with mold is that it makes your cedar look hideous. The second and more serious problem is that it can spread indoors if you have cedar siding or a patio.
While it is easy to tolerate mold outdoors, it can pose a serious threat to people with respiratory conditions. One other major side effect of not staining cedar is that the surface fibers will crack and disintegrate over time.
That means you’ll lose a few millimeters front the surface of the wood every year, which is why it has a shorter lifespan than treated wood.
See: Can you stain pressure treated wood?
What is the Best Treatment for Cedar?
As red cedar is more versatile than most other external wood options, you can apply a wide range of stains. The treatment method you use will depend on the type of look you want to achieve.
The three main options we recommend will allow you to maintain the natural redness of your cedar, a flawless gray weathered look, or something in between.
1. Bleaching stain
Gray cedar shingles are a popular facade for beach houses, lake houses, and other homes where an aged look might be desirable. No stain can achieve this better than bleaching stain.
Bleaching stain replaced the previously popular bleaching oil. Bleaching stain is a significant improvement from bleaching oil in two main ways: it is more eco-friendly and resists mildew a lot better.
That said, bleaching stain looks much better on white cedar than on western red cedar. If you have red cedar, you might prefer some of the other options.
2. Semi-transparent wood stain
Unlike bleaching stains, semi-transparent stains will maintain some of the natural color of the wood. This goes well with both white cedar and red cedar.
Semi-transparent stain has some pigments, so it adds a bit of color to the wood. One problem with this type of stain is that you must be careful with the application.
If you don’t follow the manufacturer’s directions precisely, it will look blotchy. You also need to apply it before the cedar begins to gray, as this stain won’t cover major imperfections.
Any discoloration will be obvious, and this is not the easiest stain to remove and reapply, which is why it is not recommended for horizontal surfaces like decks.
Related Post: How to Remove Red Tones From Wood
3. Transparent wood stain
Also known as natural wood stain, this is the best stain for outdoor wood if you don’t want to alter the look of your gorgeous western red cedar. It is also the easiest stain to apply and reapply.
Despite being transparent, this wood stain will protect your cedar from UV rays, mold, moss, and mildew. If you ever get tired of it, you can easily change to a different type of stain, including bleaching or solid color stain.
Also Read: How to Stain Particle Board Furniture
Should You Use Solid Color Stain on Cedar?
You will have noticed that we did not include solid color stains in the previous section. While it is a popular option, it is not one we recommend.
Western red cedar is so versatile that you can slap nearly any type of stain and paint on it. In fact, it can deliver some absolutely gorgeous projects.
Solid color stains, such as the red wood stain colors, contain pigments that mimic paint when applied to cedar. You can get nearly any color of stain, and depending on the product; it would yield a uniform shade that can last as long as five years.
Solid stain looks great until it doesnt, and that’s when the problem starts. Firstly, solid color doesn’t fade off evenly. That means you need to take it off as soon as it looks blotchy, which is when you have the second problem.
Unlike transparent stain, solid color stain doesn’t just wash off. Instead, you need to take it off with some pressure before applying a new coat, which can be expensive and/or time-consuming.
The go-to method for removing stain is power washing. Unfortunately, water pressure is not good for cedar because it damages the fibers, and it also makes it difficult to put on a new coat of finish.
To remove the solid stain right, you need to apply a wood stain stripper and scrub it off with a nylon brush, then sandpaper. For large projects like a deck or fence, this would be a nightmare.
Related Post: Can You Use Solid Stain Over Paint?
Choosing Between Oil-Based Stains and Latex-Based Stains
There is always a debate on whether to use oil-based finishes or water-based and no matter the product, every argument comes down to the same things.
However, when it comes to stain, there is a lot more to consider, but let’s begin with the cliches. Yes, oil-based products tend to last longer than water-based alternatives.
However, water-based stains (usually latex-based stains) are easier to apply and better for the environment. Latex or acrylic stains cure much faster, and you can clean the brush with soap and water.
Now, what sets oil and water-based stains apart is the type of stain you can get. Transparent stains are almost always oil-based. A few companies have toyed with water-based transparent stain, but it usually ends up as semi-transparent.
Bleaching stains are water-based, as are solid stains. This means there is no direct competition between the two, as choosing between the two is really about choosing the type of finish you want, except when it comes to semi-transparent stain.
Semi-transparent stain is usually latex-based, but there are decent oil-based alternatives. In this instance, the advantage of latex is that it does a better job of protecting against mildew. However, the refinishing process is significantly more complex.
Another major distinction is that latex semi-transparent stain is film-forming and not penetrative, so it won’t last as long as oil. Besides that, remember that latex cannot be used on horizontal surfaces.
Frankly, when looking for the best exterior stain for western red cedar wood, you should prioritize where you are applying it, then how you want it to look over what type of base you use.
How to Stain Cedar Wood
Now that you’ve decided on the type of stain to use, it is time to get to work. The process for staining cedar wood will differ slightly depending on how soon or how long after installation you are applying the stain.
For newly installed cedar siding, the prep work is significantly easier and makes for a more pleasant experience.
However, if your cedar siding or cedar deck has begun to show signs of graying, mold, or cracking, you need to spend a bit more time getting the surface ready.

How to prepare the cedar surface for stain
Step 1: Inspect the surface for damage
Whether you are working on new cedar wood or old one, you should always check for damage, splinters, or loose wood fibers. These could have occurred either during the transportation or construction phase.
If there are significant dents or holes on the cedar surface, it is necessary to fill these before staining. Otherwise, it would leave obvious discoloration. Smaller imperfections can be buffed smooth with 50-grit sandpaper.
Step 2: Clean the surface
If this is new cedar or one that hasn’t been treated, you can get rid of any surface dirt using a mixture of warm water and phosphate-free soap.
However, if there is a stain on it and it is peeling or fading, you will need to get rid of this prior to cleaning. The most effective method is to use a stain stripper and a nylon brush. You have to be patient with this step in order not to leave any old stain behind.
After stripping, sand the surface and any leftover stain to a feathered edge. You don’t want it to be perfectly smooth, as this could affect adhesion.
Step 3: Get rid of mold and mildew
If during the inspection stage you noticed any mold, you will need to get rid of this after you have removed the old stain and before you clean it. You can use mildew remover or make your own cleanser with liquid oxygen-based bleach and clean water.
After applying either product, scrub the surface with a bristle brush, then rinse with clean water. Do not use a wire brush or steel wool on cedar wood as it will react with the chemicals in the wood and turn bluish.
This is perhaps the most important step in the preparation process. While a bit of dirt can prevent adhesion, sealing in mold will cause it to spread rapidly, especially if you use oil-based stain.
Even if the stain has mildewcide, it won’t do anything against what has already penetrated the wood’s surface.
Step 4: Let it dry
After step 2 or step 3 of the preparation process, you must wait for the cedar to be absolutely dry (less than 15% moisture content) before you stain. On average, this could mean 3 to 5 days of constant sunlight.
What about other woods? Learn here if you can stain bamboo.
Tools you’ll need to stain red cedar
The actual process of staining cedar wood is pretty simple and requires very few tools. If this is a surface that has been stained before, use the same product or at least the same base as before. However, you can use latex-base on cedar wood that was previously stained with oil, but not the other way round.
- 50-60 grit sandpaper
- Applicator – brush, roller, spray, or pad
- Cleaning materials
- Pre-stain wood conditioner
A step-by-step guide to staining cedar wood
Step 1: Slightly sand the surface
One excellent quality of wood stain is that it doesn’t require a lot of sanding. For many projects, you can apply directly to the cedar without sanding. However, if you had to clean the surface, chances are a few fibers would be sticking out of the grain.
Using 50 or 60-grit sandpaper, gently buff out any uneven strands. The purpose is to give a level surface so that the stain sits evenly, so only sand obvious problem areas.
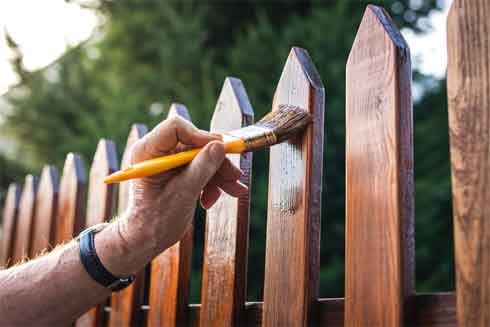
Step 2: Apply the first coat
The best applicator for the job will depend on the stain you have chosen:
- Bleaching stain – the best applicator for this is a brush. You need to stir the stain constantly to get an even color. You only need one coat of this, and it will take two hours to dry on average.
- Transparent/semi-transparent stains – you can apply this type of stain using a brush, spray, roller, or pad. If you are using a spray or roller, you must also back-brush to get a consistent result. You should also stir continuously.
- Solid color stain – before applying solid stain, you may choose to use a primer first. If the manufacturer doesn’t recommend it, then apply your first coat with a brush, pad, or roller. Read more here on staining a deck with a roller.
Step 3: Wait for the first coat to dry
Solid and transparent stains often do better with a second coat, especially on new wood, so you need to give it time to dry.
Luckily, you won’t need to sand before applying the second coat. Oil-based stains will take about four hours to dry, while latex-based can be ready in as little as one hour.
Step 4: Apply the second coat
Apply the second coat the same way you did the first one. Remember that you should keep the leading edge wet and apply the stain evenly. If you notice excesses on any area, wipe them off before it dries.
There you have it! With these fairly simple steps, your cedar siding, fence, or deck will be protected from adverse weather conditions and mildew for at least two to four years.
Read Also: Best Log Cabin Stain and Sealer
FAQs
Can cedar be stained dark?
Yes, cedar can be stained dark or almost any other color you want. However, dark stains are not as good at reflecting light as light stains, so it tends to fade faster under UV light. As a result, dark stains are better for indoor cedar, while lighter or semi-transparent options fare better outdoors.
How long will stained cedar last?
On average, you only need to stain exterior cedar every four years. However, certain factors such as your location (climate), application method, and product will affect how long the stain lasts. In some instances, the stain won’t last a year, while in others, it can last 7 years.
What is the best finish for cedar?
As cedar is very versatile, you can apply any type of finish to it. However, the best finish for indoor cedar is transparent or semi-transparent stains. Solid color stain and paint are difficult to remove from cedar when it is time to refinish. Transparent stain also allows you to enjoy the natural beauty of cedar.
Should cedar be sealed or stained?
You can extend the life of cedar by either sealing or staining it. However, stain offers a slight advantage. The main purpose of a seal is to protect wood from water damage, but a stain does the same while also providing added protection against sunlight. For that reason, a stain is often the better option.
Read more: Should cedar be sealed?
Can you apply oil-based stain on latex stain?
No, you should not apply oil-based stain on latex stain. Latex stains are not penetrating stains but rather form a film on the surface of the wood. Oil-based stain, on the other hand, is penetrating, which means it can’t work on latex stain. On the flip side, you can apply latex stain to cedar that was previously oil-stained.
Related Post: Can You Stain Wet Wood?
No Stain, No Problem
The beauty and versatility of Western red cedar cannot be overemphasized. That is why it will remain a staple wood for construction for years to come. Its eternal nature means that even without a stain, you can expect it to last half your lifetime.
However, if you are not a fan of greying or want to extend the life of the cedar even longer, your best option is to stain it regularly.
Suppose you are reading this after you have let your cedar grow old already; not to worry. This article on how to restore weathered cedar siding should help.