It’s a surprising, pivotal query: to sand or not sand the last polyurethane layer? With extensive experience in woodworking, I’ve explored this crucial detail extensively.
This subtle step often perplexes even seasoned craftsmen. Are you one of the many seeking to elevate your project’s final sheen? You’re in the right place.
In this article, we’ll tackle:
- Do you sand after the last coat of polyurethane?
- How do you smooth the final coat of polyurethane?
- How to wet sand polyurethane
- What grit sandpaper for final coat of polyurethane
- How to buff the final coat of polyurethane
Now, let’s jump straight to it.
Can you sand polyurethane?
Yes, you can sand polyurethane. Sanding is performed to smooth out imperfections and bubbles and to provide a level surface for subsequent coats, aiding in adhesion.
It’s crucial for achieving a smooth, professional-looking finish. Typically, a fine-grit sandpaper is used to avoid damaging the surface. Sand in the direction of the wood grain to maintain the wood’s aesthetics and integrity.
Do You Sand the Last Coat of Polyurethane?
No, you don’t need to sand the final coat of polyurethane. You should only sand after the last coat of polyurethane if you haven’t gotten a smooth finish. Different problems can occur when you apply polyurethane, such as dust nibs, bubbles, and streaks.
If any of these is visible, the job isn’t complete.
What grit sandpaper for the final coat of polyurethane?
For the final coat of polyurethane, use a fine-grit sandpaper, typically between 320 and 400 grit, to ensure a smooth finish.
This range of grit is ideal as it’s abrasive enough to smooth imperfections and create a level surface without scratching or damaging the polyurethane coat.
Move in the direction of the wood grain to maintain the integrity and appearance of the wood.
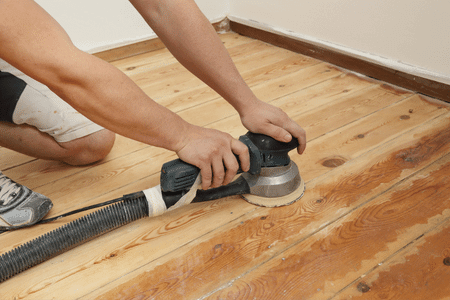
How Do You Sand the Final Coat of Polyurethane?
Most are familiar with dry sanding, involving solely sandpaper. On the other hand, wet sanding combines wet/dry sandpaper with water or mineral spirits.
Dry sanding can be detrimental; it can leave noticeable scuff marks, as it scratches the polyurethane surface. Thus, it’s usually not the recommended option.
When sandpaper above 600-grit is used, it can cause the final coat to appear cloudy and scuffed. It’s crucial to utilize appropriate grit to avoid compromising the finish.
However, if dry sanding is your only option, it’s important to do it cautiously. We’ll guide you through a safe process.
Before initiating sanding, ensure there are sufficient polyurethane coats on the surface. With just one coat, sanding will expose the bare wood, necessitating an additional coat of polyurethane.
Can you wet sand polyurethane?
Yes, you can wet sand polyurethane, it’s a common technique for achieving a super smooth finish.
Wet sanding uses water as a lubricant to minimize scratching the surface. Generally, ultra-fine grit sandpaper is utilized for wet sanding.
It’s crucial to allow ample curing time for the polyurethane before wet sanding to avoid damage, and the surface should be wiped clean afterwards to remove any residue.
How to Wet Sand Polyurethane
Wet sanding is safer, as it is less likely to leave your work cloudy or scratched.
However, you must avoid abrading too much of the floor.
Tools You’ll Need for Wet Sanding Final Coat of Polyurethane
- 400-grit wet/dry sandpaper
- Sanding sponge
- Vacuum cleaner
- Tack cloth
- Respirator
- Mineral spirits or water
Steps to Wet Sanding Polyurethane Finish
Step 1: Vacuum the Surface
Sanding the final coat is essential to remove bumps, dust nibs, and imperfections. This process ensures a smooth, even polyurethane finish, making a seamless surface paramount. It’s vital to eliminate all irregularity-inducing elements.
You also have to clean the wood after sanding. Use a vacuum cleaner for meticulous cleaning, focusing on every nook and corner. Attention to crevices in floors is particularly important.
For smaller projects, a tack cloth works. It’s an efficient alternative to a vacuum. This method ensures the removal of all residual particles, paving the way for a perfect, sublime finish.
Step 2: Wipe the Surface with Mineral Spirits or Water
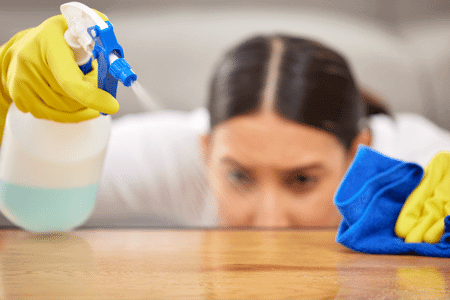
After you vacuum the floor, you might still have a few dust particles hanging around. To remove those, soak a lint-free cloth in water for water-based polyurethane and mineral spirits for oil-based polyurethane, then wipe the floor.
It is okay to use water for both.
This process may not be necessary if your vacuum cleaner did a great job and you could use the crevice tool and other bells and whistles. However, it doesn’t hurt to be safe.
Be careful not to drench the floor in liquid. Just a little bit will suffice. If you notice any dust on the cloth, discard it and use a new one.
Step 3: Let the Water Evaporate
Give the surface time to dry again. It shouldn’t take too long if you don’t use a lot of liquid. When it evaporates, inspect the surface to see if there are still any imperfections to correct.
There are times that dust on the surface makes the poly look bad. If the problems remain, it’s time for the next step.
Step 4: Pour Mineral Spirits or Water into a Cup
Pour about a quarter-inch of mineral spirits or water into a cup. You should only use mineral spirits for oil-based. However, you can use water even for oil-based polyurethane and still get good results.
Step 5: Soak the Wet/Dry Sandpaper or Sanding Sponge in the Water.
Immerse your sanding tool in the water until it soaks up a fair amount.
You can either soak it for 24 hours, in which case you won’t need to pour water on the surface of the polyurethane or soak it for 15 minutes.
Step 6: Pour Water onto the Surface and Start Sanding
Pour a small quantity of water at a time and rub the surface with the wet/dry sandpaper.
Sand the imperfections in a circular pattern. The water will prevent the polyurethane from becoming cloudy and keep the sandpaper light’s scratch marks.
Step 7: Wipe the Surface
Water will obstruct your view, so you must get rid of it often. Constantly wipe the surface with a clean cloth to properly assess your progress. Just as when cleaning the floor normally, don’t repeat clothes. Instead, get a fresh one each time you are wiping the floor.
If the particles you try to remove are still there, repeat steps 6 and 7 until you get the desired result.
Step 8: Leave it to Dry
Once you’ve gotten the imperfections out, leave the surface to dry for 24 hours.
After that, use a lint-free rag and buff the surface. The surface will be shiny once again and smoother than ever.
How to Dry Sand After Final Coat of Polyurethane
Tools You’ll Need for Dry Sanding Polyurethane Final Coat
- 600-grit sandpaper
- Sanding block
- Vacuum cleaner
- Tack cloth
- Respirator
- Mineral spirits or water*
Steps
Follow steps 1-3 of wet sanding;
Step 4: Start Sanding
Before you begin sanding, put on your respirator or face mask. Wood dust can cause health problems, so don’t take any chances, even with fine-grit sandpaper.r
Put the 600-grit sandpaper on a sanding block and gently swipe at the part of the finish with the dents, bubbles, or dust nibs. You want to do this gently to not tamper with the smooth parts of the finish.
The sanding block will help you be more accurate. As usual, you should sand with the grain. 600-grit is fine, but you should still be extra careful so the finished work doesn’t look cloudy or blotched.
Step 5: Clean the Surface
Use a tack cloth and wipe the surface. Check to see if the imperfections are gone. If they are, then your work is done.
If it looks better but still not as smooth as you would like, move on to step 6.
Step 6: Use a Finer grit
Move on to a finer grit, using the same technique as before. No matter how tempting it is, don’t sand against the grain, even if you feel like it will get the dust nibs or dents out better.
Repeat steps 5 and 6 until you get a smooth finish.
What Happens if I Don’t Sand the Final Coat of Polyurethane?
Well, nothing happens if you don’t sand the final coat of polyurethane. Therefore, you should only sand the last coat if you notice minor problems.
However, if there are polyurethane bubbles, the surface is noticeably uneven, or there are many dust nibs, you should sand between coats of polyurethane as usual and apply another coat.
How to buff the final coat of polyurethane
Buffing polyurethane is vital for achieving a smooth finish. Start by allowing the final coat of polyurethane to cure thoroughly, usually 24 to 48 hours.
To buff polyurethane by hand, you’ll need a fine-grade (0000) steel wool or 400-grit wet/dry sandpaper. Work in small sections, moving in the direction of the wood grain.
Apply light, even pressure, to avoid removing too much material. After buffing, remove any residue using a tack cloth.
How to make polyurethane smooth
Achieving a silky, smooth finish is crucial when applying polyurethane. To smooth out polyurethane, ensure the surface is clean and dust-free.
Then, apply thin, even coats, allowing ample drying time between each. Sanding between coats with fine-grit sandpaper will also remove any bubbles or imperfections, thus helping to get a smooth polyurethane finish.
However, it is not uncommon to find that the final coat of polyurethane is rough. To rectify this, lightly sand the final coat using high-grit sandpaper (320 or higher) once completely dry.
This should be done gently to avoid removing too much of the finish, focusing on eliminating dust nibs or uneven areas. Wipe away any sanding residue with a tack cloth before applying a subsequent coat if needed.
To ensure a flawless result, some choose to use a wipe-on poly as the final coat, as it is thinner and can be applied more evenly, avoiding drips and runs.
Working in a well-ventilated, dust-free environment is crucial to prevent contaminants from marring the finish. By meticulously attending to each coat and refining your technique, you’ll know how to get a smooth polyurethane finish.
What to do after polyurethane?
After applying polyurethane, let it cure completely; this may take up to 48 hours. Once cured, assess the surface. If it’s uneven or rough, lightly sand.
Wipe off any dust with a tack cloth. Lastly, if desired, apply a quality furniture wax and buff with a clean cloth for a smooth, lustrous finish, ensuring the surface remains clean and polished.
How Many Coats of Polyurethane?
If you use water-based polyurethane, ensure you have at least 5 coats, although some recommend 7 or 8.
Most top-quality water-based polys work best with 3 or 4 coats, so if you have a fifth coat and sand it slightly, you’ll still get maximum protection.
Of course, if you had to apply more coats because the polyurethane raised the grain of the wood, then add an extra layer or two before sanding.
For non-yellowing oil-based polyurethane, 4-5 coats are also advisable. However, if the product you are working with only requires 2 coats, sanding the third coat should be fine.
Also, ensure the surface has cured fully before starting this process. If not, you risk abrading much more of the coat than expected and leaving a mess.
Final thoughts on do you sand polyurethane after the final coat
Back to your question: Do You Sand the Final Coat of Polyurethane? Well, sanding the final coat is unnecessary and a rather risky process. When not done correctly, you must sand and recoat the entire surface.
If you must sand the final coat, the wet sanding is safer and gives the wood a smoother or glass-like finish.
The best solution is to get the polyurethane application right first so you don’t have to go through this trouble.
Read the battle of polyurethane vs spar urethane to know which is best for you and your projects.
Can or should I apply a wax when doing the final buffing?
Can you use a oil polyurethane and then switch to a water based polyurethane?
We already have an article on the site that answers the question
Cheers mate. I’m at the tail end of an epic raw edge barn door project and used a different gun on the final coat…..orange peel city….
Thank you. Truly helpful.