Traditionally, table legs are attached via aprons. The apron supports the legs, making the construction sturdier. Moreover, aprons make repairing or replacing broken table legs a little easier.
But what happens if you don’t have enough lumber for aprons? Or, perhaps, you’d like to try an unconventional table design. Can you attach the table legs without the apron, and if so, what’s the best way to do so?
Read on to find out how to attach legs to a table without apron!
How to Attach Legs to a Table Without Apron
Mounting blocks are the best way to attach table legs without an apron. The blocks attach to the underside of your table with four screws. Typically, you install a 3/8 inch x 2 1/2 inch bolt 1/4 way into each table leg. Then, screw the remaining 3/4s of the exposed threads into the mounting block and attach the block to the underside of the table.
What’s an Apron?
An apron, as applied to wooden furniture, is a wooden panel that connects to all the legs and helps attach them to the main furniture surface for greater structural integrity. It’s also known as a skirt or “skirting” because it looks like one.
What Does a Table Apron Do?
Furniture aprons are important for three main reasons; structural integrity, hiding mechanical pieces, and aesthetic function.
Enhancing structural integrity
Aprons are used in traditional mortise and tenon joints to enhance the structural integrity of the joints. Unfortunately, a mortise and tenon joint is weak and easily loses stability after movements. Table legs attached with an apron are secure.
Hiding mechanical pieces
Different furniture pieces feature different mechanical pieces that are best hidden away for safety and other reasons.
For instance, protruding pieces of wood from the bottom of a desk are an inherent safety risk. Similarly, corner blocks can diminish the appearance of dining room tables or chairs. Skirtings hide away these features.
Aesthetic reasons
Finally, some woodworkers intentionally add furniture skirting to enhance furniture appeal. For instance, you can radically transform a legged sideboard by adding an apron to its front rather than the underside.
Indeed, sometimes the apron is so important that removing it completely changes the look of the furniture piece.
Can You Attach Table Legs Without an Apron?
Yes, you can attach table legs without an apron. Although the apron is critical in some table designs, you can overlook them in others without weakening the table or compromising its aesthetics.
In addition, some table types look cleaner and more appealing without aprons.
How to Attach Legs to a Table Without Apron – 5 Methods
The following are the five best ways to attach legs to a table without an apron. We’ve provided a quick overview of each process and the required materials and tools.
Method 1: Attaching Table Legs Using Metal Plates
Requirements
- 4x Table metal plates
- Hanger bolts (several)
- Drill
- Screwdriver
Important Considerations
Assemble the required metal plates and hanger bolts. The ideal metal plates will depend on the type of project. For instance, vertical installations require regular plates, while angled/diagonal installations require specialized plates.
Ensure to get matching hanger bolts. A hanger bolt, better known as a hanger screw, is a screw that’s threaded on both ends. Finally, remember that surface plates work best with thin legs less than 2 1/4 inches in diameter.
Step-By-Step Installation Guide
Step 1: Set out the plates
Determine where the plates will go, typically at the corners on the table’s underside. Then ensure they are equidistant by measuring the distance between every two plates.
Finally, ensure they are in the upward position as directed by the manufacturer.
Step 2: Screw the plates to the table
Surface plate kits typically arrive with installation screws. First, verify that the screws are long enough to go through the table to the other side.
Then use an electric screwdriver to attach them to the table’s underside, one from one corner to the next. Clamp them in place for easier screwing if necessary.
Step 3: Drill a hanger bolt holes through the center of each leg
With the table leg positioned such that the part that connects to the table’s underside faces you, drill a pilot hole through the center of each leg. Use a drill bit roughly the size of the hanger bolts (depth and width-wise).
Step 4: Install the hanger bolts
To install the hanger bolts, set a bolt in each of the holes you drilled inside the legs and turn them by hand until they hold inside the legs. Then use a pair of locking pliers or an open-ended wrench to drive them in until they’re fully secured in the legs.
Step 5: Connect the bolts to the plates
Working one leg at a time, align the hanger bolt with the hole in the center of the metal plate and twist/rotate the leg clockwise to lock them in place. You can flip the table on its legs once all four legs are attached.
Method 2: Attaching Table Legs Using Threaded Inserts
Requirements
- Threaded insert nuts
- Drill and drill bits
- Furniture bolts
- Blue tape
Important Considerations
Installing table legs using threaded inserts requires more skill than the first method. So, make sure you’re up to the task. Additionally, it would help if you found the right inserts.
Avoid brass and solid zinc threaded inserts as they strip out easily. Instead, we recommend steel inserts with an Allen style.
Finally, ensure the bolts match the inserts as you don’t want the bolt protruding several millimeters outside the insert.
Step-By-Step Installation Guide
Step 1: Mark the holes
Flip the tabletop upside down and set the four legs where you intend to install them. Feel free to mark the positions with a pencil for reference.
Alternatively, use a brad point bit and hammer/mallet to mark the middle of each hole. Only tap lightly to avoid destroying the table.
Step 2: Drill countersink holes for the threaded inserts
Set the legs aside and drill holes for all four insert nuts where you made the tap marks. Always use a drill to ensure the holes are straight up and down.
Remember that you need countersink holes. Don’t bore through to the other side of the wood. Vacuum the holes as you drill.
Step 3: Install the threaded inserts
We recommend installing the inserts by hand using a T-wrench. Otherwise, you may damage the threads. Alternatively, you can use a drill to drive the inserts into the wood.
A dab of wood glue on the exterior surface of each insert is not mandatory but can increase the staying power once the glue dries.
Step 4: Attach the table legs
This last step is easy when using metal legs with screw holes. First, position the legs over the threaded inserts and align with the insert holes.
Then insert screws through the leg holes into the insert holes and tighten with a screwdriver.
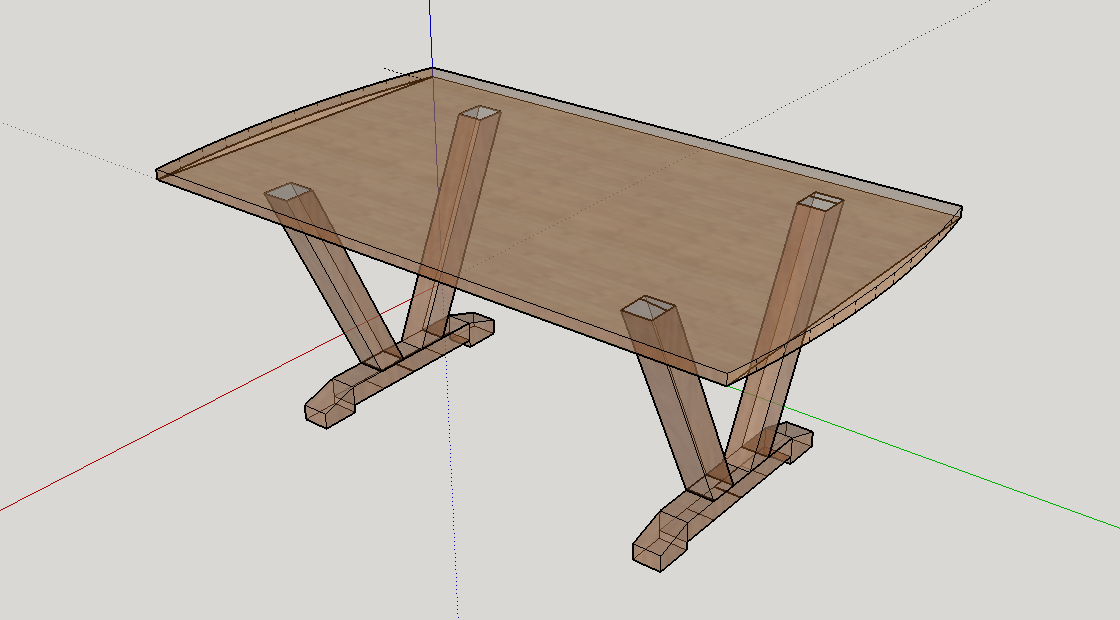
Method 3: Attaching Table Legs Using Mounting Blocks
Requirements
- 4x Mounting blocks
- Installation screws
- Drill
- 4x Furniture bolts
Important Considerations
Mounting blocks are another creative way to attach table legs with aprons. The blocks attach to the underside of the table with four screws and have a hole in the center where a bolt attached to the center of the table leg goes.
So, it’s essentially an all-wood alternative to metal plates. The good news is that you can procure ready-to-go mounting blocks online or at an established hardware store. Better still, you can make them yourself.
Step-By-Step Installation guide
Step 1: Mark the leg locations
Where do you want the legs attached? Turn the tabletop upside down, identify the leg locations, and mark the spots with a pencil. Make sure the points are equally distant for maximum structural stability.
Step 2: Position the mounting blocks
The most important thing here is to position the blocks correctly to avoid design flaws. This is especially important when installing angled table legs.
Ensure the mounting blocks slant outwards so the legs will slant outwards too. Use some wood glue to hold them in position before you begin screwing.
Step 3: Install the mounting blocks
Each mounting block kit has requisite screws for attaching the blocks onto the table’s underside and the predrilled screw holes. So, insert the screws into the screw holes and drive them in using a screwdriver.
Step 4: Attach the table legs
This is a straightforward process. First, attach the center bolt to the center of the leg, then position it onto the bolt hole on the mounting block and twist the leg clockwise to tighten.
Method 4: Attaching Table Legs Using Straight and Angled Cleats
Requirements
- Wooden or metal cleats
- Screws
- Drills
Important Considerations
Cleats are almost similar to mounting blocks. However, there are two main differences. First, cleats recess into the tabletop, a few inches from the edge.
Secondly, whereas you need four mounting blocks for a four-legged table, you only need two cleats for a four-legged table as each cleat holds two legs.
Remember that you can opt for straight or angled cleats. Straight cleats support vertical table legs while angled cleats support diagonal legs.
Step-by-Step Installation Guide
Step 1: Make the cleats
You can purchase pre-made cleats online. But it’s also nice to make them yourself. You need a plant of wood about the width of your table.
The styling is up to you. However, ensure it’s strong enough to hold table legs. Additionally, don’t forget to predrill center bolt holes where the legs will attach.
Step 2: Install the cleats
Mark the four spots where the legs traditionally go. Then draw lines connecting the two leg spots at each table end. After that, create shallow, rectangular holes along the connecting line.
Make sure they’re large and long enough to recess the cleat. Then screw the cleat into the blind holes with the bolt holes facing out.
Step 3: Install the legs
Drive a center bolt about halfway into the heart of each leg, taking care not to break the leg or cause cracking. Then gently drive the remaining half of the bolt into the center bolt holes you created on the cleats to attach the legs.
Method 5: Direct Attachment for Metal Legs
Requirements
- Drill
- Screws
- Screwdriver
Important Considerations
This method works best for smaller tables. However, you can use it on larger tables with stronger legs or install more than four legs.
Begin by ordering the leg kits online. A typical leg kit for this installation method contains at least four legs and installation screws. Moreover, the legs feature predrilled screw holes for quick attachment.
Step-By-Step Installation Guide
Step 1: Mark the leg locations
Where do you want to install the legs? Turn the tabletop upside down and mark the preferred spots. We recommend using a pencil to erase the markings easily if you make any mistakes.
Step 2: Mark and predrill the screw holes
Predrilling isn’t mandatory. However, it can be helpful when working on extremely hardwood types.
First, position the legs and mark the screw holes with a pencil or the sharp tip of your drill bit. Then remove the legs and predrill the screw holes to the size of your screws.
Step 3: Attach the legs
Put back the legs in position and align them with the predrilled holes. Then, using a screwdriver, drive the screws through the legs and into the tabletop.
Make sure the attachment is secure enough to prevent wobbling. Repeat for all four legs, then flip the table on its legs.
FAQs
Is a table apron necessary?
You can ignore aprons if you wish. However, if you want a long-lasting table, you should strongly consider an apron’s structural benefits. For instance, without the apron to support the table’s width, joints on the tabletop experience more stress, increasing the risk of sinking or breaking.
What is a purpose of a table apron?
The main purpose of a table apron is to provide structural strength and support. However, aprons also have an aesthetic function if visible. For instance, removing the apron on a large table leaves the table looking completely different. Finally, table skirtings conceal elements like corner blocks and mechanical pieces from view.
How do you secure furniture legs?
There are many ways to secure/attach table legs and even more ways to make the legs sturdier. The most common attachment method is with a dowel jig. Alternatively, consider threaded inserts, T-nuts, straight and angled meta plates, and wood mounting blocks.
Recommend Reading: How To Raise The Height Of A Desk
Summary
An apron is a critical feature in some furniture designs. For instance, it enhances the structural integrity of tables, makes some pieces more beautiful, and can help hide mechanical features in other furniture.
However, it’s not mandatory. As we’ve seen, there are at least five practical ways to install table legs without an apron.