If you’re looking to add subtle design detail to your woodworking projects, knowing how to cut a notch in wood is a must. Notching wood is a simple technique to create various effects on the wood, from simple lines to intricate designs.
It also helps to add structural integrity to woodworking projects and makes them more durable and gorgeous. You can use different methods to create a hole in the wood, but this post will show you how to cut notch in wood with simple tools such as a sharp chisel and a mallet, saw, etc. Take a look.
Step by Step Guide- How to Cut Notch in Wood
What You Need
- Safety goggles to protect your eyes
- Hammer/ Mallet
- Gloves
- A sharp chisel
- Saw
- Workbench
- Vice
- Measuring tape
- Carpenters pencil or cutter knife
- A Set square or ruler
Step 1- Prepare the wood
Your first step will be to measure and mark the location of your notch on the wood.
Have a better idea of how big you need your notch based on the woodworking project you’re embarking
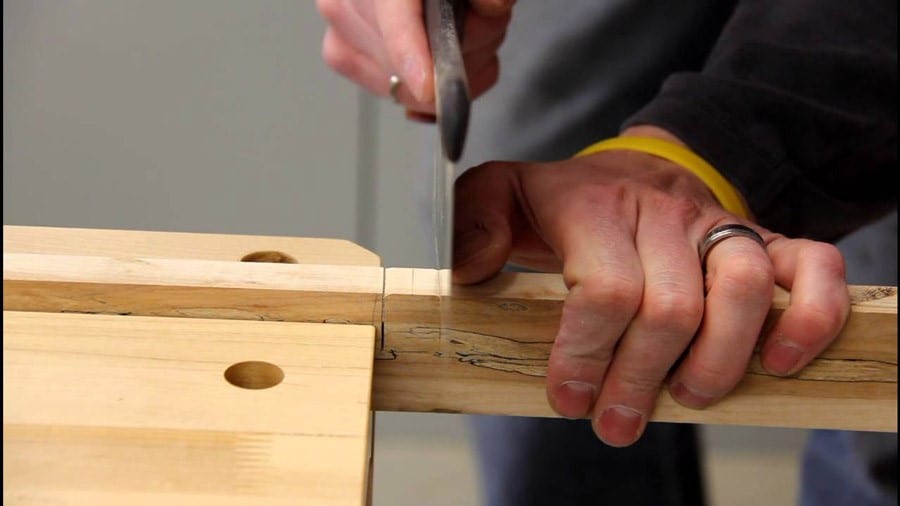
Step 2- Measure the Notch
Use a marking knife or pencil to mark the notch measurements on the workpiece. Once completed, inscribe the markings with a chisel to make them visible. This helps make cutting the notch effortless as you’ll know where to begin the hand saw. Use a measuring tape to modify the depth of the saw.
Also interested in cutting at 45 degrees? Learn here how to measure length for a 45 degree cut.
Step 3- Cut the Notch
Take the necessary precautions before starting to make a notch on solid wood. Be careful to wear gloves and goggles to protect your eyes and hands before grabbing a hammer and a sharp chisel. You will need them to do most of the work.
However, using a saw will give you cleaner cuts, and the process will be faster and simple. If you’re using a hand saw, begin by cutting along the marked line for the notch till you reach the desired depth.
Remove the strips of wood from the center of the notch with a hammer and chisel. Place the piece of wood on your workbench. Chisel away a tiny amount of wood from the center of the notch, starting from the top.
Chiseling the wood from the center of your notch is easier when using an electric saw. You start removing the teeth by placing your wood on a flat workbench and roughing up the notch.
You can check the workbench height for cutting perfect notches in the wood.
Step 4- Clean up the Notch
After roughing up your notch, please take it to the clamp and polish it until you get an excellently squared notch.
The important thing is to use a smaller chisel to polish your notch because it will give you more control over your project. Be keen to remove all the extra wood from your notch with a chisel and a hammer.
To have a superb fit, the notch must be the correct size. If the notch is too broad, you’ll need to grab a new piece of wood and repeat the process. If it is a bit narrow, chisel out the surplus wood to create ample room for the notch of other wood.
Step5- Test the Pieces by fitting the two pieces
Now that the notch is finished, place the piece of wood it needs to notch into the notch to test it. It would help if you strived to get a super snug fit. Do not worry if the notch is too broad or narrow because you can fix the problem. If your notch is too narrow, escape more wood in the middle, starting from the top. If it is too broad, make another notch on a new piece of wood.
Repeat the Process to Create More Notches
When you’re happy with your notch, do the process with the following pieces of wood, and you will be able to join the notched pieces hassle-free.
The notching process may be intimidating initially, but it is easy to master. Once you’ve gotten the hang of it, notching your pieces will offer your woodwork an appropriate polished look while also adding structural integrity.
How to Notch Wood Using Various Tools
You do not need power tools to make parallel cuts. You can notch wood in different methods ranging from conventional handsaws to more advanced band and table saws. Here’s how to notch wood using the following tools.
How to Notch Wood with a Jigsaw
A jigsaw is an excellent tool for creating curves and notches in the wood. Jigsaw has a perfect blade that enables accurate cuts when needed, letting you make unique designs on wood pieces! You can use a jigsaw to cut out shapes such as stars and hearts.
You can make a notch in wood with a jigsaw without drilling holes at the corners. Notches does not have to be deep. Start by marking ends by coming in from the edge. Make an extended cut that sweeps toward the line and then follows along to one end.
Cut out on the waste side of the line. Turn the saw around and cut the other end. Sand the line to make the notch straight and smooth. Be careful when using a jigsaw because you can cut yourself.
How to Cut a Notch with A Hacksaw
A hacksaw is one of the best hand tools in the world with a detachable blade to cut wood, metal, and plastic. Hack saw only cuts on the forward stroke and never backward.
Replace the blade if you need to before starting to make the notch. Unscrew the tension knots on the outside. Lift off the blade and check to ensure that the teeth of the new blade are facing forward. Fit the blade and tension it. The blade should not be tight but not too tight to stop it from snapping.
Once your blade is ready, use a carpenter’s marker or pencil and tape measure to mark and measure the size of your notch. It also helps you get the right cutting depth. Cut the notch to your desired depth. Cut the other side of the marking to the appropriate depth and Remove the wood in the middle with a chisel, starting from the top. You can sand the edges the notch to make it smooth. Notching may use up half your wood, so ensure you have enough wood.
Power Drill
A power drill is an easy way to add a design to your woodworking projects and a great way to personalize your furniture. By following these steps, you’ll be able to create a notch in your wood in just a few minutes.
If you want to make a notch in wood using a power drill, there are a few steps you need to follow.
Notching Wood with A Power Drill
Use the included drill bit to mark where you want the notch to be. You can use this spot as a guide when drilling down to cut the same thickness. Place the wood on its side so the notch will face down when you drill it. Make sure the bit is inserted into the wood and aligned with your mark.
Drill slowly and steadily until the hole is big enough for your instrument to fit through it. Finally, insert your wire brush into one of the holes and use it to clean up any debris from your drilling process. Make sure you keep track of your position so that you don’t end up drilling into your original mark.
Also, read this guide on how to drive screws into wood without a drill to learn different techniques.
Circular Saw
A circular saw is a perfect solution if you’re looking for an easy way to make a notch in the wood. it is a good method because you make a notch faster and get clear cuts.Here’s a step-by-step guide on how to do it:
Begin by laying out and marking the location of the notch on the face of the wood. You can use a speed square and pencil—Mark out your desired depth at the wood’s edge before making two cuts.
To set an appropriate depth loosen the circular saw blade while holding the blade guard up to raise or lower the base plate until the tip of the blade covers your pencil mark.
Make the initial cut along the right pencil line and the next cut along the left, overcutting if you need a rough cut. Make four complete cuts with each cut. Use the hammer’s claw to break the pieces free to let you refine your notch with a sharp chisel.
Router
Routers can be handheld or table-mounted. They use a spinning bit to cut. The bit is made of Carbide. A router is used for cutting dado stack, joinery, and rabbets.
How to Notch Wood with Router in your Woodworking Projects
Before cutting a notch, it is critical to understand the various types of bits and how you can use them. Otherwise, you risk ruining your material or hurting yourself. On the other hand, cutting notches using a router can be simple and enjoyable if you use a suitable bit and some practice.
The first step is to determine the size of the notch. Once you’ve determined the size of the notch, use a measuring tape to mark out the necessary dimensions on your piece of wood.
After cutting along all lines:
- Remove your router and inspect the notch.
- Remove excess wood with a chisel if the notch is too big.
- If it is too small, enlarge it with a file or sander.
Also read on how to round wood edges by hand without a router.
Scroll Saw
You use a scroll saw to cut complex designs in metal and lumber craft projects. Here’s how to go about it.
How to Notch Wood With A Scroll Saw
Set up the scroll saw. Outline your designs with a pencil. Ensure Make sure your pencil markings on the wood board are visible.
Wear protection goggles, dust masks, and other safety gear before turning on the machine, and do not remove them until you finish your project. If your hair is long, tie it at the back of your head and avoid wearing long jewelry and oversized clothing that could get stuck on the blade.
Check that the scroll saw is adequately secured to your work surface. Select a scroll blade based on the thickness of the wood being notched. Adjust the blade tension per the manufacturer’s instructions. Switch on the saw light. Cut Test the saw on a scrap piece of wood. If the material you’re notching is soft, use a faster speed, and when notching softwood.
Coping Saw
Coping the joints is one of the most challenging tasks when installing molding. You must use a coping saw to ensure a tight fit in corners. Because of their thin blades, lightweight coping saws are ideal for cutting curves and complex designs.
How to Notch Wood with a Coping Saw
Squeeze the saw to remove the blade if it is still attached. This will relieve some of the tension, allowing you to unbuckle each end of the blade. Put the blade somewhere safe because you’ll use it soon.
Set the front edge of the saw blade on a solid surface and hold with the handle facing up. Secure the wood with a vise or clamps. This will keep the wood from slipping while you’re cutting it.
Trace the line you intend to cut onto the wood. Position the saw’s central teeth at the beginning of the line. Push your saw in a short stroke and start cutting the notch.
Keep sawing perpendicular to the grain of the wood. Turn the handle as required to follow your marked course as you cut.
How to cut notches in wood with a table saw?
A table saw is a simple, powerful device that can save you lots of time and effort. Make the blade taller than the thickness of your wood. Change the width of the fence you have to cut.
Push the board into the blade and switch off the saw when you finish.
How to notch wood by hand
First, mark the measurements on the wood. Mark the top side with a Carpenter’s Square.
Make a mark on the two vertical sides. Secure the wood board in a vise and cut with a hand saw. While sawing, use the visible pencil lines on the vertical surfaces of the wood as guides to keep your saw blade very straight.
See also: How to cut squares in wood
Conclusion
If you love woodworking, knowing how to cut a notch in wood is a crucial skill that can help you create an intricate design in your woodworking projects and helps improve the wood’s structural integrity. Notching wood does not have to be a long, drawn-out affair.
You can notch or make holes in wood using readily available tools such as a sharp chisel and hammer, hand saw, jigsaw, etc. Just follow the procedure here, and you’ll notch wood like a pro, even if you are a novice.