There are many ways to finish wood, and each has its own benefits and drawbacks. One of the most common finishes for furniture and other woodwork is a glossy varnish or lacquer.
While attaining a glossy finish can look beautiful, it can be difficult to maintain and often requires reapplication every few years.
In this post, we’ll show you how to dull a glossy finish. This will help protect your furniture from scratches and make it easier to clean.
So read on for tips on how to achieve a more low-key look for your wood pieces!
How to Dull a Glossy Finish
There are two main ways of dulling a glossy finish: sanding and using a refinishing agent. Sanding is more traditional but can be time-consuming and difficult to control. Refinishing agents are newer products designed specifically for this purpose. They’re usually easy to use and give you more control over the final finish.
How to Remove Shiny Finish from Wood in 2 Methods
We will discuss two main ways of dulling a glossy finish: sanding and using a refinishing agent.
Method One: How to Dull Gloss Paint Finish by Sanding
Sanding is the most common way to dull a glossy paint finish. You can use sandpaper or a power sander for this process. The key is to use fine-grit sandpaper, so you don’t damage the underlying paint job.
Some pros of using sandpaper are that it’s relatively easy to do and requires no special equipment. The cons are that it can be time-consuming, and you must be careful not to damage the paint.
If you’re patient and careful, sanding is a good way to dull a glossy paint finish.
Tools and materials needed
- Sandpaper (coarse, medium, and fine grits)
- Water
- Sponge
- Tack cloth
- Stain (optional)
- Orbital sander
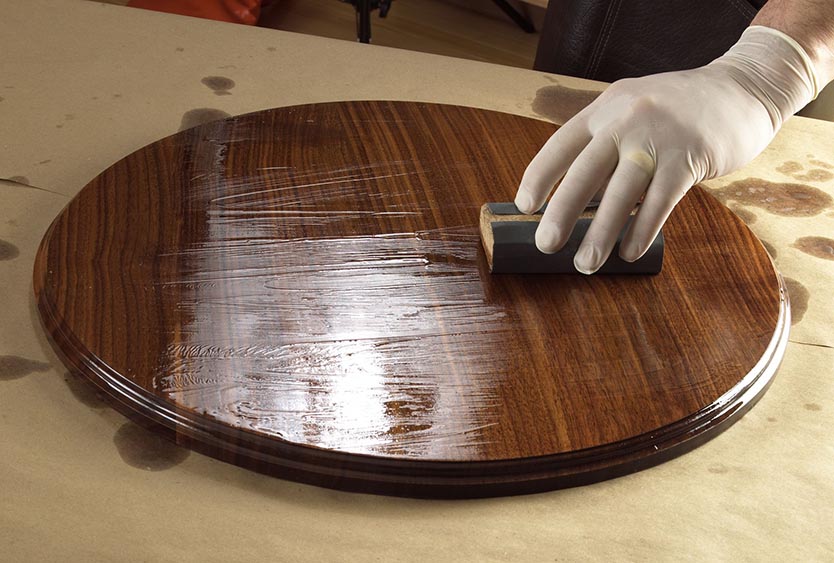
Step 1: Sanding
Sanding uses abrasive paper to remove the glossy top layer of paint. This will dull the finish and give it a more matte appearance.
You’ll need to start with coarse sandpaper and move up to finer grits as you go. The goal is to remove the glossy top layer without damaging the underlying paint job. If you’re using an orbital sander, keep it moving, so you don’t damage the paint.
Before sanding, it’s important to start with a clean surface. Any dirt or grime on the surface will be sanded into the finish, making it more difficult to achieve a smooth, even finish.
Use a tack or damp cloth to remove any dust or debris from the surface before sanding. Once the surface is clean, begin sanding with medium-grit sandpaper.
Work in small areas, using circular or back-and-forth motions. Keep the sandpaper moving to avoid creating deep scratches in the finish. After sanding with the medium-grit paper, switch to a 220 or 300-grit paper and repeat the process.
After sanding, clean the wood surface with a clean, damp cloth to remove any dust. Allow the surface to dry completely before applying a new finish.
Step 2: Polishing
If you want to achieve a completely matte finish, you can stop at this point. However, you can polish it with fine-grit sandpaper if you want to add a bit of shine back to the surface.
A finer polishing compound will smooth the surface and give it a slight sheen. It’s important to use fine-grit sandpaper for this step; otherwise, you’ll have scratches in the finish.
Again, work in small areas and use circular or back-and-forth motions. After polishing, wipe the surface with a clean, damp cloth to remove dust. Allow the surface to dry completely before applying a new finish.
Method Two: How to Remove Gloss Finish from Wood by Refinishing
You can use a refinishing agent if you’re looking for an easier way to dull a glossy paint finish. These products are designed specifically for this purpose and usually come in spray or liquid form.
Refinishing agents work by etching the top layer of paint, which dulls the finish. This method is faster and easier than sanding, but it doesn’t always give you as much control over the final finish.
You can find refinishing agents at most hardware stores. Be sure to follow the manufacturer’s instructions for the best results.
Tools and materials needed
- Refinishing agent
- Water
- Mineral spirits
- Orbital sander (optional)
- Sponge
- Tack cloth
- Stain (optional)
- 800 grit sandpaper
- 220 grit sandpaper
Step 1: Sand any polishing compound
Sanding off any polishing compound ensures an even application of the refinishing agent. Use a tack or damp cloth to remove dust or debris before sanding the surface. Once the surface is clean, begin sanding with medium-grit sandpaper.
Work in small areas, using circular or back-and-forth motions. Keep the sandpaper moving to avoid creating deep scratches in the finish. After sanding with the medium-grit paper, switch to a fine-grit paper and repeat the process.
Step 2: Clean and dry the surface
Wipe the surface with a clean soapy water damp cloth to remove dust. Allow the surface to dry completely before applying the refinishing agent.
You could also use a vacuum cleaner with a soft brush attachment to remove the dust. But, again, the aim is to have a clean surface before you start.
Step 3: Select your finish
There are a lot of refinishing agents in online stores and hardware stores. However, before purchasing, you must decide on the gloss level you want.
Some agents completely remove the gloss, while others just dull it. Finally, some products add a bit of shine back to the surface. If you need a matte surface, go for an agent that removes the gloss completely.
If you need a low-gloss or semi-gloss finish, choose an agent that just dulls the surface. Finally, look for an agent that polishes the surface for a high-gloss finish.
Most refinishing agents come in either a spray or liquid form. Select the type of finish you want and follow the manufacturer’s instructions for the best results.
If you’re using a liquid refinishing agent, apply it to a sponge and then wipe it onto the surface. Again, work in small areas, using circular or back-and-forth motions.
If you’re using a spray refinishing agent, hold the can 6-8 inches from the surface and apply a light coat. Be sure to cover the entire surface; otherwise, you’ll end up with an uneven finish.
Allow the refinishing agent to dry completely before moving on to the next step.
Step 4: Apply your new finish
After the refinishing agent has dried, you can apply a new finish to the surface. If you’re painting, be sure to use a primer first. Then, apply the paint or stain in a light coat and let it dry completely between each coat.
You can skip this step if you’re not planning on painting or staining. However, keep in mind that the surface will be more susceptible to damage without a protective finish.
How to Guide to Dull a Glass Surface
Dulling a glossy glass surface can be done in a few different ways. The easiest way is to use a product specifically designed for this purpose, such as a glass etching cream.
Glass etching cream is a safe and easy way to create a frosted glass finish. It works by chemically etching the surface of the glass, which dulls the shine.
This method is ideal if you want to paint window glass for privacy. It’s also great for creating decorative items like vases and dishes.
Tools and materials needed
- Glass etching cream
- Sponge or paintbrush
- Mask (optional)
- Mineral spirits or vinegar
Step 1: Clean the glass surface
Clean the surface of the glass with soapy water. Be sure to remove any dirt, dust, or grease. If the glass is very dirty, you can use a glass cleaner or vinegar and water to clean it. Once the surface is clean, dry it with a lint-free cloth.
Step 2: Apply the glass etching cream
Apply the glass etching cream to the surface of the glass using a sponge or paintbrush. Work in small areas and be sure to follow the manufacturer’s instructions.
If you’re using a brush, dip it into the glass etching cream and then apply it to the surface of the glass. Use circular or back-and-forth motions to spread the cream evenly.
Applying the glass etching cream directly to the sponge if you’re using a buffing pad. Again, use circular or back-and-forth motions to spread the cream evenly.
Step 3: Allow the cream to set
Allow the glass etching cream to set for the amount of time specified by the manufacturer. This is usually between 5 and 30 minutes.
Step 4: Remove the cream
Once the glass etching cream has been set, remove it from the surface of the glass. You can do this by rinsing it off with water or wiping it away with a lint-free cloth.
If you’re having trouble removing the glass etching cream, you can use little mineral spirits or vinegar. Apply it to a cloth and then wipe away the cream.
Step 5: Clean the glass surface
Once the glass etching cream has been removed, clean the surface of the glass with soap and water. Be sure to remove any residue from the cream.
If you’re using a glass cleaner, follow the manufacturer’s instructions. Once the surface is clean, dry it with a lint-free cloth. And that’s it! You’ve successfully dulled the glossy finish on your glass surface.
Can Gloss Paint Be Made Flat?
Yes, gloss paint can be made flat by adding a flattening agent. Flattening agents include talc, kaolin clay, and mica. These agents absorb light and give the paint a duller appearance.
However, keep in mind that adding a flattening agent to gloss paint will make it more difficult to apply and may also change the color of the paint.
When adding a flattening agent to gloss paint, it’s important to add it slowly and mix it well. Otherwise, you may end up with an uneven finish.
FAQs
How to dull a glossy finish without sanding?
For a quick and easy way to dull a glossy finish without sanding, try using a product called “Stripper.” It’s a liquid paint remover easily found at most hardware stores. Simply apply it to the surface of your finish, let it sit for a few minutes, and then wipe it away with a clean cloth. Here are other ways of sanding wood.
How to dull a glossy finish on metal
There are a few ways to make matte finish glossy on metal. One way is to use a wire brush or 0000 steel wool to rub the surface and remove some of the glossy finish. Another way is to use an automotive rubbing compound available at most auto parts stores. Rub the compound into the surface using a cloth or brush, and then wipe off the excess with a clean cloth. Finally, you can use steel wool to dull the finish by rubbing it over the surface in a circular motion. Be careful not to scratch the metal in doing this.
How to make polyurethane finish less shiny?
Add a flatting agent to the mix to make polyurethane finishes less shiny. This will reduce the reflected light, making the surface less shiny. If you’re starting with a high gloss finish, you can try sanding it down slightly before applying your new layer of polyurethane. This will create a matte finish.
Conclusion
In this post, we’ve shown you how to dull a glossy finish on furniture or woodwork. We’ve also given you a few tips on how to protect the new finish from damage.
Dulling a glossy surface is a great way to give your furniture or woodwork an aged look, and it can be done with simple household items.
If you have any questions about this process, please leave us a comment. Thanks for reading!