Learning how to paint between deck boards can be a pain in the neck. Why? Because the deck boards are narrow, tight, and the space is limited.
But what if I told you about the best way to paint between deck boards? Painting between the boards of your deck can be a quick and easy way to add color to an otherwise bland space.
In this article, we’ll show you how to tackle those tricky spaces with a few tips and tricks for painting in between deck boards.
As a bonus, you’ll also learn how to stain between deck boards.
How To Paint Between Deck Boards and Tight Gaps
Painting in between deck boards requires special tools to help spread the paint in the small cracks. Some of the efficient tools you can utilize are the pump sprayer, crack and groove brush, and a moldable sponge.
Materials and Tools For Painting Between Deck Boards
- Crack and groove brush
- Bristle paintbrush
- Pump sprayer
- Moldable sponge brush
- Mineral spirits
- Paint tray
- Paint stirrer
How To Paint Between Small Gaps In Deck Boards- Steps
Painting in between deck boards can be tedious, more so if you don’t have the correct set of tools to help you get the job done.
Unlike painting over old deck paint using a roller or paintbrush, getting between the grooves is another story. Remember, you can’t leave the gaps unpainted – otherwise, the entire project will appear undone.
Here are some steps you should follow to learn the best way to paint between deck boards.
Step 1: Seal Off Surrounding Area
Cover any plants around your decking location using painter’s plastic or drop cloths and securely tape the plastic on the underside of the deck siding.
You should also remove any deck furniture and fill cracks on older decks using wood filler. Screw into the wood filler only after allowing it to cure and harden fully, as this will ensure a strong and secure attachment for any additional fixtures or hardware.
Also, hammer any protruding nails flat on the wood. Ensure you have a clear surface to work on.
Step 2: Clean The Deck
The first step is to clean the deck before you apply paint. This aims at removing debris on the surface of the deck: whether it’s a new deck or an older deck.
Begin by sweeping the surface of the deck to remove peeling paint and any loose dirt between the deck floor. Next, scrub the floorboards with mild soapy water and a stiff bristle brush. Finally, rinse the surface using a garden hose or power washer.
Let the bare wood dry overnight before painting.
If your deck boards were previously painted or stained, grab some mineral spirits or paint thinner and use it to soften the paint film before scraping it. Remember also to remove paint between deck boards.
Step 3: Prepare The Paint
Once you have chosen the best deck color paint of your choice, open the paint can and stir it using a paint stirrer. Stirring the paint breaks any paint lumps and ensures it has a uniform viscosity. Therefore, you can be sure your paint will spread smoothly.
Pour some paint into a paint tray for convenience’s sake.
Step 4: Apply Deck Paint
Here are some of the different tools you can use at this stage.
Tools to Paint Between Deck Boards
Using Crack And Groove Brush
If you were well prepared for the painting task, you probably have the crack and grove brush.
Dip the bristle brush in the paint tray and press it on the edge of the tray to remove excess paint drips. Then, run your brush in between the deck boards, back and forth, leaving a trail of even paint coverage.
Using Bristle Paintbrush
A bristle paintbrush is also a practical choice for painting decks with larger gaps. Use it in the same way you would use crack and groove brush.
Since these brushes come in various sizes, you are guaranteed to find the best size for your project. Avoid jamming paintbrushes into narrow gaps because the bristles will get pinched and end up damaged.
Using Pump Sprayer
A pump sprayer is another means to apply decking paint to hard-to-reach areas like the cracks between deck boards. A pump sprayer is a type of applicator with an air-driven propellant canister.
Mix paint with its respectful thinner and put it in the canister. Leave a third of the tank empty to allow for pressure to build up when pumping the tank.
Pump to create pressure while holding the sprayer nozzle about six inches from the surface. Then, press down the trigger to release the paint and spray an even coat of paint to your deck.
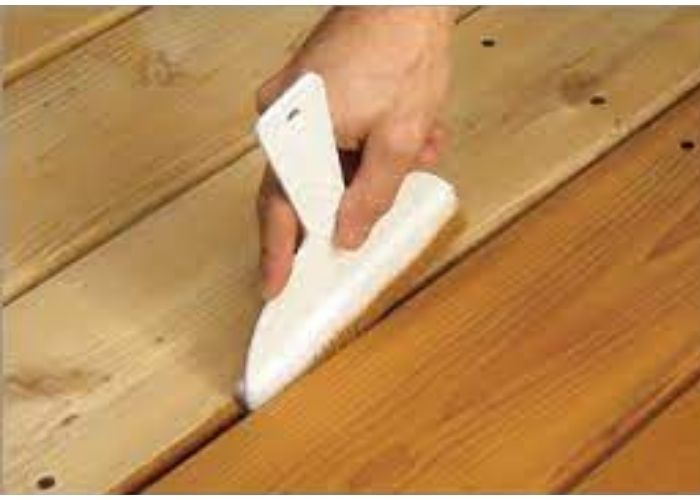
Using A Moldable Sponge
A moldable sponge is the best one here because you can fold it or mold it to fit the size of the spaces between your deck boards.
Dip the sponge in the paint tray and then wipe off excess paint on the edge of the paint tray. Next, rub and drag the sponge in the cracks to coat the gaps evenly. Finally, soak up more paint and repeat the process.
Whichever method you use, allow the first coat of paint to dry fully before applying the second coat.
How to Stain Between Deck Boards
The best way to stain in between deck boards is to use a moldable sponge or scouring pad. First, dip the applicator in the deck stain to soak it up. Next, put the sponge or scouring pad between the deck boards and rub the stain into the wood. You can apply two coats of deck stain for a perfect finish.
Make sure your wood is dry and clean before applying stain. If not, you risk trapping dirt and any contaminants in there, which can lead to streaks.
What Lasts Longer Between Deck Stain and Deck Paint?
Deck paint generally lasts longer than deck stain.
However, applying stain to a new deck is relatively cheap and takes less time than painting.
On the other hand, painting does a better job at concealing flaws, filling the cracks, and generally guaranteeing longer-lasting protection for your deck.
Paint also protects your wood decking from direct sun damage, rot, and mildew – because it’s composed of two parts, a base coat and a top coat. Here is a comparison guide of deck paint vs stain to give you more insights.
The Trick For Painting Between Deck Boards
The space between deck boards is usually about 1/8 wide, meaning you need something equally slim or at least moldable to fit in the cracks. A tool that can save your day is a sponge or replacement pad. A soft, moldable sponge can easily get in between the deck board spaces.
You have to dip the sponge into the paint on your paint tray and wipe it on the edge of the tray to remove drips.
Next, squish the sponge into the decking board cracks and drag it along the cracks to apply the paint. Finally, run the sponge back and forth to make sure there’s sufficient paint coverage.
Read also: Best composite decking brand.
FAQs
How do you seal the space between deck board cracks?
Caulking is a tried-and-tested method for sealing larger spaces between deck boards. For example, you can use silicone caulk to fill the spaces between deck board cracks. This is because it’s a waterproof, subtle, and airtight sealant. For smaller cracked gaps, fill them with wood filler.
For more comprehensive guidance on repairing a splintered wooden deck surface, be sure to check out our detailed guide.
How do you paint a narrow gap?
You can use a pump sprayer to paint a narrow gap on your decking or patio. First, put your paint in the sprayer canister and allow room for the pressure to build up when you pump in the air. Then, pump the sprayer with steady pressure, press the trigger to release paint, and spray the narrow gap evenly. (Check our guide on some of the best porch and patio paints).
How to Paint Cracks in Deck
You can easily paint cracks between deck boards using a crack and groove brush or a moldable sponge. Use water-based acrylic latex paint that can bridge gaps.
First, soak up paint and then apply the paint in the narrow gap by running the brush or sponge back and forth, up and down motion. Feel at liberty to seal the painted surface with any of the best clear coats for latex paint.
Another way to paint cracks between deck boards is to seal the crack with an epoxy wood filler before painting.
What is the best paintbrush for between deck boards?
The regular bristle brush is the best paintbrush for painting between deck board gaps. This brush easily fits into the gaps between deck boards. Dip the brush in a paint tray and brush paint on either side of the decking boards. If you are using oil-based paint, we have some of the best oil based paint brushes to choose from.
Should I paint both sides of deck boards?
Most people prefer painting the only side of the decking exposed to direct sunlight and heavy traffic. However, it doesn’t mean you can’t paint underneath your deck. If you have the time, the resources, and you prefer an all-rounded protected deck, by all means, paint both sides of your deck boards.
How to remove paint between deck boards?
You can brush a coat of mineral spirits between the deck boards. Then, let it sit for some minutes until the paint softens. Next, scrape it off and rinse with water. Alternatively, you can apply a paint stripper for wood deck and let it work for about 30 minutes. Once the paint bubbles up, pressure wash it off.
What is the proper gap between deck boards?
The proper wood deck board placement should have at least a 1/8 inch gap. If you install dry deck boards, allow for a 1/8 inch gap. However, if you use wet wood or wet treated wood, it’s better to install them without any gap between them. This is because wet wood will shrink when it dries –creating a gap.
Can you caulk between deck boards?
Yes, you can caulk between particularly large deck floorboards to prevent dirt and debris from getting trapped in there. You can use Silicone caulk sealant since it’s waterproof, airtight, and blends well with the decking boards.
Find Out: Are Outdoor Rugs Bad for Wood Decks?
How to Paint in Between Deck Boards Summary
I hope this guide inspires you with some confidence to refurbish your outdoor living space, whether you want to throw in a new color or update the same color already on your decking. You’re unstoppable when you know how to paint between deck boards and have the right tools needed to get the job done.
Do you know any other tricks for painting between deck boards? We’d love to hear them. Drop a comment below.