It’s amazing how much value you can add to your home by doing basic renovations in key areas like your kitchen. The only problem is it can cost a pretty penny.
Learning how to paint kitchen cabinets could help you save a lot of money, whether you’re looking to sell or improve the look of your house.
Contrary to what most people think, you don’t just slap on some paint. There’re a few steps to take, which will take some time, but the results are worth it. Plus the right materials like the best cabinet refinishing kit.
This guide below will walk you through all the steps you need to make your kitchen cabinets look like an IKEA showroom.
Can Painting your Kitchen Cabinets Improve your House Value?
Yes, painting your kitchen cabinets can help you sell your home at a higher price. According to research from real estate mega-company Zillow, painting your kitchen cabinets could add a few hundred dollars to your home value.
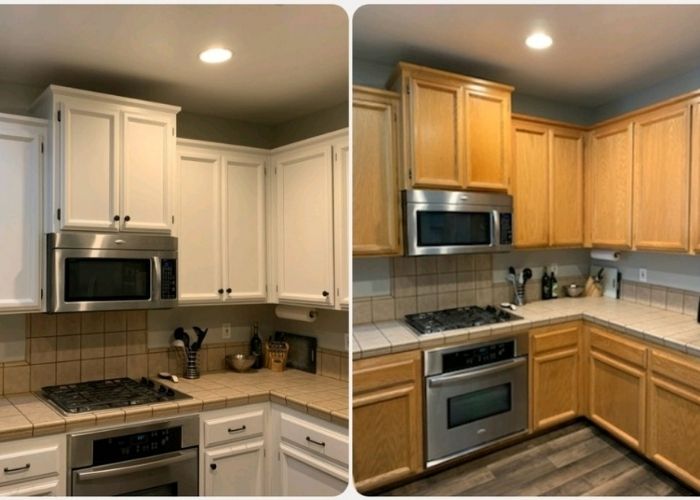
The most value they saw from their research was tuxedo cabinets – the top half is painted white and the bottom a dark shade – which added on average $1,547 to home sellers.
Before you get carried away, you need to find out how much it costs to have your kitchen cabinets professionally painted.
According to Home Advisor, the national average for repainting kitchen cabinets is $806, ranging from $175 – $2,500.
While it is still profitable to pay $806 at paint stores to get $1,547 extra on your home, you can get even better returns if you paint it yourself. Depending on the brand of paint you use and the size of the wood cabinets, you can expect to spend between $200 and $600 to DIY project.
How to Paint Kitchen Cabinets Like a Pro (Step by Step)
When most people think of painting kitchen cabinets, they imagine it is similar to painting a wall – get a paint bucket, a roller, primer, and start rolling.
Unfortunately, it’s a bit more complicated for several reasons. The first reason is painting wood is different from painting a concrete or prefab wall.
The second is, you’ll usually need a different type of paint in the kitchen due to all the spillage and staining that goes on.
Finally, kitchen cabinets have many moving parts, so you need to be deliberate during this painting process.
To help simplify the process, I’ve broken down the project into four phases:
- Prep
- Prime
- Paint
- Poly
While the first three phases are non-negotiable, the fourth one will depend on your preference. We have tacked it on as a bonus, but we will explain why we recommend it.
How Long does it Take to Paint Kitchen Cabinets?
Given the different phases involved, you won’t be surprised to find out it takes 2 to 7 days to paint kitchen cabinets. If you’re working with someone, you can save off a day or two.
While the actual painting does not take too long, prep and curing do. No wonder the contractor seemed to charge a lot for this ‘simple task,’ right?
It is important not to skip any step in the hope of saving time, as you’ll end up having to repaint it in a few months.
As mentioned before, the only optional part of the process is applying polyurethane, and this needs about 3 days extra to cure.
What Type of Paint Should You Use on Kitchen Cabinets?
When painting kitchen cabinets, we tend to focus more on the color of the paint than the type of paint. However, choosing the right paint is more important, as the wrong one can tarnish.
You first need to consider the base. A water-based paint works better in the kitchen as it is easier to clean. It also dries quickly and releases less volatile organic compounds (VOCs).
While oil based paints are easier to scrub, they take much longer to dry (about 16 hours between each coat). They may also be yellow over time. Plus, the high levels of VOCs they emit are harmful to you and any children or pets in the house.
Acrylic latex paints are highly recommended for kitchens. Besides being better for the environment, you can clean your applicators with water. It dries quickly and is washable. It will also retain its color for a long time.
While this type of paint shows brush strokes and tends to raise the grain, these problems can be solved by applying a primer and multiple coats of paint to help paint stick. Be mindful of the curing time.
Even though acrylic latex paints dries in hours, it can take two weeks to cure fully, during which time it can be ruined or stained. As a result, you need to be careful and restrict access to the kitchen while it cures.
Once it cures, you can protect the paint from further damage by applying polyurethane over it. You can use either oil based paint or water-based polyurethane.
In terms of sheen, semi-gloss and satin tend to work better. High-gloss will show all the nicks and dents, while matte is difficult to clean, and it’s not appealing on kitchen cabinets.
What Color of Paint Should You Use for Kitchen Cabinets?
The color of your kitchen cabinets will depend on the purpose of the renovation. Are you painting the cabinets for yourself, or trying to sell your home?
If you’re doing it for yourself or with the help of professional painters, then go with any color you like!
However, if you are trying to sell your home, Zillow report suggests using white for cabinets or the aforementioned tuxedo look with white and dark gray. In contrast, colors like dark red can cause your home to sell for less.
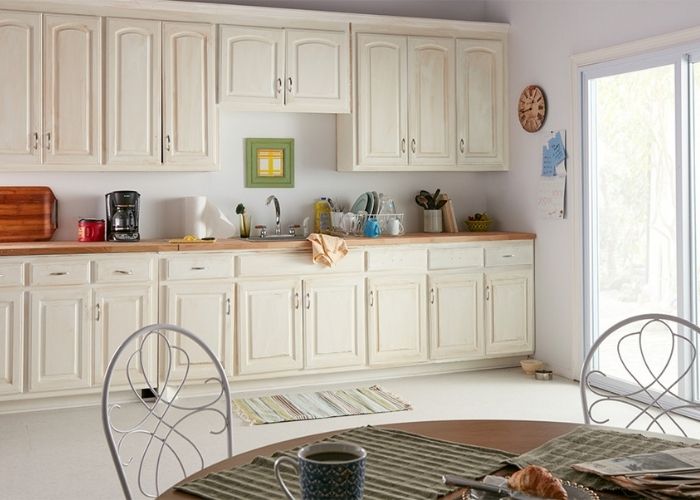
The benefit of using white is that it goes with any theme in the house and will go well with any hardware you choose. Nearly 50 percent of all kitchen cabinets in the US are white.
How to Prepare Your Kitchen Cabinets for Painting
With any project, preparation is key to success. Below, I’ll outline the tools you’ll need and the steps to follow.
Tools you need to prepare your kitchen cabinets
- Drop cloth
- Masking tape
- Pen/marker
- Screwdriver
- Water
- TSP (trisodium phosphate)
- Goggles
- Rubber gloves
- Safety gear
- Mini roller
- Sponge
- 120-200 grit sandpaper
- Vacuum cleaner
- Tack cloth
- Bucket
- Wood filler (optional)
- Putty knife (optional)
- Paint stripper (optional)
- Painter’s tape
- Ziploc bag
- Microfiber cloth
- Plastic scraper (optional)
Painting Kitchen cabinets like a pro
Once you empty your cabinets, follow the steps below.
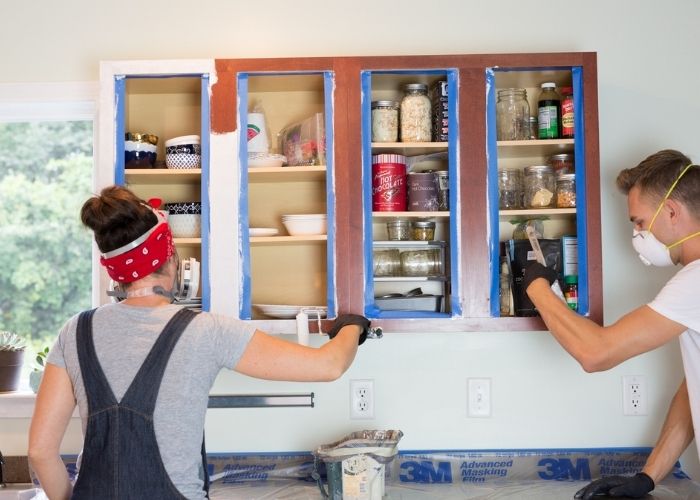
Step 1: Cover all other surfaces
All of the different phases of this paint job are messy, so you need to cover all the other surfaces in your kitchen. Cover countertops, floors, sinks, and other nearby surfaces with a drop cloth. You can use masking tape to hold them in place.
Step 2: Line the edges with painter’s tape
Put painter’s tape around the edges of the cabinets you’ll be painting. Painter’s tape is better than masking tape for this because it does not peel off wet paint, and you can leave it for the entire 2-to-7-day period of work.
Also read: How to clean tape residue off wood.
Step 3: Remove the cabinet doors
Unscrew all cabinets, doors, and drawer fronts. As you do so, label each door and section to make it easy to put them back up. Also, keep the screws from each compartment in a separate Ziploc bag or a plastic container, which should also be labeled.
Keep the screws somewhere safe and out of the way.
Step 4: Clean or strip the cabinet doors
Depending on the current finish on your cabinets, you would either need to clean them or use a paint stripper. If what you have is stained wood, you need to degrease it. Here are some degreasers for kitchen cabinets before painting.
Mix ¼ cup of TSP with a gallon of warm water and use a sponge to wipe down the doors and cabinet surface. Even if you’re not going to paint inside of the kitchen cabinets, it is a good time to de-grease it.
TSP is a powerful agent, so use gloves and wear goggles when applying it.
Apply a generous portion of the paint stripper for painted surfaces and scrape off until you’re left with the underlying wood. You might also need steel wool to scrub off any old paint.
After using the cabinet degreaser, wipe the surfaces with water and dry with a microfiber or a lint-free cloth.
Step 5: Fill any holes in the wood*
If your cabinets have open grain or holes from damage, apply a small portion of wood filler and smoothen with a putty knife. Be careful not to fill in the holes from the screws.
The filler will take between 30 minutes and one hour to dry.
Step 6: Sandpaper
Before you can apply primer or paint, the surfaces of the cabinets need to be level and smooth. Use 120-grit sandpaper which is available in any paint store to remove the first layer of the stain and scuff the surface. If the wood is in good condition, you can start with 150-grit sandpaper.
You can use a sanding block to make it easier. To make the surface smoother, use 200 or 220-grit sandpaper for a second pass.
Always follow the grain when doing light sanding. Get into the corners, even if it won’t be visible when you put the cabinet frame and doors back.
Step 7: Clean the wooden surfaces
Now, you need to get rid of all the sanding dust. First, use a vacuum cleaner to go over every inch of the cabinets. Afterward, use a damp tack cloth to get rid of any stubborn dust particles.
Once this dries, you are ready for the next phase.
How to Prime Kitchen Cabinets Like a Pro
Congratulations on finishing your preparation process. Now, it’s time to paint cabinets.
Primer serves as a fresh coat, which helps the paint adheres better to the wood. It also prevents you from applying too many coats of paint to achieve a beautiful, bright tone.
For this, you will need a few tools you didn’t have before.
Tools you need to prime wooden cabinets
- Primer (best bonding primer for kitchen cabinets)
- Synthetic brush
- Paint tray
- Nap roller (Read our guide, 1/2 vs 3/8 nap roller, to find out which one you should pick.)
- Painting tripods
- Painter’s bucket
- 220-grit sandpaper
Steps to priming your kitchen cabinets
Step 1: Cut in the edges connected to the wall or other objects
Whether you’re applying primer or paint, you should always start from the furthest part and work towards you. That way, you won’t smudge something you’ve already painted over.
In this case, you need to start on the edges in contact with the walls, floor, ceiling, or other objects. Before you begin, ensure the painter’s tape you applied in the previous phase is still secure.
Next, pour the primer into your painter’s bucket, preferably one with a handle. This makes it easier to work (you’ll thank me later).
Using a tapered brush, start by cutting in the edges. First, dip the brush into the primer and tap the edges of the painter’s bucket to get rid of the excesses.
Next, holding your brush at an angle, place the shorter side of the brush close to you and bring the long sider in contact with the edge of the cabinet hardware touching the wall. Cut or draw a line on the edge, moving in one direction, first towards you, then away from you.
Hold the brush like a pencil when you cut in. This will yield more deliberate, straighter strokes.
Step 2: Prime the sides of the cabinets
Once you’re done with the edges, use a square trim brush to prime the external sides of the cabinets. Use long strokes along the wood grain, starting from the highest part of the cabinet.
It would be best if you always started high so you can brush any excesses downwards – you don’t want it to run down after you’ve already primed the bottom.
If the surface is vast, you might want to use a mini foam roller.
Pour the primer into a paint tray. As you dip your roller inside the paint, work off some of the excesses before applying.
Next, apply the primer in a W-motion, also following the grain of the wood. You can then go over any missing spots with the dry roller.
*Tip: When applying primer, you don’t need to get it smooth like paint. As long as it covers every inch, it’ll be fine.
Step 3: Prime the interior *
Depending on the condition of your interiors, you may or may not need to paint inside the cabinets. If you do, start from the top.
Next, move to the back panel, then the side panels. Use vertical strokes along the grain as always and also start from the higher parts.
You may choose to use a mini foam roller if the cabinet is large enough, or you can stick with a brush. Of course, you would need to cut in along the edges before you put primer on the body.
Step 4: Move to the frames
Now that you’re done with the sides and interior, it’s time to move to the cabinet frames. Again, start high and work your way down, following the grain.
Step 5: Work on the doors
Finally, we come to the doors. Before applying the primer, take off the label and stick it above where you’ll be working on the cabinet door.
Next, arrange the painting tripods and place the front of the door on them. You’re going to apply the primer first on the back of the cabinet door. The back is easier to work with as it is usually flat, so you may use a roller for this.
When applying primer to the front, work the brush into any edges or contours before moving to the main face. As the doors are more obvious, ensure you feather out the primer, so you don’t get any thick parts.
Step 6: Prime the drawers
When painting drawer fronts, you only need to do the front. Painting the sides could cause them to stick on the rollers. Of course, you may also choose to paint inside the drawers, but that’s up to you.
Step 7: Sand the primer
After the primer has dried, which could take about 2 hours, it’s time to sandpaper it entirely. This is merely to smoothen any globs, brush strokes, or rough patches, so you need to be gentle.
You don’t need to get deep into or remove the primer, so 220-grit sandpaper should get you the desired results.
After this, you’re ready to paint your cabinets.
How to Paint Kitchen Cabinets Like a Pro
Finally, you’ve come to the actual thing you wanted to do. As I mentioned earlier, it is important to follow this detailed process, or you’ll be left with a shoddy job that won’t last long.
If you don’t clean the surface, the paint won’t stick properly. If you don’t sand, the paint won’t stick properly. If you don’t apply primer or any of the other things listed, well, you get the idea.
As you will be using acrylic latex paint or some other water-based paint, it will raise the grain of the wood if you don’t use a primer.
So, even though this process takes a while, it is necessary and worth it.
Tools you need paint kitchen cabinets
- Acrylic latex paints
- Synthetic brush
- Paint tray
- Foam roller (optional)
- Painting tripods
- Painter’s bucket
- 220-grit sandpaper
Steps on How to Paint Kitchen Cabinets like a Pro Steps
Step 1: Paint over all the primed surfaces
Just as with the primer, you can use both a paint roller and a natural bristle brush. First, pour the paint into the painter’s bucket or paint tray.
Next, you’re going to cut in the edges, as you did before, then apply paint to the sides, interior, doors, and cabinet frames.
The process for painting is almost the same as priming. The only difference is when you paint, you may use longer strokes. You also need to cover every inch of the surface evenly.
Step 2: Sand the painted kitchen cabinets
After about four hours, the latex paint should have dried. You can now lightly sand the previously painted cabinets with 220-grit sandpaper. Follow the grain and ensure you smooth out any imperfections and brush strokes.
When you’re done sanding, use a vacuum cleaner and tack cloth to get rid of the dust. Paint doesn’t stick well to dust, so make sure you take your time to get this right.
Step 3: Apply a second coat
Once the surfaces are dry, apply a second and final finish coat of paint. Do everything as you did before.
If you notice the grain has been raised after it dries, still brush strokes or uneven portions, repeat steps 2 and 3 until you’re satisfied.
Step 4: Let the paint cure
Acrylic latex paints take between 24 to 72 hours to cure enough for light use. However, it would need another two weeks before fully curing, and the paint would be difficult to stain or smudge.
Do You Need to Apply Polyurethane Over Paint?
No, you don’t have to apply polyurethane to your painted kitchen cabinets. Once the paint has cured, you can restore all the drawer fronts, doors, and hardware where they belong.
However, applying polyurethane has several benefits:
- It makes the paint brighter – acrylic paint can dry dull, so applying polyurethane gives it a sharper look.
- It protects the surface from dirt and dust – there’re a lot of particles floating around your kitchen. Polyurethane will prevent them from building on the paint.
- Polyurethane is waterproof – this is important, especially in kitchens. Polyurethane will protect your cabinets from both minor and intentional spills, in case your kitchen is the venue of a food fight.
- It is scratch and scuff resistant – polyurethane is a durable finish and will keep your surfaces from routine damage and accidents. If you live with kids, imaginative teenagers, or playful pets, polyurethane will come to your rescue many times.
- Polyurethane is durable – once you apply it, expect the polyurethane to protect the gloss of your paint for years to come.
If these advantages have convinced you to apply polyurethane, then keep reading. Otherwise, you may skip to the next section.
Related: Best Clear Coat for Kitchen Cabinets
How to Apply Polyurethane Over Paint
I recommend you use water-based polyurethane instead of oil-based polyurethane. Water-based poly dries quicker and clearer. On the other hand, oil-based polyurethane has an amber hue that only gets darker over time, which can turn off oil paint.
Tools you’ll need
- Detergent or trisodium phosphate (TSP)
- Water
- Water-based polyurethane
- Tack cloth
- Vacuum cleaner
- Lint-free cloth
- 220-grit sandpaper
- Synthetic brush
Steps to Applying Polyurethane Over Paint
Here is how to paint with polyurethane;
Step 1: Clean the Surface
Polyurethane doesn’t adhere properly to greasy surfaces, so you must clean the painted surface thoroughly with detergent or TSP. As you painted these surfaces, detergent should be enough to get rid of the grease.
However, if perchance you or someone has already spilled grease on the paint, then use TSP.
Step 2: Sand the Surface
Since this is a fresh surface, you don’t need to go too deep with sandpaper. A 220-grit sandpaper should be enough to scuff the surface of the wood.
Sanding the wood helps polyurethane adhere to the surface better. If you don’t sand it, then polyurethane might peel off.
Step 3: Tack the Wood
Clean the sanding residue using a vacuum cleaner or lint-free cloth. Make sure no trace of dust is left, or it will ruin your polyurethane application.
You can dip a lint-free cloth in water and use it to clean the surface as well. This method gets rid of dust better, but you need to let it dry before the next step.
Step 4: Apply the First Coat of Polyurethane
Apply a thin coat of any polyurethane you want, which I’m hoping is water-based polyurethane. The process for applying polyurethane is identical to applying paint – follow the grain, use a light touch and start high, then work your way down.
The best tool for applying water-based polyurethane is a synthetic bristle brush, but you may also use a sprayer or roller.
Once you are done, leave your smooth finish to dry.
Step 5: Sand After Drying
Once the polyurethane is dry, use the same grade sandpaper as before to smoothen the surface. Make sure you eliminate any dust nibs, brush marks, or other imperfections such as deep scratches.
Step 6: Clean the Painted Surface Again
Follow the same routine as in step 3 to eradicate the sanding residue and small dust particles.
Step 7: Apply a Second Coat of Polyurethane
Just like with paint, you can’t apply one coat of polyurethane.
Apply another thin coat of polyurethane, using the same process as before. Wait for it to dry, then repeat steps 5 to 7 until you achieve the desired level of smoothness.
As you’re working with new paint, you might not need more than two coats of water-based polyurethane. While kitchens are used frequently, the wear and tear on kitchen cabinets are minimal compared to countertops, so two coats should suffice.
Step 8: Leave it to cure
Water-based polyurethane will need 24 hours to be dry enough for you to put the cabinet hardware back together. If it isn’t dry by then, wait another two days. After this time, you can restore the cabinets while you wait for them to cure fully.
This should take anywhere from 7 days to 3 weeks. You can use the kitchen cabinets for most functions during this time, but try not to slam the doors often or spill liquids.
Your Cabinets are Ready!
Now that you’re done with the four phases of painting kitchen cabinets, it’s time to return your drawer pulls and doors to their rightful place.
Bring out your Ziploc bags and replace the hardware and screws where they ought to be.
What is the Best Tool for Painting Cabinets?
Given the small size and varied surfaces, brushes are the recommended tool for painting cabinets. However, a mini roller can help you finish the paint job quicker with large, flat surfaces.
Another handy tool is a high volume, low pressure (HVLP) paint sprayer. These are great for large painting projects or if you decide to paint the doors side by side. This can be quicker than a brush or roller because you won’t have to deal with brush strokes or roller lint.
However, sprayers are more expensive than rollers and brushes. Consider one that can spray paint and polyurethane. You can either buy it at existing paint stores or rent an HVLP sprayer.
Besides being fast, spray painting and poly tend to dry quickly, thus reducing your work time.
Read more: What Is the Best Wood for Painted Cabinets
How Long Does it Take for the Kitchen Cabinets to Dry?
Painting kitchen cabinets can be a drag because of the long drying times. That is one reason most professionals recommend you use water-based paint and water-based polyurethane.
The first coat you apply, which is the primer, will be dry in 1 to 4 hours.
Water-based paint takes 24 to 48 hours to dry. However, in case of poor ventilation or unfavorable conditions, it may take up to 72 hours.
Water-based polyurethane may be dry to the touch in 2 hours, but it needs 72 hours to cure. However, it will take three weeks before the poly is fully cured and virtually impermeable to routine spills, dents, and scratches.
Painting Kitchen Cabinets is Worth the Wait
Waiting for seven days to complete a project might seem like a lifetime for people new to woodworking. However, when you consider that learning how to paint kitchen cabinets could save you hundreds of dollars while earning over a thousand, it is absolutely worth it.
Besides, painting your cabinets can do more than just save you hundreds of dollars in labor costs; learning a new skill can be a rewarding experience in itself. Plus, master that skill enough and you could end up offering your services to others and getting paid for paint jobs.
As I’ve mentioned a few times in this article, the actual processes: preparation, primer, paint, and polyurethane – don’t take much time; only the drying does.
Remember you must not skip any step, or your previous paint job won’t last. Finally, while the old saying is true that if you don’t like the paint, you can always change it, try to get it right the first time.
I would like to get new cabinets but I just can’t afford the price. I have a large kitchen and it’s 1980’s cabinetry. I really don’t care for them anymore and was wondering if it’s even possible to paint them. I would like to take off the barn/country looking trims and fill in the many hole that would leave? I would like to get your opinion. They are oak veneer. They are also very dirty and greasy from cooking. I could never find anything the removed grease totally just cleaning them.
Quick one: Do you just not like the look or do the cabinets not work from a layout perspective? Not enough drawers for instance.
I’m asking because the contour of the doors would be my first concern, however, without pics, I don’t think I can give much advice.
As for cleaning – TSP is a good grease remover.