Oak is typically a more premium type of wood and can cost significantly higher than pinewood. However, what if you could achieve that premium look without spending the premium cash?
If you love the light beige, to red and brown shades of oak wood, you may be happy to know that you can achieve that look even when you do not want to spend tons of cash on the wood.
You can create your own custom oak wood at home by knowing how to stain pine wood to look like oak.
This post walks you through the ins and outs of staining pine to look like oak and provides some useful suggestions on the best products you might use to achieve this effect.
How to Stain Pine to Look Like Oak
First, apply pre-stain wood conditioner, letting it dry for at least 30 minutes. After that, apply golden oak gently over the wood using an old cloth dipped inside the stain. Ensure the stain does not spill. Let it dry for some time.
Remember that oak has open pores and even grain, while pine tends to be knotty throughout its structure. So you will need to begin by choosing a board with significantly more grain and the fewest knots possible.
Once you get this first step out of the way, the rest should easily fall into place.
How to Stain Pine to Look Like Oak Step by Step
The secret to staining pine to look like oak is mainly in selecting products to use on your wood. While some people prefer to start with a dye, we find that dying is not always necessary.
Instead, we often just achieve the desired look with a selection of wood stains. You can easily replicate these results by following the same steps and using the products we will recommend.
The Supplies You Will Need
- Drop cloth
- Sandpaper
- Sanding block
- Tack cloth
- Pre-stain wood conditioner
- Clean lint-free rags
- Two to three different wood stains (more than one stain is essential to achieve the look)
Procedure for Staining Pine to Look Like Oak
Once you have everything you need ready, you can follow these steps to get the job done.
Step 1: Prepare the project area
Start by moving anything you can get out of the way to create space for your project.
Since the project will involve using a wood stain that might spill on the objects around the place, lay down a drop cloth, plastic sheeting, or a couple of newspapers to protect the surrounding surfaces.
You do not want the stain or primer spilling on the floor or ground under your project, so covering them with a tarp or newspaper will be essential. This helps protect these surfaces from unwanted staining.
Step 2: Prepare the pinewood
If your wood has knots as pine often does, check to see if any of the knots are loose. Any such knots could come off, so apply some epoxy into the gaps around the knots to secure them into place.
Use a putty knife to ensure the paste is flush on the wood surface, and leave it to dry once you are done with this step.
Next, sand the entire wood surface to make it smooth to the touch. You will want to use a power sander if the project is big. For a small project, a hand-held sanding block should get the job done.
While sanding, follow the direction of the wood grain so that any marks that remain from the sanding activity hide seamlessly with the grain.
180 to 220-grit sandpaper is always a good place to start before deciding whether or not to move finer or keep the surface as such.
Use a tack cloth or clean rag dampened with water to wipe the sanding dust. If you use a damp rag instead of a tack cloth, ensure you let it dry properly before proceeding to the next step.
Step 3: Practice with pieces of scrap wood
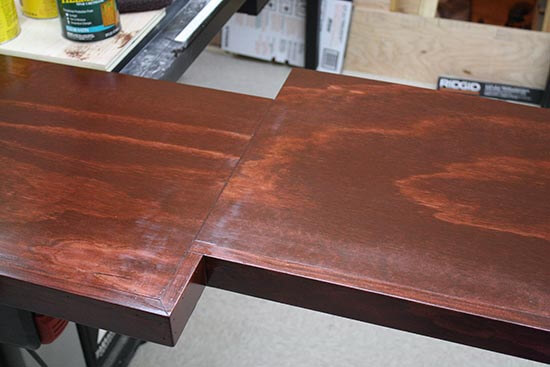
Oak colors vary significantly, from red-brown to beige, and a lot more hues in between. This is why you will find at least five different wood stain shades labeled as oak-colored wood stains.
The only way to identify the look you most resonate with is by testing it out with a few stain combos. So we recommend buying at least two shades of wood stain; you can go up to as many as you wish to try out.
Even with just two shades, you will want to test with various coats and stain color intensities on multiple pieces of scrap wood. Let them dry and assess to see which shade you like the best.
Once you identify your preferred shade, you can replicate it on your project.
Step 4: Prime the pinewood
Applying a pre-stain wood conditioner is essential to a smooth and consistent stain job. Pine is one of the wood types that do not accept stains readily. So priming it is an essential step in ensuring it stains evenly and is free of blotches.
The product will have the stipulated drying time and application method. It is always advisable to follow these instructions to the letter.
Ideally, you should apply the primer the same way as you do the wood stain. Saturate a lint-free rag with the product and rub the wood surface with it. Allow it to dry completely, then add another coat and let it dry too.
While wiping the wood conditioner onto the wood, ensure you follow the direction of the grain. This will help the pine absorb the wood stain more evenly and consistently across the surface.
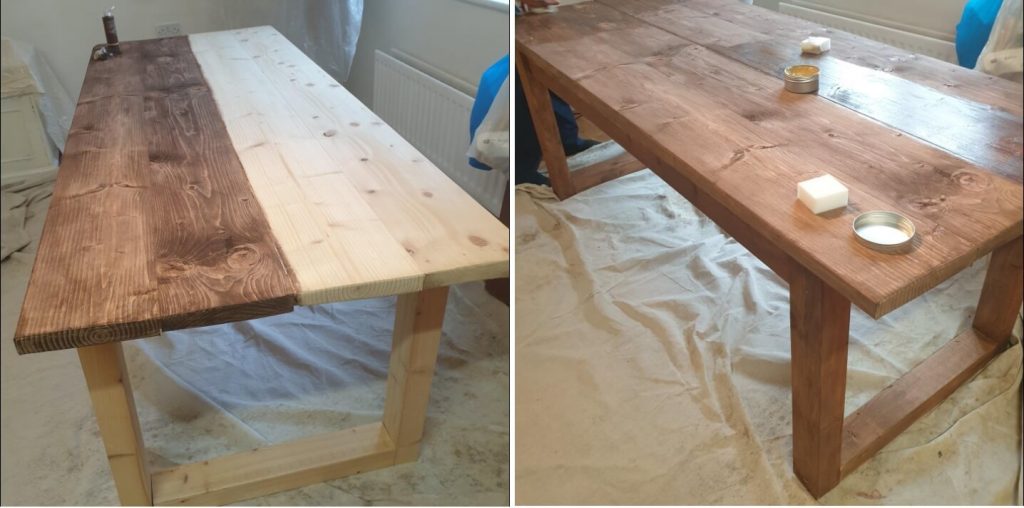
Step 5: Apply the first wood stain
You will find several shades of oak-colored wood stain. For instance, the Weathered Oak oil-based wood stain and the Golden Oak Wood Finish oil-based wood stain do an excellent job on pinewood.
We went with the Golden Oak wood finish for this project after a series of successful tests. To apply this wood stain to your pine boards, saturate a clean, lint-free cotton cloth with the stain and use it to wipe the wood along the direction of the grain.
You could use any motions in any direction while wiping the stain onto the wood. However, it is essential to follow the direction of the wood stain when wiping out the excess, usually after 5 to 10 minutes.
Since this is an oil-based wood stain, you can let it stay on for up to 15 minutes before wiping if you are looking to achieve a deeper color. However, you can wipe it immediately after rubbing it on whenever you want the stain color lighter.
In any of these cases, the most important this is to cover every inch of the wood surface with an even coat of the wood stain.
To achieve that, ensure you apply generous amounts of the darker stain to cover the entire surface, then wipe the excess evenly along the grain.
Step 6: Inspect the surface and apply a second coat if necessary
After the stain has dried fully according to the instructions on the product label, inspect it to see if you like the shade.
We recommend applying a second and even a third coat to make the color as deep as possible before proceeding to the second wood stain.
Step 7: Apply the second wood stain
If you apply multiple colors and let them sit on the surface for at least five minutes before wiping the excess, you will end up with a relatively dark hue.
Now is the time to lighten that color a bit to give it that beige oak magic. For this purpose, we used the White Wash layering color from Minwax. It is a water-based formula, so do not let it sit on for too long before wiping the excess.
Just about a minute should be plenty. You can apply it with a rag or foam brush, but ensure you wipe the excess with a clean cotton cloth along the grain.
This pickling stain should be dry in an hour, after which you can apply a clear-colored topcoat to lock in the color and preserve it.
You also want to be careful with the pickling stain to ensure it does not puddle anywhere on the surface. The best way to avoid such as issue is to wipe before a minute elapses.
Step 8: Apply a topcoat
After completing all the steps above, protect your newly created oak with a transparent film-forming topcoat. Remember that any topcoat with an amber tint will affect the final look, so it is best to buy a non-yellowing product like Minwax’s Polycrylic for this part.
Alternatively, you can use water-based polyurethane. The water-based formula goes on clear and stays clear over time, which makes it an excellent topcoat.
You want to keep the coats thin and sand with fine 240-grit sandpaper between the coats of polyurethane to get the desired texture and look.
Read also: How to paint knotty pine.
Best Wood Stains for Pine to Look Like Oak
Here are the pine wood stains we used in our experiments, and we loved how they turned out.
1. White oak Stain on Pine – Varathane Premium Fast Dry Wood Stain
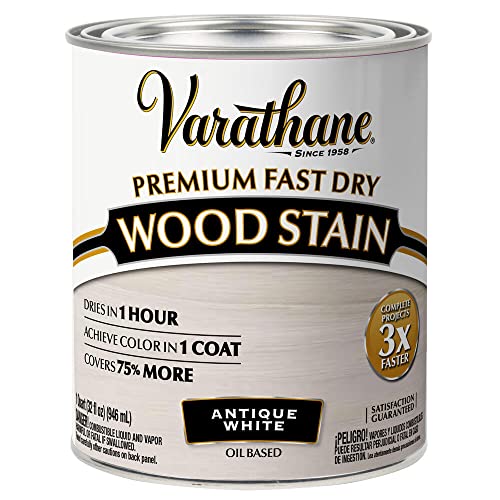
- Ideal for use on all interior wood projects: furniture, cabinets, doors, trim and paneling
- One-coat coverage, fast-drying oil based formula
- Dries to the touch in just 1 hour and covers up to 275 square feet
If you want to go white with your oak-on-pine appearance, there is no better way to achieve that look than with this Varathane Premium wood stain. This white wood stain on pine creates an antique white that makes your pine board look every bit like oak.
It is formulated for indoor use, so consider it for pine wood that you intend to keep sheltered. The oil-based formula is designed for superior coverage in just one coat. However, you can always add another coat for a deeper color.
The high-performance finish will highlight your wood’s grain and bring out its natural beauty, so ensure you don’t skimp on surface preparation to create a smooth, desirable finished look.
2. Weathered Oak Stain on Pine Wood – Minwax Weathered Oak Wood Finish

- RICH EVEN COLOR – Minwax Wood Finish is a deep penetrating, oil-based wood stain that provides beautiful color and enhances the natural wood grain in one coat. It’s perfect for interior staining projects such as wood furniture, cabinets, doors and more.
- QUICK DRYING – Staining interior wood has never been quicker. The special formula allows it to deeply penetrate wood pores within 5 minutes of application, resists lapping, and dries in two hours, making all your wood projects quick, beautiful and easy.
- EASY TO APPLY – Use a clean cloth or wood stain brush to apply this wood stain in the direction of the grain. Wait 5-15 minutes and wipe away excess stain. The longer you wait, the darker/richer the color. Reapply coats for deeper color.
Applying a whitewash over a golden oak stain was not the only way to achieve a weathered oak look on pine wood. A quicker way to achieve that look is to use this weathered oak stain on your pine cutting boards.
After sanding and wiping the board with a tack cloth, prime the wood and follow through with at least two coats of this oil-based stain.
It does an excellent job creating that sophisticated, weathered oak appearance on pine. Its unique formula allows it to penetrate pine deeply, creating a rich, even color—just the way we wanted it.
3. Pickled Oak Stain on Pine – Minwax Color Wash Transparent Layering Stain
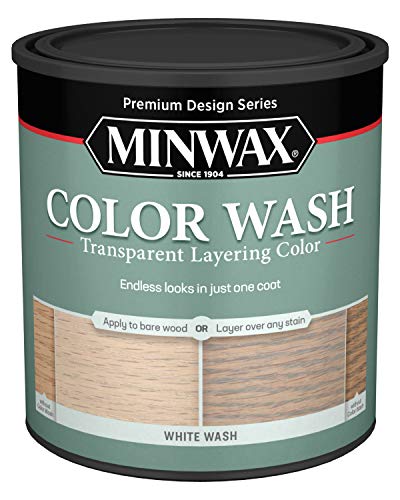
- Adds a touch or age & character to bare or already stained wood
- Apply over oil or water-based stain with a synthetic or foam brush, stain pad or rag.
- Dries in 1 hour. Endless coats in just one coat.
This pickled oak stain does an excellent job adding a touch of character to bare wood, but you can also use it alongside other oak-colored wood stains for layering.
If you seek a weathered look over something like a golden Oak stain, this pickling stain will give you just that. Alternatively, apply it to the real wood if you don’t want a solid color.
It will allow the grain to show while giving your wood a less formal, country appearance. However, what we love the most about the look is its unmistakable sophistication.
When used on bare wood, don’t forget to sand thoroughly and apply a pre-stain wood conditioner to make the wood absorb it better.
4. Golden Oak Stain on Pine – Minwax Golden Oak Wood Finish
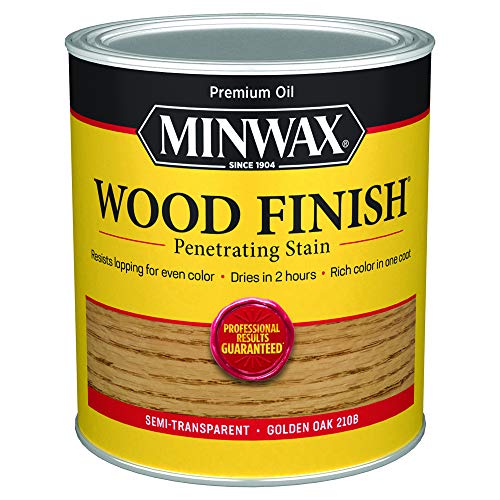
- Is color matched to the standards of the traditional Wood Finish™ line so that your finished results are the same, beautiful, consistent color that you are use to
- Used to enhance any interior bare or stripped wood surface
- Allows recoating in 4-6 hours and dries completely in 8 hours
We love Minwax penetrating stains’ ability to distribute the color across the wood surface evenly. Pine is not the easiest wood type to stain, but this golden oak wood stain has a way around that impasse.
So long as you have prepped the surface and applied a pre-stain wood conditioner, you can be sure to get that premium golden shade you want.
The stain requires only five minutes to penetrate the wood deeply; then, you can wipe off the excess with a lint-free cotton cloth. Regardless of your skill level, you will love the outcome.
5. Honey Oak Stain on Pine – Varathane Premium Wood Stain

- Ideal for use on all interior wood projects: furniture, cabinets, doors, trim and paneling
- One-coat coverage, fast-drying oil based formula
- Dries to the touch in just 1 hour and covers up to 70 square feet
This Varathane Premium wood stain may be your best bet if you prefer your pine with some reddish-brown hues. We love how readily it transforms the pine color into honey in just one coat.
The product is high coverage and dries to the touch in just an hour. You can apply the stain with a paintbrush, but we recommend rubbing it onto the wood with a cotton cloth.
The cloth creates an even coverage and well-distributed pigment across the surface. Do not use this product to treat outdoor pine wood as it will not hold up too well over time. It is ideal for indoor use and lasts for a long time.
Related Post: How to Stain Mdf Board
Conclusion
Numerous wood stains imitate the various colors of oak. While any of these stains will give you the shade you want, following the right steps is essential to achieving professional-looking results.
We hope this tutorial helps you achieve satisfactory results in your pinewood stain job.