Wood filler is an excellent way to fill nail holes, conceal scratches, dents, and other surface imperfections on wooden items like tabletops and more.
But when hiding blemishes on stained wood, the main challenge is to match the patched-up sections with the rest of the wooden surface.
So, is wood filler stainable? Finding the answer to this question can help you know whether it will be viable to fill your wood and touch up any imperfections on its surface or not.
Read along to learn the following;
- Can you stain wood filler?
- What does wood filler look like?
- Tyes of wood filler that can be stained.
- How to use stainable wood filler
- Best wood filler for staining
- Is wood putty stainable?
Is wood filler stainable?
Yes, many wood filler formulations are stainable, but not all of them. Manufacturers often specify their stainable wood fillers on the label to make it straightforward to identify the stainable options from the standard ones.
Staining a standard wood filler will typically make the filled spots look significantly different from the rest of the wood surface. Such an outcome can be undesirable, especially when the light-colored wood stain.
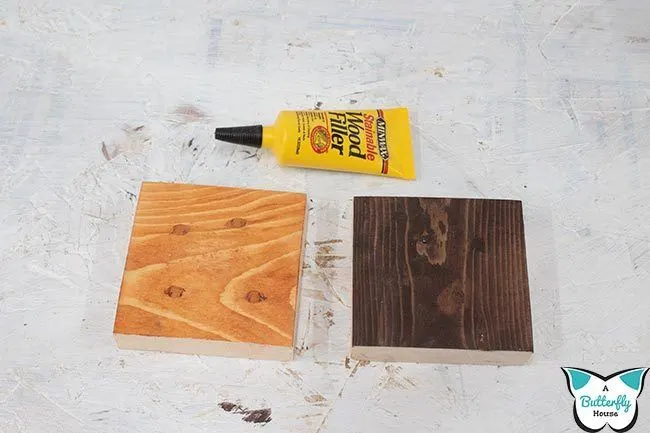
Stainable wood fillers are different in that they have tiny holes in their structure that resemble natural wood pores to absorb the stain.
Still, you will always want to test the product on a piece of scrap wood when staining wood filler to get a sneak peek of the expected outcome.
This way, you will often have the chance to make necessary adjustments in your process to ensure you get the desired outcome.
Types of Stainable Wood Fillers on the Market
Stainable wood fillers come in different varieties that you can choose from. This section looks at the main types of wood filler you can stain.
Epoxy-based wood fillers
Epoxy-based fillers consist primarily of epoxy resin. The whole thing is a two-part organic compound of a resin and hardener (curing agent).
The two parts making up epoxy are often stored separately and form a hard substance once combined.
Mixing the resin and the curing agent creates a chemical reaction that results in a tough compound capable of withstanding tremendous amounts of physical impact without breaking.
This characteristic makes epoxy-based fillers the toughest and most durable of all. On the downside, epoxy wood fillers are more demanding to use.
In addition, you must follow the manufacturer’s guidelines carefully to mix the two parts of epoxy to achieve the desired consistency.
After preparing the epoxy properly, you should use it within a certain window because it begins to harden, so letting it sit around after mixing can result in total wastage.
Epoxy-based fillers are significantly weatherproof, making them perfect for outdoor projects. You can also use them in high moisture environments due to their excellent resistance to moisture and humidity.
Gypsum-based fillers
These stainable wood fillers are generally a mixture of gypsum dust and water. The filler must be used while in paste form as it dries to form a tough composite material similar to a rock or hardwood.
Since gypsum fillers are inflexible when dry, they are not ideal for outdoor applications where temperature changes can be rapid and extreme. They work best in environments where temperatures are relatively consistent, usually indoors.
Gypsum-wood fillers are rarely used on wood. Instead, they are the go-to material for filling gaps and imperfections in drywall. If you’re looking to repair gaps in wood, here are the best wood filler for large holes that I recommend.
Their main advantage is the price. These composites are the most inexpensive of all types of stainable fillers available.
They have a low tolerance to water and can sustain significant damage in damp conditions even after they have dried completely. For this reason, it is best to use this filler in relatively dry locations with low humidity.
Cellulose-based fillers
Cellulose wood fillers are composed of actual wood matter, making them stainable by default. Because of this characteristic, some manufacturers skip the trouble of describing them as stainable in the product description.
However, when you see ‘cellulose’ in the description on the packaging,’ expect the product to be sandable and stainable once it is dry.
In many cases, the manufacturer will indicate on the packaging that the product has actual wood fibers in it.
Since these wood fillers are soluble in water, you can mix them with most wood stains to form richly pigmented wood finishes that fill the surface inconsistencies and color them in one go.
Note that this differs from DIY wood fillers that you make by mixing sawdust with a small amount of wood glue. The glue tends to darken the wood, so you want to add only a drop of it at a time.
While cellulose-based fillers are more expensive than gypsum wood fillers, their prices usually fall under those of latex and epoxy-based wood fillers.
Some, but not all, are also formulated to withstand extreme weather changes, so you can use them on exterior applications. However, you must check the product label to determine if what you are buying is exterior grade before using it outdoors.
Latex-based wood fillers
Latex-based fillers are premium stainable due to their resilience to various extreme weather conditions. So you will often find them relatively highly priced, just like epoxy wood fillers.
They form durable materials that can withstand rapid and extreme temperature changes, so you can use them in outdoor applications.
However, they are easier to use than epoxies because they do not require much preparation before application. The other main advantage of latex-based wood fillers over epoxy fillers is their quick setting time.
Latex fillers can finish setting in an hour, unlike epoxies that can take several hours to set. After this, the surface becomes rigid and resistant to water and moisture.
The material then continues to harden and become more solid and durable. You can sand a latex wood filler into a smooth, even surface or drill it without damaging it.
Latex fillers are ideal for new DIYers due to their ease of use. You do not need any prior experience to create a successful project with these wood fillers.
Stained Wood Filler: How to Stain Wood Filler
When staining wood filler, there are specific steps you must follow to get the desired results. Here is some help.
Supplies for staining over wood filler
- Putty knife
- Stainable wood filler
- Random orbital sander
- Sandpaper
- Vacuum (optional)
- Pre-stain wood conditioner
- Wood stain
- Applicator
- Clean cotton rag(s)
How to stain wood filler step by step
Following the correct procedure when staining stainable wood filler can help you achieve satisfactory outcomes. The steps below should apply across the board regardless of the type of filler you are using.
Step 1: Sanding and wiping the dust
Always begin by sanding the wood to scuff it up for better adhesion. The filling material you choose will stick better to a scuffed-up surface.
Sanding also helps remove any grime or grease likely on the wood surface that could hinder adhesion.
We recommend using medium 120-grit sandpaper for this task. You could use a sanding block for a small project or a power sander for a larger project to move faster. Sanding by hand on a big project can be quite time-consuming.
Once you are done sanding, use a vacuum to remove the excess dust, or just go on and wipe the dust with a tack cloth. You could also use a clean rag dampened with water and wrung thoroughly to remove all the excess water.
Step 2: Applying the wood filler
Your selected wood filler will come with the instructions for application. Ensure you follow these to the letter for the best results.
Most of the time, you will need to use a putty knife to apply the filler. Some manufacturers recommend using a plastic putty knife, but we find metal spatula to do the job just fine.
While plastic putty knives are often recommended to avoid gouging the wood, you may find them pretty flexible, making it hard for you to be effective. So you may just stick to metal putty knives but be gentle and careful while using one on your wood.
Ensure you press the filler firmly but gently into the wood. If used correctly, metal spatulas give the best outcomes. Metal spatulas are also perfect for harder fillers requiring pressure to force wood filler into the holes.
You want to fill it slightly above the wood surface when applying the filler. This measure provides enough material to be sanded away to create a smooth finish.
Step 3: Sanding the wood filler
Here, you will want to use a slightly finer grain of sandpaper, preferably 150 to 180-grit, to make the surface smooth to the touch.
After sanding, use a tack cloth or dampened cotton cloth to wipe away the sanding dust. If you use a damp rag to wipe the dust, ensure you allow the surface to dry completely before moving on to the next step.
Step 4: Applying pre-stain wood conditioner
You could apply the stain without a pre-stain wood conditioner, but the outcome may not be as desired.
The conditioner helps make the stain stick better and more evenly. This is especially important when a wood filer is involved. The wood and wood filler sections will absorb the stain better after conditioning the surface with a suitable product.
Whichever conditioner you choose, ensure you follow the application instructions provided to apply it. This can involve using a cotton cloth or brush to rub it onto the wood and then wiping the excess using a clean rag.
Whichever method you choose, ensure you follow the manufacturer’s instructions, especially regarding drying times.
Step 5: Applying the wood stain
After the conditioner has dried, use your selected applicator to apply an even layer of the stain to your project. Let it stay on for 5 to 10 minutes, and then wipe the excess stain with a clean, lint-free rag along the wood grain.
Let the surface dry, and then observe. If you are not happy with the color, you may add another coat the same way as the first.
Stainable Wood Filler Reviews
Perhaps the most important characteristic of stainable wood fillers is their ability to absorb wood stain the same way natural wood does.
The product should be significantly particulate in its structure, leaving enough pores for the wood stain to penetrate when it is dry.
Here are the products that produced the best results in our tests.
1. Minwax Stainable Wood Filler
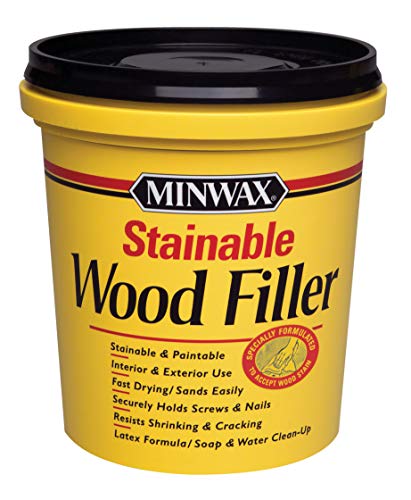
- STAINABLE WOOD FILLER – Minwax Indoor/Outdoor Wood Filler is a stainable and paintable latex formula specially formulated to accept all Minwax stains, including both oil and water-based wood stains.
- REPAIR CRACKS – The durable wood filler is ideal for repairing cracks, small gouges, nail holes, knot holes, and other defects in all types of unfinished indoor and outdoor wood surfaces.
- APPLICATION STEPS - Squeeze a liberal amount of into the area to be filled and press firmly into place, using a putty knife. Fill slightly above surface to allow for sanding while minimizing overspreading on surrounding areas. Remove excess wood putty.
Minwax stainable wood filler is a premium latex-based wood filler designed for both indoor and outdoor applications. It boasts a fast-drying formula, drying in just 15 minutes to allow for sanding and staining.
This means it can significantly speed up your project, which can be a godsend if you are pressed for time. The product is ideal for nearly every wood filling application on interior and exterior wood surfaces.
The formula easily accepts penetrating stains, making it easy to conceal any patched-up areas. In addition, you can use it with both water-based and oil-based wood stains to create professional-looking projects.
2. Elmer’s Stainable Wood Filler
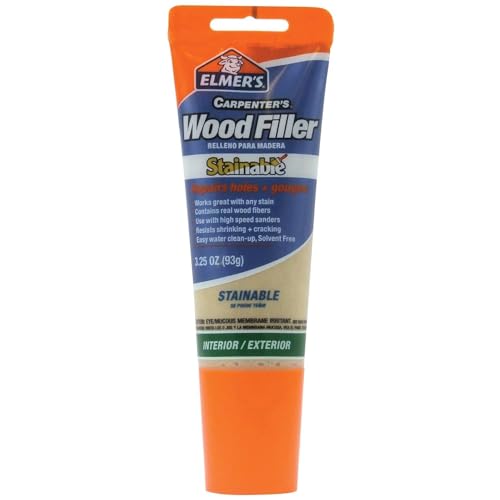
- For interior and exterior use
- Resists shrinking and cracking
- Contains real wood fibers for superior sanding, staining, and painting
This Elmer’s product is another stainable wood filler designed for indoor and outdoor wood surfaces. It is specially formulated to resist cracking and shrinking, making it ideal for use in areas that experience rapid weather changes.
Since the filler is cellulose-based, it contains real wood fibers in its formula. This gives it the texture and appearance of actual wood. So you can sand it and stain it with incredible ease. You can also drill it without breaking the dry composite.
3. FamoWood Latex Wood Filler
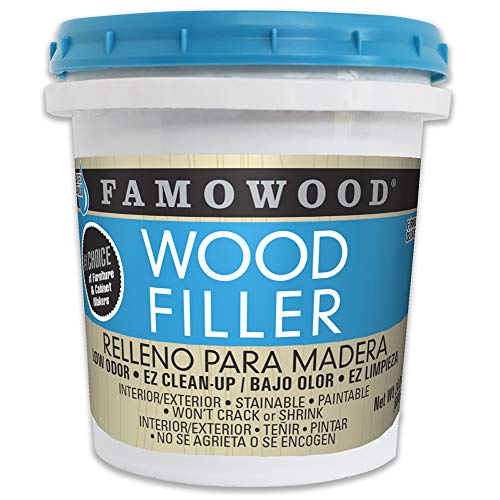
- Dries in 15 minutes
- Won't crack or shrink, solvent free – low odor and easy water cleanup
- Can be sanded, drilled or planed
Just like Minwax’s stainable wood filler, this FamoWood filler dries in just 15 minutes. It is a latex-based product, so it dries to form a strong, durable material that can be sanded, stained, or drilled. You can also drive nails through this filler, and it will not break.
The filler has excellent resistance to cracking and shrinking. In addition, its solvent-free formulation gives it a low-VOC, low-odor quality that is ideal for people with smell sensitivities or allergies. It is also environmentally friendly and easy to use.
The product is formulated for use in exterior and interior applications. Despite this resilience, it cleans easily with water. No wonder it’s the best wood filler for hardwood floors.
What to Consider When Buying a Stainable Wood Filler
Even after identifying a few wood fillers with the characteristics matching your project requirements, it is essential to know how to narrow down to the final pick.
This can be challenging, especially when you have multiple products with close similarities. So, here is what to consider to identify the best stainable wood filler for your needs.
Nature of the project
Factors such as the size of your project and its location will heavily influence the product you can use. For instance, while Elmer’s stainable wood filler may be designed for indoor and outdoor wood surfaces, it may not be ideal for large projects.
In such a case, Minwax’s latex-based wood filler may be a better pick because of its size.
Dry time
The wood filler selected must dry first before you can stain it. If your chosen filler takes several hours or days to dry, it can significantly prolong your project timeline.
Products such as FamoWood and Minwax take only 15 minutes to dry, which can speed up your work. For convenience, ensure you buy the quickest-drying wood filler on your shortlist.
Environmental friendliness
Products such as epoxy-based wood fillers are organic. This means they contain few chemical ingredients, making them environmentally friendly.
It is essential to go through the product description to identify if it contains any toxic ingredients that might harm the environment.
The best wood fillers are low-VOC (meaning they contain less volatile organic compounds) and low odor (meaning they do not release toxic gases into the air).
Range of applications of the filler
A wood filler can be formulated for a specialized purpose or a wide range of uses. For instance, if the filler is sold in a large container, it would be best if it can work for a wide range of applications indoors and outdoors. That way, its chances of going to waste are minimal.
Clean up
Some wood filers, such as FamoWood latex wood filler, clean easily with water, while others may require solvents to clean from surfaces.
Choosing an option that cleans up easily with water may simplify your work, especially if you do not have cleaning solvents at home.
Amount of filler required
Most stainable wood fillers come in small tubes intended for minor wood surface repairs. However, you may have large sections of damaged wood to mend, which would require more of the wood filler instead of wood spackling.
So, when buying a filling material, consider the scope of your project, and choose a product whose size corresponds to that scope instead of several small tubes that may easily drive up the cost.
Read: Best Wood for Dark Stain
How Long Does it Take For a Stainable Wood Filler to Dry?
Most standard surface repairs typically dry in two hours or less, depending on the stainable filler used. However, deeper holes filled in ¼-inch layers may take between two and six hours to dry.
This is when you can sand the filler to smoothen it and prepare it for staining.
How Long Should You Wait Before Applying Stain to Wood Filler?
Oil-based and water-based stains require different wait times, and so do various wood fillers. These factors determine how long you must wait before applying stains to wood filler.
Nonetheless, the wait time for water-based stain should be anywhere from immediately after applying the filler to two hours after the filler has dried. On the other hand, oil-based stains may require 12 to 24 hours of wait times
FAQs
What kind of wood filler can be stained?
Any stainable wood filler with tiny holes in its structure resembling natural wood pores to absorb the stain can be stained. These fillers are specially formulated to absorb oil and water-based penetrating stains.
Does stainable wood filler work?
Yes, stainable wood filers accept wood stain and allow the pigment to spread across their tiny pores, coloring them in the process. Darker stains provide better results closely matching the surrounding stained wood surface than lighter stains. So it may be recommended to go for a dark stain instead of lighter ones when you want your stainable wood filler to work.
Is color-changing wood filler Stainable?
The color-changing wood filler from Minwax is formulated for easy application and easily accepts both oil and water-based penetrating stains. It is an excellent solution for unfinished wood with minor defects on the surface.
Can you stain wood putty?
Yes, wood putty can be stained if it is designed to be stainable. Such wood putty will have the specification on the description to indicate that it can accept wood stain. However, standard wood putty may not accept wood stains properly.
In such cases, a perfect workaround would be to purchase and work with colored wood filler instead.
When staining wood putty, remember that the final color will depend on the type of wood putty used and the type of stain that is applied.
In general, light colors will be produced when a light-colored putty is used with a light-colored stain, while dark colors will be produced when a dark-colored putty is used with a dark-colored stain.
How to hide wood filler after staining
To hide wood filler after staining, ensure you sand the area with the defects and wipe the sanding dust before filling it. Afterward, use medium-grit sandpaper to sand the filling until it is flush with the surrounding wood surface, and then apply a conditioner before staining it.
Does wood filler stain well?
No, wood fillers don’t stain well like natural wood. If you stain the wood filler, the stain does not perfect and appears much darker than the natural parts of the wood. Since they are not made from wood, the filler’s color will not exactly match the color of the natural wood.
Can you stain plastic wood?
Staining plastic wood is quite possible. Don’t be discouraged from staining your plastic wood surface as there is a special finish to use. Apply special polyurethane to the surface, and you will get a color that resembles the real wood stain.
Will gel stain cover wood filler?
Yes, gel stain will cover wood filler. In fact, it’s advisable that you use it for a great finish. This is because the gel stain is thicker and covers the wood filler perfectly compared to other stains. Overall, it’s a great option if you have an imperfection in your wood that you want to hide.
Can Wood Filler be Stained Summary
A good wood filler can fix minor defects such as scratches and dents on wood and major ones like nail holes and broken wood sections.
While this can mean introducing a different color to the wood at the cost of making it an eyesore, using a stainable filler can eliminate the problem.
We hope this guide helps make your next project a success.