Has your living room recently taken on a dated and dingy appearance? Have you often been asked the question, ‘should you sand between coats of paint’?
Knowing when and how to sand your walls is crucial, whether you’re a seasoned painter or enjoy doing it yourself. You can wind up with a lousy paint job if you seldom sand your walls, and when you always sand them, you may destroy them.
This is a helpful guide for learning how to sand walls when painting, including what kind of sandpaper to use. So, let’s get started and discover more!
In this post, we’ll look at:
- Why should you sand between coats of paint?
- When is it crucial to sand between coats of paint?
- How to sand between coats of paint?
- Your options if you don’t want to sand between coats
- My pick of the best sandpaper for sanding between coats
Should you Sand Between Coats of Paint?
Yes, you should sand between coats of paint. Use fine sandpaper to sand between the coats after they are dry. While sanding between layers of paint isn’t always essential, it’s recommended for a smooth and even finish. This is the only distinction between an excellent coat of paint and one that falls short.
Why Sand Between Coats of Paint?
Sanding between paint coats is done for two reasons: to eliminate accumulated filth and provide a completely hardened surface with teeth to bind the next layer or eliminate brush marks or other irregularities for a really smooth texture.
Sanding should eliminate the majority, if not all, of the flaky or cracking paint from the surface, allowing the new paint to cling properly to the area.
Latex paint does not cling well to a smooth or slick area that has previously been painted with oil-based paint. Sanding helps roughen up the area when painting glossy or metal surfaces, allowing for better bonding.
When You Should Sand Between Coats of Paint
Regrettably, there is no universal answer to this dilemma. Before determining whether or not to sand between coats, you’ll have to consider a few variables. Here are a few questions that may assist you in making your decision:
Where Am I Painting?
Sanding between layers of paint is done primarily to obtain a flawless, silky smooth finish. Sanding is not required for many drywall interior paint applications.
On surfaces painted with glossy or flat paint finishes, tiny defects, fuzzies from the rollers, or dirt in the pigment are generally difficult to see.
If you’re employing glossy paints, painting cabinet doors, or painting a surface that will be exposed to a lot of light, you may prefer sanding it between applications to get a completely smooth surface. Remember to sand the primer as well!
What Paint Am I Using?
If you use inferior or old paint, you’ll have more bubbles, dripping, brush traces, and roller defects. These paints lack the ingredients that enable premium paints to achieve a smooth surface.
Sanding between coats may be essential if the paint doesn’t “lie flat” or leaves paintbrush marks after several layers. However, sanding to erase brush strokes may remove all the pigment, so be cautious not to overcomplicate it.
How Long Can This Project Take?
Your paint applications should dry for at least 24 hours before sanding, perhaps prolonging your process by a few days. This is an excellent time to balance quality and speed because the better the standard, the longer a good paint job may take.
The paint must be dry to the touch when sanding between latex paint applications.
What Grit Sandpaper Should I Use Between Coats of Paint?
For various tasks, several varieties of sandpaper are employed. In general, the higher the grit or number, say 60 or higher, the silkier and more uniform the area. It’s best to sand using the finest sandpaper, like 220 grit.
For staining, use 100-grit sandpaper or above, and for smoothing surfaces, employ extremely fine sandpaper with a grain between 360 to 400.
Related Read: What Grit Sandpaper To Remove Stain From Wood
How to Sand Between Paint Coats
It is not tough to perfect the skills of high-quality sanding between paint coats, but it does take some experience. You can go from a novice holiday painter to a proficient painter within only a few hours.
Tools and Materials Required for Sanding Between Coats of Paint
- 180-grit and 220-grit fine sandpaper
- Canvas drop cloth
- Rubber gloves
- Clean cloths
- Shop vacuum
- Tack cloth
- Roller assembly that has a sturdy foam cover
- Plastic sheeting
- Trisodium phosphate (TSP)
- Eye and hearing protection
- Bucket
- Primer
- Orbital sander
- 2 to 2.5-inch paintbrush
- Interior paint of your choice
- Paint tray and liner
Step 1: Covering the Work Area
Shield the floor or any other work surface from paint spills by draping plastic sheets over it. You can further cover the plastic sheet with a contractor’s sheet or canvas drop cloth.
The canvas offers a non-slip layer and aids in controlling paint spillage, while the plastic prevents the paint from seeping through to the flooring.
Step 2: Clean the Surface You Want to Sand
Wear safety glasses and rubber gloves. Mix a TSP compound with warm water according to the manufacturer’s instructions. To eliminate any oils, dust, and filth, soak a cloth in water, wring it dry, and wipe off the surface.
Using clean, lukewarm water and a piece of cloth, clean the surface. Allow the surface to dry completely. Check the section for significant nicks, grooves, and blemishes after drying. If required, fill them with a filler compound using a versatile putty knife.
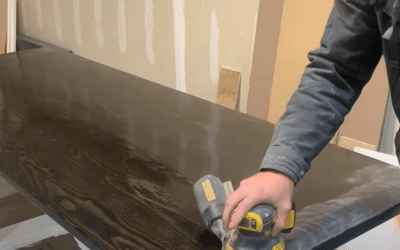
Step 3: Start with Sanding the Flat Surfaces
Protect your eyes and ears by wearing a respirator or dust mask. Using 180-grit sandpaper and orbital sander, sand the smooth, flat sections of the space.
The goal is not to remove all of the layers and blemishes off the surface but rather to even out the face and create some “tooth,” or minor scrapes, to aid in the paint’s adhesion.
Step 4: Sand the Nooks and Crannies
Shift to hand-sanding if you’re sanding a surface with uneven terrain so the paper can better fit the contour of the portion.
Step 5: Remove Any Dust
Cleaning wood after sanding before painting helps remove debris from all areas. Start by using a vacuum that has a brush accompaniment. Using a blower will spread the dust all over the area.
To keep airborne particles to a minimum, make sure the vacuum has a bag and a filtration system. Use a cotton rag soaked in water and properly wrung out to eliminate the remaining dust after you’ve cleared most of it with the vacuum.
Step 6: Priming the Surface
Apply the primer using a paintbrush or roller after thoroughly mixing it. Prime it again using a thin coat if the primer appears translucent on the surface after drying. The primer may have a powdery texture and appearance, but the paint will cover it up.
Step 7: Sanding the Primer
Allow the primer to dry thoroughly before sanding and painting. To avoid scraping the primer, use fine 220-grit sandpaper and minimal force. A brief sweep with the vacuum and a light stroke of a clean tack cloth will eliminate the priming dust.
Step 8: Paint the Surface with a Roller or Brush
It’s better to use a brush for extremely uneven surfaces like furnishings, bare wood, crown molding, and trim. (Also find out the best nail guns for crown molding in the market.)
When painting walls or working on surfaces with vast, flat expanses, using a good-quality roller will speed up the process.
Consider spraying the surface with fresh paint rather than painting it with a brush for a much more polished effect.
Step 9: Sand the First Coat
If you sand and repaint one more time, you can generally get an even smoother finish. The first paint layer is sanded to remove lumps and irregularities caused by the roller or brush.
Sand delicately by hand with 220-grit sandpaper, or mount the paper to a sander and gently rub it all across the area. Besides the mass of the sander, please do not put any pressure on it.
Start opening the tack cloth after sanding, bundle it up but leave it flexible, and lightly rub it all over the area. Excessive tack cloth compression will force the tack cloth’s inherent wax onto the area, which will be unhelpful.
Step 10: Apply a Second Coat of Paint
Apply a finishing layer of paint, as appropriate, with a roller or brush. Following this, allow the paint to dry overnight or more if possible. After the final coat has entirely dried, the paint becomes much more resistant.
Want more tips on sanding? here are 16 methods of how to sand without sandpaper.
What Are My Options If I Don’t Want to Sand Between Coats of Paint
You can use chalk paint to eliminate sanding between coats of paint. If you would not want to sand the area first, adhesive chalk paint is intrinsically a bit of a marvel because it sticks to several surfaces other than the disappointment there’s no waterproof chalkboard paint.
Aside from that, you can use mineral paint. Mineral paint is both non-toxic and waterproof. Water rings, we’ll never see you again! It clings to a slippery surface without any preparation.
However, the disadvantage is that you’re paying for that durability because it’s more costly and comes in relatively tiny doses than most of the other choices.
Best Sandpaper for Sanding Between Paint Coats – HSYMQ’s 24pcs Sandpaper Variety Pack
This is a fantastic selection of sandpaper, ranging from low grit for sanding down the roughest areas to high grain to make your surfaces as smooth as butter. The grit range is ideal for going from minor flaws to a smooth shine.
Additionally, they provide excellent value for the money spent and perform admirably even with rough use. They eventually break down when wet sanding, but they last far longer than expected.
Use that 3000 grit, cover it with a clear coat, and you’ve got yourself a glass-like surface that would brighten up any tabletop, bar surface, bench seat, or anything else!
FAQs
What happens if you don’t sand between coats?
There is nothing wrong with not sanding between layers of paint. But, if you avoid sanding dust spikes and paintbrush marks on the surface, most paints would not bond effectively. The paint coating will peel off or distort with time.
Should you sand walls between coats of paint?
While sanding isn’t essential for every painting endeavor, rough patches on walls, whether painted earlier or not, should be sanded before painting to ensure that the coat goes on evenly.
Can you sand after painting?
Yes, you can! The time it takes for flat paints to dry depends on how wet the surface is. It’s best to wait 12 to 24 hours before sanding it. Allow at least an overnight period for the coat to dry properly. Follow this up with lightly sanding the surface using very fine grit sandpaper after the last application of flat paint. Your subject should look and feel even and smooth.
Do you have to sand between coats of paint?
Yes! If you choose not to sand before painting, you’ll undoubtedly wind up with an odd texture and a coat of paint that peels after a couple of months. Any darker or lighter parts of the area could also show through the coat, which is unsightly and amateurish.
What grit sandpaper should you use between coats of paint on walls?
While the grain of the sandpaper you use may vary depending on the project and the sort of surface you’re working on, consider using 320 to 400 grit. Light sanding with finer grit sandpaper or medium grit sandpaper allows for a thin covering between layers.
Can you sand between coats of Latex paint?
To begin, sand the surface before applying the initial layer of paint for most paint kinds. Conversely, it is unnecessary to sand the wall after each application if you employ latex paint to paint it. If you sand the surface between applications, you risk completely removing the paint.
Should you sand between coats of oil-based paint?
You don’t need to fret if you’re applying the second layer as soon as the first has dried. When you apply oil-based paints to a freshly dried-up area of the same solution, the paint binds flawlessly without sanding. However, if you’re sanding, finely texturing it between layers once they have dried is ideal.
How long to let the paint dry before sanding?
Allow enough time for the top coat of paint to dry before uncovering any rough spots. You don’t want to speed up or rush the color sanding process. The amount of time it takes to dry depends on the paint, but it’s best to wait 12 to 24 hours before sanding. Allowing it to sit overnight might guarantee that it is completely dry.
Should I sand between coats of enamel paint?
Sanding between coats of enamel paint is only necessary if you want to eliminate nibs or defects. On the other hand, you can wipe the surface with soapy water and follow by priming it with a primer.
Do you need to sand between coats of gloss paint?
No, you can paint over gloss without sanding. Unless you’re using oil-based gloss and the coatings are applied a few months ago, you need to sand first. The oil-based gloss takes a while to dry fully, but you will always get a build of dust and grit on the surface, making the surface less than perfect. In this case, lightly sand between coats to ensure you get the best possible result.
Read: Best black spray paint for wood furniture.
Conclusion
Sanding between paint coats varies as per the job and your particular taste, whether you’re an amateur or seasoned painter. However, answering the question, ‘should you sand between coats of paint?’ is a little tricky.
The real kicker is that sanding between each fresh coat will not do any damage. It may take a bit longer and need more attention and meticulousness, but the result after the final coat of paint is usually good enough to justify the additional time and work.