It is so frustrating when you think you have applied a beautiful coat of polyurethane, only to find brush marks or roller fibers on your final coat.
So, it is only natural to ask, ‘Can you spray polyurethane?‘ After all, spraying paint gives it a gorgeous, smooth finish, so why won’t it do the same as polyurethane?
That is a brilliant question, and it is one I’ll answer right now, but with an extended caveat.
Let us get started now.
Can you Spray Polyurethane?
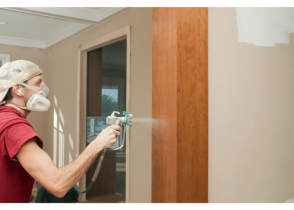
Yes, you can spray polyurethane with a spray gun. Spraying polyurethane gives it a smooth, streak-free finish that is harder to achieve with a brush or a roller. However, not every type of polyurethane can be sprayed.
Always read the instructions before purchasing polyurethane you haven’t used before.
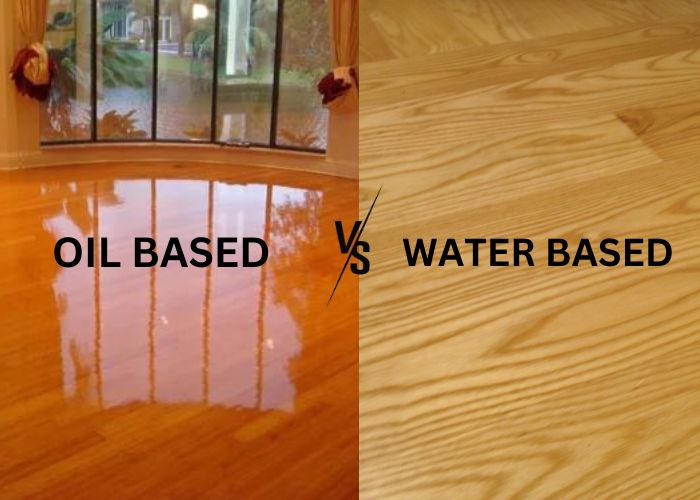
Water Based Polyurethane vs Oil-Based Polyurethane
Polyurethane gives a smooth, gorgeous finish when sprayed, but using the wrong one will give less than desirable results. (Here are some common polyurethane finish problems and how to fix them)
While water-based and oil-based polyurethane do the same thing, they have some unique properties you need to consider.
1. Color
The first thing you need to be aware of is how different they look. In the can, oil-based poly looks yellowish, while water based polyurethane spray looks milkish. When it dries, oil-based polyurethane has an amber hue, and it gets darker over time.
On the other hand, water-based polyurethane dries crystal clear and remains clear for the rest of its life.
This is neither a good nor a bad thing and comes down to personal preference. If you prefer darker, more lively-looking shades, then oil-based poly is fantastic. However, if you want to keep the color of the wood as is, then stick with water.
2. Drying Time
While spraying polyurethane dries faster than when it is brushed or rolled, the wait time for oil-based polyurethane can still be nightmarish. On average, you would need to wait between 5 to 12 hours before the oil-based polyurethane is ready for a second and third coat.
Water-based polyurethane is dry and ready for another spray coat in just 2 hours or less in favorable conditions. Even when you are using fast-drying oil-based ones, the quickest it takes is 4 hours.
If you’re in a hurry and are trying to wrap up your project in one day, you only have one option.
3. Cleaning up
Another factor to consider is how easy or difficult it is to clean your tools when you’re done. Water-based polyurethane spray can be thinned and washed with water and gun cleaning solvent. This makes it easy (and cheap) to clean up any messes along the way, which helps you save time even further.
Oil-based polyurethane is thinned and cleaned with mineral spirits. As you would expect, this takes considerably more time and a higher degree of difficulty.
4. VOCs and Toxicity
Spray polyurethanes are made with isocyanates and emit volatile organic compounds (VOCs), which makes them toxic. This toxicity is heightened when it is sprayed.
Even though both types emit VOCs, it is significantly more in oil-based polyurethane. That is because the chemicals needed to make the oil-based polyurethane contain larger quantities of chemicals containing VOCs.
Therefore, you need to be extra careful when spraying polyurethane. Stay in a ventilated area away from any pets, children, or anyone with respiratory difficulties.
5. Cost
This won’t affect the outlook of your product, but it does affect your expectations. When you spend a lot on a finish, you want it to be worth every cent.
Water-based polyurethane is more expensive, but it does save you time on the project, and the cleaning supplies are also cheaper.
How to Spray Polyurethane
Spraying polyurethane is the quickest way to apply the finish. It also dries much faster, and you get a more even coat. Okay, I think I’ve sold it enough.
I will run through the process of how to spray polyurethane on a surface that has already been prepped, i.e., sanded, stained, and dry.
Also, remember that spray polyurethane is flammable, so you should not apply polyurethane in direct sunlight or near any open flames.
Tools You’ll Need to Spray Polyurethane
- Spray gun or paint sprayer
- Face mask
- Polyurethane (for exterior projects, use the best polyurethane for outdoors)
- Mineral spirits or paint thinner
- Gloves
- 220-grit Sandpaper
- Tack cloth
- Vacuum cleaner
- Mesh filter
- Drop cloth
Steps to Spraying Polyurethane
Step 1: Put on Your Protective Equipment
It’s important to cover your body fully to stay safe from polyurethane. Polyurethane contains volatile organic compounds (VOCs) and isocyanates, which are toxic and can accidentally enter your eyes, nose, or mouth.
These toxins are more likely to cause problems as you are spraying polyurethane. If you are asthmatic or have a respiratory condition, you shouldn’t use a spray or should probably avoid polyurethane entirely until you have consulted your doctor.
The four key items that are a must before your spray polyurethane are:
- Overall
- Gloves
- Goggles
- Respirator
Some people use long clothing instead of overalls, which is fine when you spray water-based polyurethane.
Step 2: Prepare the Polyurethane
Preparing the polyurethane requires you to follow this simple step procedure:
- Stir the polyurethane. Even though shaking polyurethane adds bubbles to it, this isn’t a problem when you spray paint. Stirring the polyurethane will mix any solids and flattening agents (which determine sheen) that have sunk to the bottom.
- Filter the polyurethane using a mesh filter or pantyhose.
- Thin the polyurethane or put it directly into the paint sprayer. Thinning polyurethane gives a smoother finish, but it is not necessary. If you choose to thin the finish with water (for water-based polyurethane) or mineral spirits (for oil-based polyurethane), follow the instructions on the can.
Step 3: Prepare Your Workspace
Spraying polyurethane is hard to control, so the finish will likely end up on other wooden surfaces. Use a drop cloth to protect other items in your workshop you don’t want to be sprayed.
Also, crack open the windows to ensure proper ventilation. If there is a fan blowing in your direction, either turn it away or switch it off.
Step 4: Get Rid of all the Dust
You need to sand the wood before you begin. Use a vacuum cleaner or a tack cloth to ensure no dust is left on the wooden surface after sanding.
Even though you are unlikely to have bubbles when using a spray, you can still get dust nibs, so take your time to clean the surface.
If there is any source of dust around you, you should clean that too, so the fan or air from outside doesn’t blow it on your work.
Step 5: Test the Paint Sprayer
Paint sprayers, just like other motorized tools, can be unpredictable. When you spray paint the first batch, it might splutter, so try this out on a random surface first.
Once you get a smooth, even flow, test it out on a small part of the wooden surface. This is important because you may or may not like how it looks.
Oil-based polyurethane will add an amber tint to your wood. If you don’t like how it looks, then you should switch to a water-based finish.
You should also test out water-based polyurethane because despite drying crystal clear, it can still cause discoloration or yellowing when applied on white-painted surfaces.
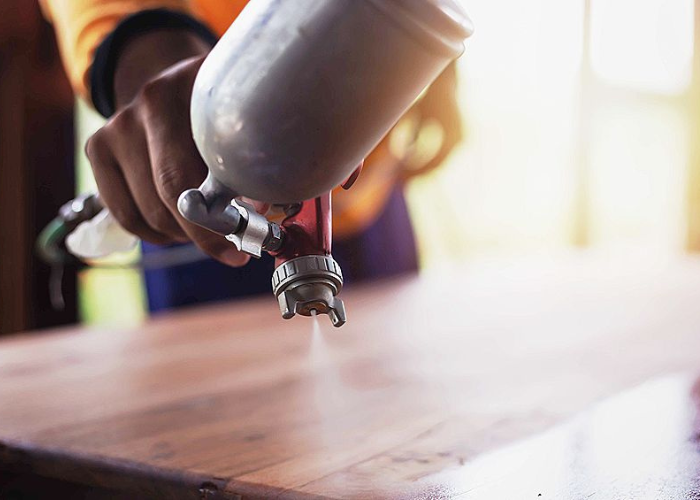
Step 6: Spray the First Coat of Polyurethane
Holding the canister 10-12 inches away from the surface, start spraying the first coat of polyurethane before it comes in contact with the wood, so you don’t spray too much on one spot. Keep your wrist stiff and apply the finish in a sweeping motion and continuous movement, ensuring you don’t stay on one spot for too long to avoid runs and drips. This is more common on vertical surfaces.
Try to finish spraying the surface in one motion. Also, keep the coat thin, as it will dry faster, and you’ll be able to evaluate your progress better.
Step 7: Wait for the Wood to Dry, Then Sand
Spraying polyurethane takes between 2 to 4 hours to be dry completely and ready for a new coat. Once it is dry, use 220-grit sandpaper to eliminate dust nibs, uneven spots, or runs.
Sand gently, following the grain of the wood. Don’t go too deep, just enough to make the surface even, and give it enough roughness for the next coat to cling to.
Step 8: Get Rid of the Dust Again
After sanding, bring out your vacuum cleaner or tack cloth again. You need to be patient while doing this because there will definitely be dust particles hanging around, waiting to be blown back by the spray.
Make sure you get into any holes or crevices that dust might hide in.
Step 9: Apply Another Coat
Apply the second coat just as you did the first one. Also, test it out on unfinished wooden surfaces first to ensure the spray is still working correctly.
Once you are done with the second coat, repeat steps 6-9 until you reach the desired final finish. You usually need about 3 or 4 coats for a smooth finish.
When you are done, allow the polyurethane protective coating to cure fully before you can place heavy items on the surface. This would take about 3 weeks for water-based polyurethane and 4 weeks for oil-based polyurethanes.
Read also: How to thin rustoleum oil based paint.
Tips for Safely Spraying Polyurethane
Spraying polyurethane can be quick and pretty, but it can also be painful if you don’t know what to watch out for. To ensure a smooth finish, here are some things to watch out for:
- Watch out for runs and drips when you are spraying poly on a vertical surface
- Always spray very thin coats and don’t go over it until it’s dry completely
- If you do get runs, use a sharp razor blade to gently remove them
- Always spray in clear light, and look at the piece from different angles, so you don’t miss or overspray any area
- Have all of your safety and cleaning tools ready before you begin application
What is the Best Sprayer for Polyurethane?
1. Best for Water-Based Polyurethane – HomeRight C800971
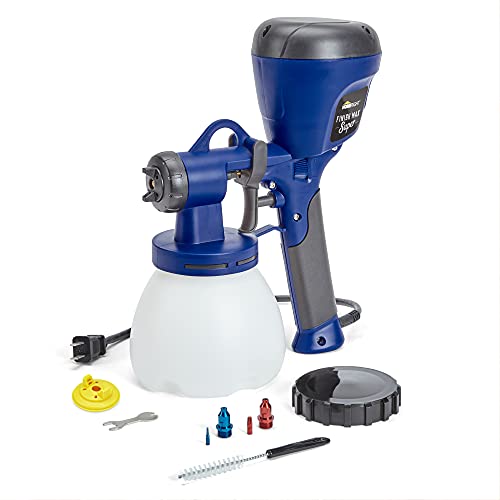
- PAINT SPRAYER FOR COUNTLESS DIY PROJECTS: The HomeRight Super Finish Max paint sprayer offers the ultimate DIYing experience. It’s great for applying a great finish on small to large projects like fences, decks, furniture, cabinets, dressers and more.
- ADJUSTABLE SETTINGS TO SUIT ANY PROJECT: You can adjust the air cap to spray horizontal, vertical, and round. You can also adjust the material flow control knob to quickly increase or decrease the material output
- MORE POWER=SPRAY MORE MATERIALS: Offers 450 watts of powerful spraying experience. It sprays a wide variety of paints and stains such as chalk type paint, milk paint, latex paints, enamels, primers, clear sealer, polyurethane, stain and varnish
Water-based poly is great for a larger project due to the quick drying process. That is why it is important to use a polyurethane spray gun that is light, easy to use, and doesn’t consume a lot of power. The HomeRight Super spray guns ticks all of those boxes.
This is a multi-purpose paint sprayer that can be used with a wide range of polyurethane finishes on a wide range of indoor and outdoor jobs, from small desks and cabinets to floors and fences. It also runs on just 450 W of power, which is great for large projects.
Besides being energy-efficient, you can also easily adjust the spraying flow and type using a volume control knob. The air cap can spray in three directions: horizontal, vertical, and round. This can be used on other paints such as chalk paint and milk paint.
This HomeSpright HVLP spray gun for woodworkers comes with three brass spray tips. These offer better consistency than plastic tips. They are also corrosion and wear-resistant.
The one drawback about this best polyurethane spray gun is that it is not as easy to clean as some of the other excellent sprayers.
PROS
- Energy-efficient
- It can be used for indoor and outdoor projects
- Works with different finish types
- It comes with interchangeable brass tips
CONS
- Tricky to wash
- It doesn’t come with a viscosity cup
2. Best for Oil-Based Polyurethane – YATTICH Paint Sprayer

- 【3 Spray Patterns & 5 Nozzle Sizes】Paint sprayer can be adjusted to 3 different spray patterns: horizontal, vertical and circular, and equipped with 5 size nozzles (1.2mm/1.5mm/1.8mm/2.5mm/3.0mm) for any painting projects, such as furniture, cars, fences, interior walls, garage doors, garden tables and chairs etc.
- 【Perfect Design For User Experience】Detachable, making it easier to use and clean; the paint output can be controled by adjusting the flow control knob on the sprayer to obtain different paint output; The 6.6ft power cord is long enough to allow you to move freely within a larger work area.
- 【High-Quality Materials】Using copper nozzles can withstand pressure more than plastic nozzles, and is less prone to clogging. It can also make the spraying surface more concentrated and more uniform. The use of double-layer insulation materials allows you to avoid worrying about any safety issues during operation.
The Yattich Paint Sprayer takes versatility to a different level. This high-powered spray gun comes with five copper nozzles, making it great for a wide range of applications. You can use this polyurethane spray gun with nearly any type of poly finish and surface inside and outside the home.
This product has three spray patterns – vertical, horizontal, and circular. You can also adjust the volume control knob to release more or less liquid.
Given how thick oil-based polyurethane is, one thing to watch out for is clogging. However, these nozzles are copper, so not only do they offer better spraying output, but they are also less prone to clogging. Plus, if you clean them after every use, that won’t be a problem.
This unit is detachable, making it super easy to clean after every job. Another feature we love is that it can trap moisture and dust, which is critical when applying oil-based polyurethanes.
Finally, you get a full kit complete with a viscosity cup, fluid nozzle cleaning needle, cleaning brush, spanner, and lid pot. With all these features, you’ll agree that it is the best paint sprayer.
PROS
- 5 copper nozzles
- It can be used with a wide range of finishes
- Very easy to clean
- Dust and moisture resistance functions
CONS
- Small paint container
- It cannot be operated by battery
FAQs
Can You Spray Oil-Based and Water-Based Polyurethane?
Yes, you can spray both types of polyurethane. The spraying method for both types is the same; you just need to read the instructions and thin the polyurethane paint accurately.
You should note that not every brand of polyurethane can be sprayed for various reasons.
Also, remember that you need to keep the room properly ventilated when spraying oil-based polyurethane especially, as it has a strong odor.
Is it Better to Spray or Brush Polyurethane?
Whether to spray or brush will depend on the project you’re working on:
- If you’re working on a plain surface like a tabletop, spraying is ideal as it’s able to cover all areas easily and quickly.
- If you’re working on a curvy or edgy project like table legs, brush, so you can get between the cracks and edges better.
Take note! Trying to fill the cracks with a sprayer would mean you have to stay on one spot more prolonged, which will cause an uneven polyurethane coating.
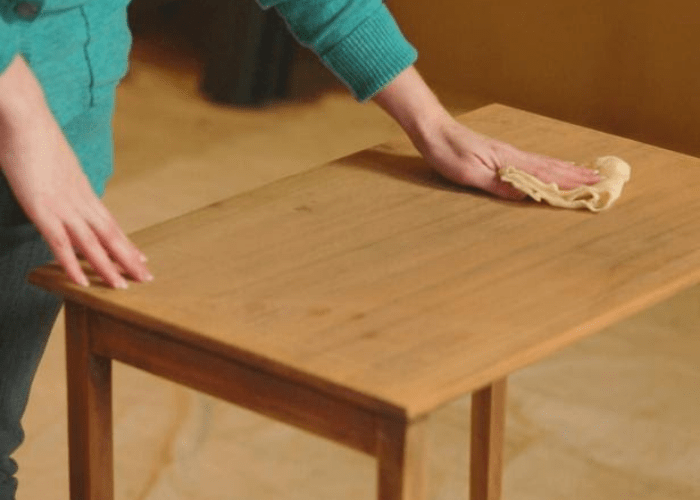
Pitfalls of Applying Polyurethane with a Brush
Traditionally, brushes have been the go-to tool for applying polyurethane. However, applying polyurethane with a brush can be problematic, particularly when you’re just starting out.
However, some problems are common to all users, both pro and amateur alike:
- You have to sand between coats, which makes the process longer and more expensive if you need to hire sanding machines.
- It takes a longer time to dry than when you spray. Spraying leaves a much thinner coat than brushing, which is why it dries quicker. When you’re working on a large project, this can be frustrating.
- Brushes often leave streaks and drops. This is more common for new users. However, no matter how good you are, if you’re not using the best paint brush for polyurethane, you will end up with streaks, which will need to be sanded.
Is Spraying Polyurethane Toxic?
Yes, spraying polyurethane can be toxic as it releases VOCs into the atmosphere. That is why you must wear protective clothing when applying polyurethane.
VOCs cause a wide range of health problems, so ensure you follow the instructions properly. On the plus side, polyurethane toxicity ends once it dries.
Do You Have to Thin Polyurethane Before Spraying?
No, you do not have to thin polyurethane before you spray it. However, thinning can help you get a smoother, more even finish.
Use water to thin water-based polyurethane and mineral spirit or paint thinner for oil-based polyurethanes. If you don’t know if you have thinned it enough, test it out on a small parts of the wooden surfaces.
Do I Have to Sand Between Polyurethane Coats?
No, you do not need to sand between coats of spraying polyurethane. However, some manufacturers and products require sanding, and even when it doesn’t, it is an excellent practice to maintain. At this point, the question “is it necessary to sand between coats of polyurethane?” often arises.
Sanding between poly coats will get rid of any dust nibs or unevenness in the application. Sanding also makes the surface a bit coarse so that the next coat of polyurethane adheres better.
Can I Spray Minwax Polyurethane?
Yes, you can spray some Minwax products such as minwax fast drying polyurethane. Minwax has a wide range of oil-based and water-based poly, some of which can be sprayed.
Minwax also has an aerosol polyurethane, so you don’t need a paint sprayer for that, and it works just as well.
Next, read this article about the top finishes for rifle gun stock.
Bottom Line
Spraying polyurethane is the fastest method for applying polyurethane, not including the preparation time, of course. However, what you lose in prep, you gain from how quickly the finish dries.
As long as you follow the instructions, you will get a smooth, buttery, professional-looking finish without the hassle of a foam brush or roller.
That’s it from me. I hope you enjoyed reading this article. Let us know what you will be spraying the polyurethane on. If it’s a hardwood floor, be sure to check out our reviews on the best water-based polyurethane and best oil polyurethane for floors.
Can I use an air sprayer to apply water-based polyurethane or even oil-based poly? If I can, do I use the external mix nozzle or the internal mix nozzle? Thanks.
Great information.
easy to understand.
thank you for your time putting this together.
Chris Johns
Welcome Chris
Can I spray Minwax water borne Polycrylic with an HVLP System?
Sure! Thin it a little and expect it to have one to two shades less sheen. Finish with a fine sanding sponge and one coat of hand-rubbed poly for a great finish.
This is great! If you’ve already sprayed water based poly but ran out, can you brush on water based poly once completely dry?
Yes. I’ve done it many times. I use spray on for the really hard to reach parts and brush the other parts. Water based is water based.
Thank you for this article.
I was not Satisfied with the results with applying poly with a brush,and wasn’t sure about spraying it.
I don’t have a sprayed yet, so I will definitely check out your recommendation for the oil sprayer.
Thanks again
Steve
Wonderful article, thank you!
What are one or two of your favorite water based polys to spray? I’ll be using an airless sprayer.
Thanks!!
Thanks David! Your overview is very informative, and has helped clarify some questions I had about spraying poly. I appreciate the time you took to post this!
Glad you liked it.