Whittling is as old as human beings. You can use this art to make essentials such as seats, cooking sticks, spears, and walking sticks.
Traditionally, the whittling pocket knife was the only tool used. But today, more sophisticated carving tools are used.
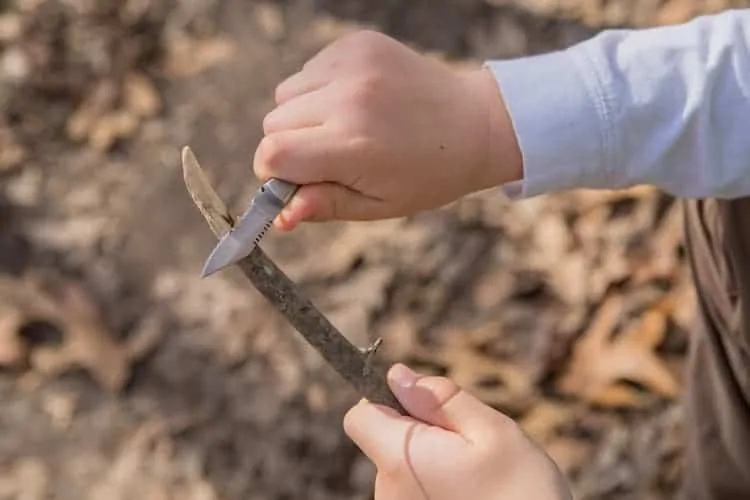
In this post, you’ll learn how to whittle a stick and the tools you need for this project.
Tools Required
To get good results in stick whittling, you may need the following items:
- A wood stick of an appropriate length
- Pocket knife
- Carving knife
- Chisel
- A mallet
- Sandpaper
- Stain
- Gloss/ Linseed Oil
Choosing Wood for Whittling Sticks
Finding appropriate pieces of wood could make your stick-whittling exercise easier. For example, you may buy pre-cut wood or blocks or cut a fresh branch from a tree.
Basswood is one of the most commonly used materials. It is ideal because it’s soft and doesn’t show much grain. Besides basswood, you may whittle various products from pine wood or cedar.
Other than the dry wood, you may whittle various products from greenwood. This is freshly downed wood featuring more moisture. But if you’re looking for the best results, use wood with fewer gains.
Also, hardwood could be effective because it accentuates the details better. But unfortunately, working on hardwood is demanding and requires a lot of patience and experience.
Also, the job is tiring and may consume your precious time. As a result, I consider basswood to be the best wood for stick whittling.
Using a quality carving knife is essential whether you plan to practice stick whittling as a hobby or a source of income. So, the big question is whether you should use a Pocket knife or a specialty whittling knife.
Fortunately, you don’t need a sophisticated or expensive knife for stick whittling. In ancient times, whittlers used the regular pen knife to make impressive artwork.
Thus, pocket knives are the most preferred tool. It’s easy to carry around and versatile enough for different uses during the process.
The pocket knife comes with different blades, giving you various cutting choices. But using the knife requires patience and great mastery of the carving skill.
Alternatively, instead of pocket knives, you may use a specialty knife. It features carved blades that come in handy when making bows and carves.
But the challenge you will face while using the specialty knife is that it requires some special skills to sharpen it. Nevertheless, using the knife allows you to work faster and produce quality products.
Types Of Whittling Cuts
There are various methods to follow when whittling cuts. The methods range from rough cutting to the push stroke to pare cut (pull stroke). Here are the details:
Rough Cutting
One of the easiest ways of whittling wood, this method is mostly preferred by amateur stick whittlers. Still, the experienced whittler may use it to outline the wood carving shapes.
Of course, you’ll have to use precise cutting methods for finer details in this case. Straightaway rough cutting allows the carver to whittle away pieces of wood in a sweeping motion.
It allows you to carve without letting the knife stick into or split the wood. Remember to make thin cuts to achieve impressive wood carving results.
The Push Stroke
Here is another method for first-time wood carvers. The push stroke method requires you to hold the knife such that it cuts in a motion away from the body. Move the right hand out as you carve the wood to protect you from injuries.
The right hand should help you control the cut you make. For example, when whittling, ensure the knife faces you while the left thumb pushes the blade. Also, use the right hand and the fingers to steer the direction of your knife.
I use my thumb to push through to enable them to exert some force and make precise cuts.
The Push Cut
This method systematically removes the excess wood from the block you are working on. While there are various methods of achieving this, the best way is to hold the blade with your right hand while the left hand holds the wood.
Next, remove unwanted pieces of wood with the knife’s motion moving away from the body. The push cut method is easier to master regardless of your experience level. It only entails pushing the knife away from the body.
Make the cuts in quick succession because the ultimate goal is to remove the excess wood.
Thus, you needn’t get to the finer details. However, this method may come in handy whenever you find it inappropriate to employ the pairing cut. I find it the case whenever the distance is small, but I still need to reduce the dimension of the wood.
The Pull Stroke
I recommend this method for making a detailed cut in whittling. However, ensure that you take the necessary protective measures, including wearing hand gloves.
The pull stroke involves cutting the wood while moving the pocket knife towards the body. Hold the wood in your left hand and use your right thumb to pull the pocket knife if you’re right-handed.
How To Whittle A Stick – Step-By-Step Process
We have learned more about the tools you need and the safety measures you must take when carving objects from wood. Next, we’ll take you through the step-by-step process of stick whittling. Here are the things to do.
Step 1: Sourcing Your Wood
Finding a suitable wood piece is important and determines the outcome. When choosing your piece, ensure the wood is not too dry since it is easier to cut and sculpt fresh wood.
Also, if you decide to use a tree branch, ensure it doesn’t have too many knots. Cutting through knots is hard, and your outcome may not be as attractive as you want.
Trees that you can use to source good pieces of wood for whittling are sycamore, willow, and silver birch. If need be, you can also use actual wood such as limewood, apple wood and alder.
These are trees that have been tested and guarantee beautiful wood carvings.
Step 2: Curing Your Blank
Although carving green wood is much easier, certain types of wood require adequate drying and curing before use. For instance, you may come across some softwood types that contain excess water.
So, whittling them before they dry up may result in the shrinking and cracking of your artwork. Drying and curing the blank entails storing it in a cool, moisture-free place.
Step 3: Cleaning Your Stick Blank
You’ll need to clean the stick blank, especially if you had stored it in a dusty room for a while. When cleaning, use a soft piece of cloth to clean it.
Alternatively, you can use a feather duster to brush over the stick blank and remove the dust. If there are crevices, insert a soft piece of cloth and rub thoroughly to get rid of the dust.
Step 4: Remove Blemishes and Rough Spots
Blemishes and rough spots make your carving less attractive. As a result, remove them by sanding your project. When sanding, use 60-grit sandpaper to remove the blemish and rough spots effectively.
Check out the tiny crevices that could trap dust and sand them correctly. Sanding is important since it delivers a smooth and attractive look to your carving.
However, it may not remove grooves and crevices. In this case, scrape the surface using a mallet and wood chisel to enhance the appearance of the crafts.
Scraping also helps to remove excess wood and make the surface clean. You can use a bench knife to smooth the edges of your carving.
Step 5: Round the Edges
Creating round edges on sticks could be challenging, especially when working with wood that features a straight grain. However, with enough whittling experience, you’ll agree it’s a simple undertaking.
You may use a file to smoothen the sharp edges on your crafts. Also, filing the stick strips away wood slices to give it a smooth finish.
When filling, rub the file against the edges to reduce their sharpness and remove any unwanted marks. Once you’re done, use sandpaper to smoothen the surfaces.
Step 6: Staining the Stick
The grain on carved crafts makes them look attractive. But you can further enhance your craft’s appearance by staining them using the best paint brand for wood crafts. Alternatively, you may use a wood stain for a custom, rustic look.
But to get the best results, you must follow the correct procedure. Here is what to do when staining your wood crafts:
- Cover parts of your carving that you don’t want to stain
- Apply an even coat of stain using a stain brush. Let it dry for 2 hours before applying another layer
- I encourage applying thin coats to prevent streaking or dripping
- If you notice streaking and dripping, let the stain dry and use 100-grit sandpaper to remove them
Why Stain Your Carvings?
- Staining adds life to the wood and protects it from excessive moisture and dirt
- It protects the carvings from gaining excessive moisture
- It makes the wood attractive
- Enhances the color grain of the wood
Preparation:
Before staining your crafts, you must prep them properly.
- Use quality sandpaper to remove the blemishes. 180-grit sandpaper will do a good job
- Use a file to round all the edges
- Ensure you don’t under-sand or sand certain parts excessively- sanding should be uniform
- Apply your favorite stain
Step 7: Applying Finish
The final step in making your carvings sparkle is to give them a final finish. You may do this by applying a coat of boiled linseed oil.
Alternatively, you may apply a coat of polyurethane gloss finish. It gives the wood extra protection and makes it shine.
Step 8: Clean Your Knife
A knife is a crucial tool in stick whittling. I use it to remove excess wood and shape the stick into the desired shapes. You should offer proper care and maintenance to guarantee a long service span.
After carving, you’ll want to clean the sharp knife and store it to wait for the next task. How should you clean the whittling knives, you may ask?
Start by removing dirt from the knife blade. Next, wash the handle with soap and rinse it under running water. Finally, use a clean dish towel to dry it and apply some oil before storing it.
Safety Tips When Whittling Wood
Taking adequate safety measures is critical when engaging in stick whittling. But, of course, it takes time to perfect whittling.
Consequently, if you are starting, you must do certain things right to guarantee your safety. This also ensures that you stay long in the game and become perfect.
Take it slow
Stick whittling can be enjoyable if you master the art and avoid accidents. Therefore, going slow and taking your time when working on the wood is vital. Use the right tools always and work at your pace.
Use a sharp knife
The pen knife is one of the tools you will use in stick whittling. So, ensure that the knife blade is sharp to reduce the force you apply. Note that a blunt knife exposes you to accidents.
Besides using additional force, working with a blunt knife requires more attention and control. Losing your attention could result in a fatal accident.
Thus, whether you use a straight whittling knife, chip knife, or sloyd knife, ensure they’re sharp and up to the task.
Wear hand gloves before carving
Stick whittling exposes you to sharp knives and swift strokes, which can injure your hand. So, wearing special carving gloves can help mitigate the risk of accidents. Alternatively, you may opt to use a thumb guard or pad to protect your fingers from injuries.
Stick Whittling Ideas: 3 Things To Whittle From A Stick
Whittling a Spear
You can whittle a spear by looking for a tree branch about your height. Still, anything longer could be better. First, however, ensure the pole is more than one inch thick.
Typically, the thicker it is, the better your chances of whittling a perfect spear are. Do not carve a spear from a thinner branch or one with knots since they tend to break easily. Instead, use a thicker one.
Start by carving out the tip using a knife. First, use the knife for whittling away the bark of the wood and other unwanted pieces of wood. Then, plane it until it’s smooth.
Whittling a Walking Stick
You may also whittle your own walking stick if you have the appropriate tools:
- It would be best if you had a piece of wood of the correct length and thickness. Typically, a piece of wood measuring half your height is your best bet for a walking stick. Here’s the best wood for walking stick you can use.
- Start the job by using the knife to whittle the greenback. Afterward, let it dry for a day and use the knife to remove the unwanted wood.
- Use a file to round the edges of your walking stick.
Whittling an Owl Bookmark
Making an owl bookmark is a complex but doable exercise. All you need is a knot-free stick, a carving knife, and the technique.
Split your stick right in the middle and use a whittling knife to smooth its top. Next, make two shallow cuts at the top. The cuts may form letters X or V. Use sandpaper-grit to smooth it out to enable it to fit in a book and use it to mark the pages.
If you’re interested in expanding your woodworking skills and learning how to create impeccable bowls, consider exploring our recommendations for the best wood lathe for bowls. This tool can be instrumental in your woodworking journey.
FAQs
Can you whittle a stick?
Stick whittling is one of the easiest ways to get into wood carving. Whittling as art involves carving different shapes out of wood using a knife. While whittling seems like a basic form of wood carving, it requires caution, practice, and patience.
What makes a good whittling stick?
Basswood is the most common wood used to whittle sticks. It’s soft and features minimal grain, making it easier to work with/ Other types of wood that make a good whittling stick includes pine and cedar.
What should I whittle as a beginner?
Branches and twigs from various tree types are great for whittling. I find it enjoyable sitting around a bonfire, whittling away at a tree branch, and interacting with my buddies. Consider carving wooden knives if you’re looking for a popular item to whittle from a twig or branch.
What is the difference between wood carving and whittling?
While they are occasionally used interchangeably, carving and whittling are different forms of art. Generally, carving involves using chisels, gouges, mallets, and sometimes power tools such as lathes, including the best wood lathe for the money. On the other hand, whittling only involves using whittling knives to create shapes or patterns.
What wood is good for beginner carving
I recommend using softer woods that rank low on the Janka hardness test for carving, especially for beginners. These woods include Aspen, Basswood, Balsa softwood, White Pine, White Willow, Silver Maple, Butternut, and Box Elder. Softwoods like Balsa are easy to cut, so they lessen the force needed and minimize tool damage and injury risks.
What is the hardest wood to carve?
Here are some of the hardest woods I’ve tried to carve. They include;
- Lignum vitae
- Snakewood
- African Pearwood
- Piptadenia Macrocarpa
- Brazilian Olivewood
- Brazilian Walnut
- Brazilian Ebony
How do you cut irregular shapes in wood?
Using a scroll saw, you can cut carves and jigsaws, among other irregular shapes, into the wood. A scroll saw allows you to achieve more delicate and detailed cuts.
Next, read on: What is the best whittling kit for beginners?
Conclusion
With wood, you can whittle products that are not only durable but attractive. But to do this, you need the necessary wood carving skills, which you can only achieve through continuous practice.
Thus, if you are a beginner passionate about learning how to whittle a stick, spend time practicing with different stick whittling projects and hone your skills.
If you’ve whittled a stick before, leave a comment telling us what you’d do differently next time.