Combine performance with style, and right there, you have the demand for engineered wood. Not only do these come in a wide range of stains, but they also enhance the overall appeal of your hardwood floor.
Now that you can already imagine the retro look of your house, the top layer of your plywood flood might appear dull. So, it’s obvious that you’ll consider refinishing your engineered hardwood floors.
But, there’s still something that you should know about! Before you start varnishing the engineered wood floors, there are cautions and care that your existing surface demands.
So, can you refinish engineered wood floors? Let’s find out
Can You Refinish Engineered Hardwood?
Yes! Refinishing engineered hardwood flooring provides a new look to your house and offers longevity to your beautiful floors. However, refinishing wood floors is a good idea if your installed flooring wear layer is thick. The greater the thickness, the more sanding you will need to do.
What is Engineered Hardwood?
Engineered or manufactured hardwood appears like regular timber but differs from your standard natural wood planks. Essentially, it’s a thin layer of wood applied as a coating or veneer on top of the plywood to enhance its durability.
Such laminate flooring does not need stains or a clear polyurethane finish that leaves a peculiar smell behind. At the same time, this solid hardwood flooring enhances the visuals of your interiors because of the shades and varieties they come in.
In addition, if you’re a flooring fanatic, you can refinish your engineered hardwood floors, keeping the installed multiple layers in mind.
Read Also: Is Manufactured Wood Good?
Things to Consider Before Refinishing Engineered Hardwood Flooring
Whether you’ve just hired a flooring contractor or want hand scraped surface treatment at home, you need to consider the engineered hardwood’s requirements.
Doing this will help you save time and give your existing floors the right surface treatment without causing any damage.
Type
Before you begin the process, it’s crucial to analyze the type of wood your home surfaces have. Usually, people don’t realize the difference between real hardwood and similar-looking plywood.
Most of the time, laminate flooring will cover the surfaces of your houses. Even though these might give you the appearance of natural hardwood, they are just embossed synthetic fibers on top of your regular floors.
You can figure out the difference by how artificial or ‘plastic’ it feels.
Thickness
Engineered hardwood is a durable alternative to solid wooden flooring. These options mimic the look of dark wood floors with the combination of thick veneer on top of the plyboards.
Since the base is usually thin, you need to gauge the thickness of the engineered hardwoods before you start sanding. Your aim must be to scrub off the upper surface of your hardwood flooring without causing any scratches on the plywood under it.
How Often Can You Refinish Engineered Hardwood Flooring?
Going by the look of the engineered hardwood floor, you might think that you can coat it with veneer as many times as you want. However, there’s a limit to it.
While solid wood can tolerate several rounds of refinishing, your engineered hardwood floors can withstand only one or two. So, if you want to refinish engineered hardwood flooring, you must keep in mind how much gritting it allows.
Usually, the professional flooring contractor can go as far as scraping 1/16th thickness of the wear layer during surface treatments with veneer.
But, if you’re not careful, you might damage the plywood with the heavy-duty scraping of thinly engineered hardwood floors.
Ways to Refinish Engineered Flooring
Your method of dealing with engineered hardwood floors depends on what you want to achieve with refinished living room floors.
Not all wood types can handle the same surface treatment. So, consider your final look for your floor before beginning with surface cleaning and coloring your plank.
Glazing
This is your go-to method if you have engineered floors with a thin veneer. With this procedure, you don’t have to sand the surface and go straight to adding shine and stain to your room floors.
Refinishing with Sanding
This is the most popular method of providing a different touch to your usual hardwood floors. However, it works the best on the planks with good enough thickness to allow proper refinish.
Tools required for refinishing engineered flooring
Now that you have analyzed the current state of your flooring in line with how much you want to alter it, it’s time to visit the hardwood store.
Keeping all the necessary ingredients close helps you swiftly finish your solid hardwood floors’ refinishing. Also, it will leave you with no excuses to make you postpone fixing the heavily-eroded surface layers in your basements.
Here’s a list of engineered hardwood products that you must keep handy ahead of the refinishing process:
- Pencils to mark the area
- Masking tape
- Hammer
- Molding bar or putty knife
- Orbital sander
- Plastic sheeting
- Sandpapers of different coarseness
- Protective coat for moisture resistance
- Floor stain options
- Polyurethane sealer (How to choose the best polyurethane finishes for hardwood floors)
- Wood Filler
- Vacuum cleaner
- High-Quality Brush
How to Refinish Engineered Hardwood Floors
Once you’ve figured out the type of your planks, giving surface effects through refinishing engineered hardwood floors is pretty straightforward.
You will start by scraping the installed layer of your hardwood and fixing the flooring to ensure a clear finish. After correctly mending the area, you can begin smoothening and layering the wood with varnish and protective coats!
Step 1: Preparation and Repairs
Your engineered flooring outcome relies heavily on how you patiently treat the top layer of solid hardwood surface before initiating the refinish. The better the pre-coating process, the smoother the results will be!
Analyze the present state of the room
Is it too damaged? Does the floor have random nails coming out? Before going all-in with sanding the surfaces, look around your space and see if the room needs any repairs.
Now, start by gently prying out the molding using a putty knife. Ensure you don’t use a heavy tool like a crowbar, as it will ruin the mold and wear layer forever.
Begin repairs if needed
If you find any nails sticking out of the hardwood floors, it’s time to fix them. Just cautiously hammer them back in. Also, if there are any holes or cracks, keep track of them before you start scrubbing the top layer.
As soon as you’re finished, cover the recently repaired area with masking tape to ensure no sander runs over or ruins it. Moreover, you also need to cover all the outlets such as windows, power plugs etc. with a plastic screen.
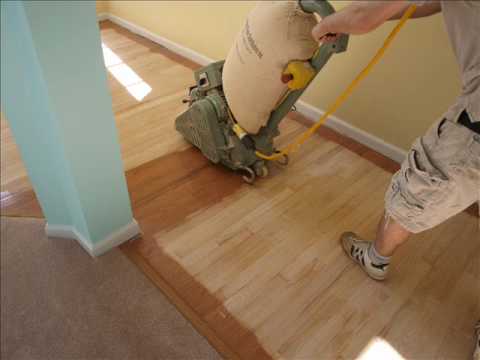
Step 2: Sanding engineered hardwood
This process ensures that your stain and varnishing stick to the surface. That’s why you need to rid the surface of any remnant of a previous coating or a protective layer.
Pick a floor compatible sander
It’s important that you use suitable equipment to sand the engineered wood floor. Each section of your room’s perimeter will require a different tool.
It means that you must have more options for sanders other than the basic ones – a large scrubber for the central area, a hand-held orbital sander for the edges and a detail sander to remove the coating from corners.
You can even go with hand-scrubbing the corners, but that’ll consume significant time and effort.
Start with rough sanding
Now that you have a sander with the right grit size, remove the top layers of the marked area. Keep in mind that you have to move the equipment slowly and consistently.
Additionally, it’s important to not stay in one area for a long duration to get an even finish.
Look for flooring imperfections
Remember the holes and cracks you marked during the preparation stage? It’s time to fix them with glue, wood filler or sawdust as needed.
Also, while stripping the room surface, look for the floor holes, nails, and masked surfaces. Essentially, any bumps in the repaired section can damage beyond correction.
Smoothen the rough edges
Before starting the second sanding phase, draw the perimeter around which you have sanded. This will ensure that you don’t strip off the upper layer more than required.
After marking the once-sanded area, you can level up your equipment. Bring in the 50-60 grit sandpaper to smoothen the edges. After flattening the rough surfaces, vacuum the remains to analyze the even sanding progress.
Complete the sanding process
For giving the final touch to your pre-stain process, give your engineered hardwood floor another round of scrubbing. When you’re done with the final sanding step, clean the area with a damp microfiber cloth.
Step 3: Staining and Varnishing
This is the last milestone to cover for emphasizing the surface effects and the floor appeal. Whether you want another color or just need a shiny top layer, this step is crucial if you wish to refinish engineered hardwood floors.
Start with staining
To refinish engineered hardwood floors, let the sanded area dry up properly before applying any lacquer. Once the solid hardwood is devoid of moisture, slowly start applying the stain one section at a time and steadily increase your pace.
Now that you have covered the sanded area completely with your desired stain, leave it alone for a while. The layer must not be moist before applying anything else to it.
Choose a sealing or varnishing agent
After finishing with the stains, you need to layer the engineered hardwood flooring with a protective sealant.
You can pick between an oil-based and water-based sealant as per the time and effort you’re willing to invest in refinished solid hardwood flooring.
Related Post: How to Remove Glued Wood Flooring from Subfloor
Cost of Refinishing an Engineered Hardwood?
To know the exact cost for refinishing engineered hardwood flooring, you need to factor in the following:
- Room’s square footage
- Cost of the stain for plank’s square foot area
Once you’ve measured up the entire room and have specifications for each plank, you can calculate the overall budget you need to allocate. Here’s how to do it:
- Take the complete estimate of your engineered flooring.
- Add 15% of the metric with the hardwood floors’ whole measurement.
- Sum up a little extra to compensate for wastage and door thresholds of solid hardwood.
- Multiply the sum with the paint cost per square footage of engineered hardwood floors.
That’s it!
If you’ve completed your flooring project only to find that your floor remains slippery, don’t worry. We have a comprehensive guide on how to make a floor not slippery.
FAQs
Can you frequently refinish engineered hardwood floors?
No. Since veneer makes for the top layer of the engineered hardwood, it won’t be safe to refinish the plank more than twice. Additionally, by overdoing the process, you can cause irreversible damage to the hardwood.
Can you change the color of prefinished engineered hardwood?
Of course, you can. To get a different texture and color to your prefinished engineered hardwood, you’ll need to sand the wear layer of your house surface flooring. Post-which, you can apply any lacquer of your choice.
Can you sand engineered hardwood?
Yes! You can sand and refinish engineered hardwood. To refinish engineered hardwood floors, you’ll have to sand them first using equipment with suitable grit dimensions. After cleaning the wear layer, you can apply stain or protective sealant on the sanded surface.
Can you stain and refinish engineered hardwood?
Yes, engineered hardwood can be restained. However, there’s a cap on the number of times you can safely refinish engineered hardwood floors. Essentially, thickness determines the extent to which you can alter the appearance of your engineered hardwoods.
Engineered Wood Refinishing Summary
So, can engineered hardwood be refinished? Well, refinishing is a great tactic, from adding a rich, luxurious look to your new floors to protecting the natural color of engineered surfaces.
Since they are the perfect modern choice for hardwood flooring, they can fit in spaces where real wood planks can’t, like basements.
Not only the natural wood lookalike can elevate the ambiance, but it also offers excellent cost efficiency with a simple tweak in the wear layer.
So, if your usual house flooring doesn’t match your taste anymore, refinish engineered wood and install a brand-new, gleaming surface today!