The world of finishing is a vast sea of countless combinations that produce myriad surprisingly different results. While the burnishing wood technique sounds new to many, it’s antique and produces impressive finishes.
So, what is burnishing wood?
Burnishing wood is one of the easiest finishing methods for an exciting DIY job. Follow our simple steps below to give your wooden surface a perfect finish.
What is Burnishing Wood?
Burnishing is one of the polishing methods that help to add an extra glow to your finished wood.
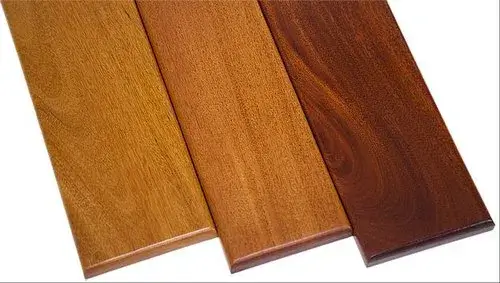
The chemical-free finishing technique creates a smooth and nice sheen on your wooden surface, similar to when commercial products like special lacquers or modern polyurethanes are used.
The wood burnishing process involves rubbing together two pieces of wood, and the friction produces heat. Unfortunately, this heat erodes the soft and dried cell walls, exposing the hard cells which can’t absorb stains.
Nevertheless, you can expect a smooth and shiny finish that renders finishing products unnecessary. But we have to warn you…
Burnishing is hard work and takes a while to apply, wait and repeat the process, all by hand. No wonder it’s also called a hand-rubbed finish. The wood fibers are also blended with lacquer to achieve a lustrous finish.
You can also burnish your unfinished wood by rubbing small chips or shavings on your wooden surface. This polishing wood method gives wooden structures the best finishing touch.
Though a popular technique among old-world woodworkers, today, burnishing is just another option for professionals that avoid using chemicals in their projects.
Ultimately, the end justifies the means—the time and extra effort used to burnish wood are truly worth the results. So, if you have the time, try these polishing wood methods and give your wood projects a unique finish.
The Tools and Materials Needed to Burnish Wood?
Smoothness is fundamental in wood burnishing. Always use materials that guarantee an ultra-fine finish as you burnish and compress wood to deliver the desired finish.
Tools and materials needed
- Denim fabric
- Hardwood
- Ultra-fine Sandpaper
- Wood chips
- Steel wool
- Burnishing wood cream
- Metal burnishing tools
Denim Fabric
Denim is the typical material needed for wood burnishing. To achieve excellent results, we recommend a 4-inch sized denim fabric.
Fold the denim fabric in half to form a small pad. Then use the fabric to rub hard your plank’s surface in circle rotations with a diameter measuring about 6 inches.
Rub vigorously until the plank becomes warm. The buff quickly penetrates the wood and blends well with the pores. Stop to check if the wood looks glossy.
Suppose it hasn’t; continue rubbing in a circular or oval motion. Once you’re satisfied with the shiny surface, start polishing a new area, allowing it to overlap the initial area by around an inch.
Of course, the market is awash with burnishing wax and creams, but the results of traditional burnishing beat the need for these materials. Always sand smooth your wooden piece before cleaning to remove any debris.
Hardwood
When another plank, such as oak or maple, is used to burnish your wooden project, it must be tougher than the wood being burnished.
Take a small block-shaped hardwood and rub it against the wooden piece you’re burnishing. Using moderate pressure, rub the wood in circular motions.
This process causes compression of wood fibers, resulting in a high gloss shine and grain patterns on the surface. Repeat until you feel the force against the piece of wood.
But, if you start to feel your hand and fingers cramp, then know you’re using excessive pressure. Rub the whole surface until you achieve a more uniform and high-gloss finish on your wood.
A quick and affordable way to burnish your wood projects is to use your kitchen knife’s handle or the rear part of a wooden spoon.
Ultra-fine Sandpaper
Sandpaper does a decent burnishing job once the varnish is applied and completely dry. We recommend using ultra-fine sandpaper with at least 1200 grit to produce a rubbing effect rather than removing materials from the wooden piece.
The sandpaper should be rougher than the grain on the burnished wooden surface. You can also attach ultra-fine sandpaper to sanding equipment and use it to burnish your wooden project.
Hand sand the wood in circular patterns. The manual process takes a while as one has to work spot by spot while checking to ensure a smooth feeling that’s shiny enough to reflect light off for a mirror finish.
Once the wood is sufficiently shiny, you can move on to the next spot and sand it until it’s even.
Wood Chips
Wood chips are often used when a project involves a lathe. After sanding down your wood to a higher grit (220-grit will do), rub in wood chips as you turn the project.
Next, firmly press a handful of wood chips, dial up the lathe’s Revolutions Per Minute (RPMs) and then hold the chips against the rotating plank.
This step will create a nice sheen and smooth surface. Since this process happens as the wood turns, burnishing becomes relatively easy and quick.
If you’re interested in creating bowls, consider exploring our recommendations for the best lathe for bowl turning to elevate your woodworking experience.
Steel Wool
Steel wool? That’s right. While out rightly, it may appear counterintuitive, when used properly, it delivers a super finish. Consequently, steel wool is commonly used on high-end pieces of furniture.
For the best results, use wood wax and the finer wool pad rated 4/0 or 0000. Start the burnishing process by applying enough wood wax to lightly coat the pad before you rub the steel wool into the plank in a circular pattern.
Don’t hesitate to burnish wood past the grain during this process. Don’t forget to work your way into the hard-to-access areas. Continue rubbing until your wood surface looks and feels satiny and smooth, not slick.
Once the wood wax has set in, use a furniture brush or dry cloth to buff the plank, working in a circular motion again. Repeat the whole process once or twice to achieve the most amazing results.
Metal Burnishing Tools
Smooth metals like metal rods or metal balls make excellent burnishing tools. The medium pressure applied will generate heat when these tools are quickly rubbed over your wooden items that need to be burnished.
Unlike hardwood, metal burnishing tools are smooth and can’t scratch easily.
Burnishing Cream
It helps you clean and invigorates your wood projects with buffs like lacquers and French polish to get the desired finish.
Burnishing cream will only give great results when the surface is thoroughly cleaned using a wax or polish remover to eliminate any stains.
After this, soak a piece of fabric with some cream, rubbing it into the plank in circles. Be sure to give your cream a good shake before opening it.
Where possible, rub over the grain as you pay attention to tough or hard-to-reach spots. After working the cream into your piece of wood, allow it to dry, and use a clean, dry cloth to buff the plank.
When using a burnishing cream, it’s extremely important to test it on a small piece of furniture before applying it to your project. This is because sometimes the cream creates broken finishes when freshly used.
A shiny and even finish should be your result. Ideally, you can apply a candle wax coat to protect the new high gloss finish.
Step-by-Step Procedure on How to Burnish Wood
The actual process of burnishing is typically done by hand. Our step-by-step procedure will make polishing wood easier than you think and help give your wood project a hand-rubbed finish that is simply unmatched.
Step 1: Ensure your wood is clean
Before you burnish your wood, clean it thoroughly, whether it is a floor, furniture, or wooden cabinet.
Remove the dust and dirt or loose planks accumulated around the wood. Always ensure your wood surface is dry to the touch before burnishing.
Step 2: Roll your denim pad and rub
Using denim from your old denim jacket or pants, improvise a small burnishing pad from the denim piece by folding it into two. Next, use your fingers to hold the burnishing pad and vigorously rub it over your plank in circular swirls.
Ensure this happens on a completely dry lacquer finish. Then, using your fingertips, you can also wrap the denim pad into a smaller sheet before rolling it over the lacquer polish in a repetitive straight motion.
If you’re burnishing a round piece of wood, swirl the denim sheet around the leg or spindle using your palm. Follow it up straight, stroking it in an up-and-down movement.
You may have to get a new denim piece if the one you’re using gets soaked with lacquer dust.
Step 3: Keep rubbing for 6” in diameter
Rub vigorously in one area 6” in diameter until the surface feels slightly warm. This step should leave your surface feeling warm and smooth.
Step 4: Overlap the first pattern with another rub
A single rub 6” in diameter will not give you the results you’re looking for. Instead, it would be best if you kept rubbing to overlap the first pattern you rubbed. For the overlapping rub, be sure to follow the direction of the grain.
Step 5: Check for the light reflection
After vigorously rubbing your wood in a given area, bend over to see if the light reflects off your varnished surface.
So, what should you check for at this juncture? First, look for a brighter, well-polished spot within the area you just rubbed. If there’s no noticeably bright and smooth look, repeat the process until light reflects off your surface.
Step 6: Rub till a blend is achieved
Keep rubbing your plank back and forth straight with the wood’s grain to perfectly blend the circular spins to make straight lines. It’s necessary to smooth out the circular spins to achieve your desired finished shine.
Step 7: Rub in circular and then straight patterns
In circular swirls, rub your wooden piece from end to end before turning it up to straight patterns atop the circular ones. Continue this process one area at a time until the entire wood is burnished.
Also Read: Best Beginner Lathe
Precaution when Burnishing your Wood
It is important to ensure the lacquer is completely dry before you start wood burnishing. The working area (room) should also be free of fumes. If it isn’t, wear a respirator and follow the steps to burnish the wood.
Following the steps for performing burnishing above and the required precaution will give your wood project a perfect hand-rubbed finish.
Drawbacks when burnishing surfaces?
While burnished wood guarantees a striking finish, you need to remember that the result of a smooth glass finish can prevent its absorption, affecting the durability of your wood finish.
Ideally, the wood surface heats up during the process of burnishing. However, the heating process leads to the oxidation of the wooden surface.
Consequently, the heat causes the pores to close up, making the wood resistant to adhesion by the varnishes.
What is burnishing wood cream?
A burnishing cream is specially designed to deliver a beautiful sheen by rejuvenating and reviving dull polished interior surfaces like modern lacquers, varnishes, painted surfaces, and French polish.
You can also use the burnishing cream to repair heat damage or discoloration and haze from antique and modern furniture or conceal superficial scratches on wood surfaces.
The cream works best to revive old finishes as it’s gentler and gives a better sheen. It can also help remove heat, water, and white ring marks.
Note: Since burnishing cream is slightly abrasive, ensure the thickness of the polish to hold up the wood’s top layer during burnishing to your desired finish.
Can I Burnish a Wooden Floor?
Yes. Unlike smaller wood projects and wooden furniture, you’ll need a floor burnisher for burnishing your wooden flooring. A floor burnisher is an electric device that makes the floor burnishing process easier and faster.
The process involves cleaning the floor to remove any debris. A coat of floor cleaner is sprayed over the wooden floor before mopping the surface to eliminate debris.
After the floor has dried, use the floor burnisher to make rotations ranging from1500 from 3000 RPMs for a great effect.
Repeat burnishing the floor 2 to 3 times to get a smooth, ‘wet,’ and high gloss finish. Once this is achieved, remove the freshly burnished wooden floor with a mop to remove lingering debris.