Grain raising is a complex problem. First, you may or may not experience it. It depends on the type of wood and wood finish. Moreover, many woodworkers, including experienced industry experts, can’t fully explain its origin.
Nevertheless, you must be ready to deal with it. So we’ve compiled this guide to help you better understand what it means, why it happens, and how to prevent and fix raised wood grain.
How to Prevent and Fix Raised Wood Grain
The easiest and most effective way to prevent wood grain raising is to raise the grains before applying the wood finish. Doing so lets you knock down the broken wood fibers through a light sanding process for an even finish layer and minimal or no wood grain raising.
What is Grain Raising?
“Grain raising” is a technical term for tiny wood fibers that appear on dried sawn wood. It often causes a rough, unappealing finish as millions of tiny hairs can be seen standing from the boards.
Different people have different theories for their origin. However, scientific studies trace grain raising back to damaged wood cells.
Like humans, trees comprise billions of tiny cells that transport food and water and give the tree its shape. These cells are found throughout the tree but vary in shape and form from one tree part to another.
A typical wood cell is hollow and long, similar to miniature soda straws. Softwood fibers are often 3-5 mm long, while hardwood fibers range from one to three millimeters long. The average wood cell diameter is 0.03-0.05mm.
A substance known as lignin holds the cells together and simultaneously contains extractives that give wood its color. More importantly, some wood cells are larger and stronger, while others are smaller and weaker.
This is evident from the different colors of annual growth rings. Lighter rings often comprise softer, weaker cells, while darker rings comprise harder, stronger cells.
The cells run vertically except for ray cells. Ray cells store starches and run horizontally to transport the same throughout the tree.
Occasionally, wood cells, especially weaker cells, rise from the wood surface, causing a fur-like raised wood grain texture. This phenomenon is known as “grain raising.”
What Causes Raised Grain in Wood?
Grain-raising in wood results from two main situations; uneven moisture content and compressed wood cells.
Uneven moisture
When milling or sawing wood, we aim to make perfectly straight cuts because that’s what woodworking requires. However, tree trunks are not perfectly symmetrical. Therefore, a straight board often comprises many sections with different wood cells.
Unfortunately, different cells release moisture at different rates. Softer ones dry fastest, while mature ones dry slowest. As a result, you will end up with uneven surfaces throughout the boards.
This usually doesn’t cause a rough wood surface. However, the unevenly raised grains throughout the board can create troughs and bumps throughout the wood.
Compressed wood cells
A different type of grain raising occurs when wood cells absorb water and swell. This is most common in softer wood cells or broken cells. Wood cells can become broken for many reasons.
For instance, uneven moisture can cause warping and break some wood cells. Soft cells are the easiest to break. So, suppose you subject the wooden board to water or moisture.
All the cells will rush to absorb some water – because it’s their nature (remember we said they transport water). This usually causes the cells to swell and expand.
Now, imagine what follows if a broken cell swells and expands. Like a balloon filled with air, it will rise off the surface as if to fly away.
Most soft cells will break, too, and follow suit. So, before you know it, billions of cells are rising from the wood surface!
Effects of Woodworking Machinery on Raised Grain
Woodworking processes, from sawing to surface planing, sanding, and finishing, are the most common causes of grain raising.
For instance, planing and sanding processes tear down the cells to achieve an even, smooth surface, creating a big risk of a raised wood grain. All it takes is a humid day, and the broken fibers will swiftly rise off the surface.
Similarly, the cells tear during surface planing or when sawing the end grain. Then the pressed and torn areas swell and rise to the surface, causing raised fibers.
Some types of woodworking tools sometimes “forcefully” compact wood cells to create a smooth surface. For instance, the planer’s role isn’t limited to cutting away thin layers of the wood surface.
Instead, it also presses down on the surface cells to smooth the surface. Such tightly compacted cells rise from the surface at the slightest disturbance.
How to Prevent and Fix Wood Grain Raising
Fortunately, you can fix raised grains or prevent them altogether. Let’s begin with prevention methods;
#1: Proper finishing
Poor finishing methods are the most common cause of grain raising in finished wood. Two things are particularly important;
Water-based vs oil-based finishes
We’ve seen that water and moisture cause wood cells to swell, break, and rise from the wood surface. Therefore, you should avoid water-based finishes if you’re serious about preventing grain raising.
This applies to stains, paints, and other finishes. It is best to avoid water-based stains and finishes if working with woods prone to grain raising.
Thickness of finish
So, oil-based finishes are your best choice when struggling with wood-raising issues. But did you know that wood fibers can push the finishing coat away to cause a rough surface?
This is most common if you use an oil finish with no build and leave the coating too thin to withstand the surface tension.
Humidity will gradually penetrate and accumulate under the finish layer, eventually causing the cells beneath to swell. If the finish layer isn’t strong enough to withstand the forces, the fibers will rise from the board, causing a rough-feeling surface.
The only way to prevent this problem is to ensure a thick enough finishing coat. So, consider two or three coats of stain and a protective water-proof finish over it.
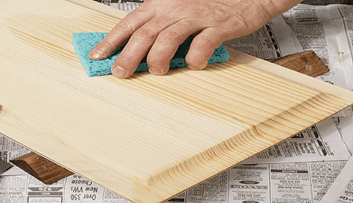
#2: Raise the Grain Before Finishing
You can also tackle grain raising in wood by raising the grain before finishing to minimize grain-raising issues post-finishing.
- Begin by sanding the boards down to 220 grit sandpaper until it’s smooth enough for your project.
- Use a small foam brush to apply a coat of water over the entire wood surface. How much water to apply depends on the project conditions. However, don’t soak the wood in water.
- When done, allow the wood to dry overnight. All the grain raising will happen during this period.
- It’s time to sand down the surfaces again to remove the raised fibers. But remember that more damaged, tiny cells are often only a few cells beneath the surface. So, you want to use dull sandpaper. That way, you won’t expose fresh wood. Lightly sand the raised grain smooth to a perfectly flat surface.
How Much Should You Sand Surfaces with Raised Grain?
You should only sand lightly using very fine sandpaper to avoid tearing down more wood cells or exposing fresh wood.
Therefore, you want to use no less than 320 grit sandpaper to remove raised grain, though 400-500-grit sandpaper is the best.
Alternatively, bury the raised fibers with the first coat and allow it to dry. Then sand it smooth before applying additional coats.
What happens if you use low-grit sandpaper to knock down raised grain?
Using more abrasive sandpapers is asking for more trouble. The large sand grains will dig into the wood surface, breaking more cell walls and exposing fresh wood.
Then the newly exposed damaged cells can absorb humidity and swell, causing new grain-raising problems.
What’s the Best Way to Raise Wood Grain Before Staining?
The best way to raise the wood grain before staining depends on the type of wood and stain. But generally, you should start by sanding the surface you wish to stain using 120-grit sandpaper through to 220-grit sandpaper in the direction of the grain.
Then vacuum the surface to remove the dust and wipe the surface impurities with a rag. After that, wet the surface using a damp sponge and allow the wood to dry.
How to Stain the Wood Surface after Grain Raising
You can begin staining the wood surface after raising the grain. You’ll need high-quality oil-based stain and application cloths.
- Prep the surface: Sand down the raised grain using fine sandpaper, ideally 320-grit or higher. Sanding deeper can break more cell walls.
- Apply the stain with a clean cloth: Dip the cloth in the stain and apply generous amounts to the whole surface, gently rubbing one small area at a time. You can also stain wood using a roller if you are working on large flat surface.
- Wipe the excess stain: Allow the wood to absorb the stain for at least five minutes. Then wipe the excess stain using a new rag.
- Allow the surface to dry: Wait 24 hours for the surface to dry completely. Depending on the weather, you may even need to wait 48-72 hours.
- Apply a finishing coat: A protective sealant over the stain shields it from weather elements, preventing new grain-raising issues.
How to Fix Raised Wood Fibres After Staining
There are two ways of removing raised grain after staining, both of which involve sanding down the surface.
- Sand lightly and re-stain: If the grain raising isn’t too pronounced, you only need to sand down the finish using 220-grit sandpaper and apply an additional stain coat.
- Strip the finish and stain the surface afresh: This is your best option if the raised grain is substantial. Use coarse sandpaper to strip down the surface to bare wood, then raise the grain, sand with fine sandpaper, and re-stain the surface.
FAQs
Does wetting wood raise the grain?
Yes, wetting wood before sanding raises the wood grain. This is because wood cells always swell whenever water or any stain or wood finish containing wood comes in contact with wood. Raised wood grains often cause a rough-feeling surface after the wood has dried. Thin finishing coats applied over the affected wood surface also feel rough.
What’s the best way to sand raised wood grain after finishing?
After sanding the wood with medium grit sandpaper between 150 grit and 180 grit, use a sponge or piece of cloth to wet the surface. Then allow the wood to dry fully. You may need to wait a full day. Then go over the wood surface using 180-grit sandpaper and then 220-grit sandpaper.
How to fix raised wood from water?
An easy way to fix raised wood grain resulting from wetting, such as rain or surface prepping, is to let the wood dry completely and then sand it using 150-180 grit sandpaper. First, clean the surface or wipe it down with a cloth. Then allow it to dry overnight so all the damaged or compressed fibers can rise before sanding with 150 grit and then 180 grit sandpaper.
When should you raise the grain of wood?
You should always raise the wood grain and fix the grain-raising issue beforehand if your boards or planks have come in contact with water or if you intend to use a water-based finish. Raising the grain and sanding down the raised fibers solves the problem of a smooth, even surface.
How to bring out wood grain without staining?
The best way to bring out wood grain without staining is by using penetrating oils like tung oil, walnut oil, and double-boiled linseed oil. Use a sponge to rub the oil over the wood surface gently. Then allow the surface to dry. Another option is denatured alcohol. It naturally enhances wood grain.
Summary
Raised grain is a common problem in porous woods that readily absorb moisture. For instance, it’s very common in earlywood softwoods finished with a water-based stain.
The easiest way to prevent the issue is by harvesting mature trees, raising the grain before finishing, and avoiding water-based stains.