As easy as you might think, joining two pieces of wood is, it could easily fall apart! Much work and calculation are put into making most furniture and wooden items you see around the home. This, in the long run, keeps them durable and strong.
However, it could be challenging to carry out a DIY on this. But not to worry, this article will guide you on how to join two pieces of wood at a 45 degree angle and other ways of joining wood you should know. You want to read this up.
But first and foremost, do you know how to join 2 pieces of wood lengthwise?
What Does Joining Two Pieces of Wood at a 45-Degree Angle Mean?
Firstly you might be confused about what a wood angle denotes. Well, a 45-degree angle between two pieces of wood is one of the most commonly measured degrees at which wood is joined.
It is an acute angle cut on the face of the wood. Remember, wood fibers naturally run side by side, so the grains might come in between at times while joining.
But when wood pieces are joined by 45 degrees, the wood’s end grain remains hidden after the joint has been formed.
How to Join Two Pieces of Wood at a 45 Degree Angle
Using wood glue and nails, you can join two pieces of wood at a 45 -degree angle. This is suitable when the wood pieces are to be nailed. You can also use dowels if the wood is thick enough to hold them for added strength and support to the joint.
Types of Wood Joints You Should Know
So just as you have two bones in the body meeting to form a joint, it is the same for a wood joint. There are six different types of these joints which are also joinery techniques you should know before you consider joining two pieces of wood at any angle.
Knowing these joints individually and their differences before proceeding with your woodwork is important.
They are described below:
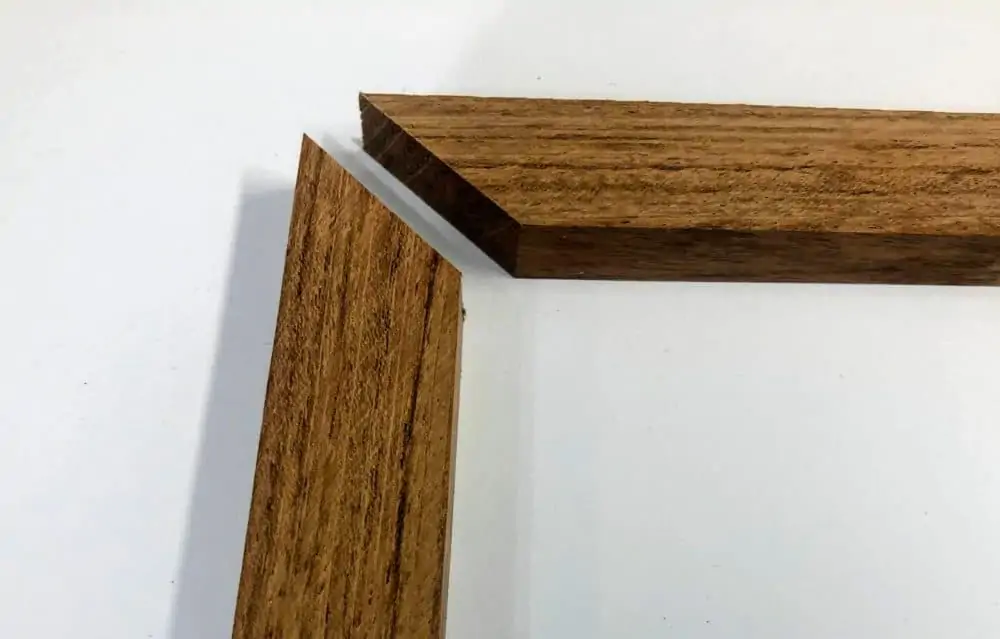
Miter Joint
If you take a picture frame in your home and check its corners, those are miter joints. This type of joint is formed by joining two pieces of wood whose ends have been cut out at an angle.
This angle provides a semi-long grain and long-grain surface, which makes it easy to be joined either by glues or nails.
Most pieces with four corners as a square or rectangle are usually joined using this technique. Miters still require splines or biscuits to strengthen the joint further.
Edge Joint
Creating an edge joint is a good option if you want to create a wider board than you have to work with. It is a simple joint that requires attaching two pieces of wood side by side.
This can be done by using glue and then fixing dowels or biscuits to help align the boards and make the joint stronger.
Butt Joint
Butt joints are formed when two boards are joined at right angles, which is 90 degrees. This is the common and easiest way of joining two boards.
Here the end grain of one of the boards is attached to the long grain of the other to prevent warping over time. This joint also needs nails or screws to hold it in place.
Rabbet Joint
This is also known as a dado joint because it forms a groove or dado on the edge of the wood piece, forming a lip. Rabbet joint is used mostly in constructing furniture that requires panels, such as dressers and cabinets commonly used in homes.
Dovetail Joint
A dovetail joint is formed by joining two pieces of wood at a right angle. It is often used in making most furniture today, like drawers.
This joint is difficult to pull apart as it is shaped like pins and tails. Glue can make this joint stronger and does not require a mechanical fastener.
Mortise and tenon joint
These simple and strongest woodworking joints have been used over the years to construct cabinets. It is formed by creating a mortise hole in one end of the piece of wood and a tenon tongue inserted into the hole in the other.
The tenon helps hold the joint in place and could be wedged, glued or pinned.
How to Join Two Wood Pieces Using Miter Joints
Since miter joints are commonly used, you want to know how to create a miter angle, so follow through. The tools and materials you would need include:
- A hand or miter saw
- A miter box
- A circular saw
- A clamp
The steps involved in this method are:
Step 1: You would begin by doing a little maths by measuring the degree of angle change in the wood pieces and dividing the result by the number of wood pieces that made the turn.
Step 2: Measure the start points, ensuring one side’s length is more than the other since the cuts are already angled.
Step 3: Use scraps to measure the angled gap and find out the additional material you would need to add at the ends cut.
Step 4: Get your saw and set it to the angle you are working with on the wood. Clamp the wood down and begin to saw till the other piece comes off. Here’s more on measuring and cutting 45-degree angle in wood.
Step 5: Then, join the wood pieces by applying glue and fixing nails or dowels on the joint surfaces for extra strength.
How to Build a Mitered Corner Joint
Each piece of wood is cut to a 45-degree angle and then joined. A mitered corner joint is a much better alternative to the regular pieces of wood joined together. It is made so that the end grain of one of the wood pieces is not visibly seen.
Reinforce with mechanical fasteners
Glue, at times, is not enough to hold two pieces of wood that have been joined well. It leaves the ends of the wood with a weak glue joint. This is where mechanical fasteners such as finish nails or screws are used for adding support.
To do this, wood glue should first be applied to the joint and held in position with a clamp for holding the woodwork. Excess glue is scraped off the ends.
Then a brad nailer is used to drive the finish nail through one face of the board into the end of the other board. This driving should also be done in the opposite direction.
Remember to make pilot holes first before putting nails or screws in so the wood does not split. Other forms of metal fasteners that can be used on mitered joints include L-brackets and reinforcement plates.
FAQs
Why are my 45-degree cuts not lining up?
Your 45-degree cuts might not be lining up because you cut one of the wood pieces too short or too long. It could also result from the blade of the saw not being perpendicular to the base.
What is the strongest wood corner joint?
Mortise and Tenon joint is the strongest wood corner joint. It is a simple type of joint used by several woodworkers over the years. The two pieces of wood, one called a mortise and the other a tenon, are joined at a 90-degrees.
What is the strongest woodworking joint?
The mortise is the strongest woodworking joint as it is stable and holds well. It is relatively simple to build and has been used over the years by most woodworkers due to its versatility and strength.
How can I make a wood corner joint stronger?
You can make a wood corner joint by drilling holes through one piece into another and driving dowels into those holes. After which glue is applied to keep the dowels fixed in the holes to strengthen them and prevent easy loosening. Here are some tools for making holes in wood.
Should dovetail joints be glued?
Some types of dovetail joints require gluing, while others do not. For those that require glue, you apply it only on the diagonal faces or long grains of the wood tails and pins. At times applying on only one face is adequate for proper glueing.
Are miter joints strong?
Miter joints are not the strongest because the end grains to be joined can be quite difficult to align when using glue. Also, the porous nature of the end grain makes glue not hold as well as it should. However, they can be strengthened.
Are pocket holes stronger?
Yes, pocket holes are stronger than most types of wood joints. They are a form of wood joinery that requires securing screws through the face grain of the wood instead of the end grain. This joinery also is quite easy and takes little time to set up.
What type of joint is used to make drawers?
The half-blind dovetail joint is best used for making drawers as it is the strongest. Once it is glued, only breaking the wood can sever the joint if properly fixed. This is because drawers require very strong joints not to fall apart easily. Other joints can be used, like the rabbet joint and butt joint. Also, read, how do you make wooden drawers slide easier?
Conclusion
So we have discussed on how to join two pieces of wood at a 45 degree angle using glue and nails. Five other joinery techniques that can also be used to join woods are described above, and you might want to use one of them in your next woodworking projects.
Do not forget to fix mechanical fasteners to make the joints stronger. Hope you found this article helpful.