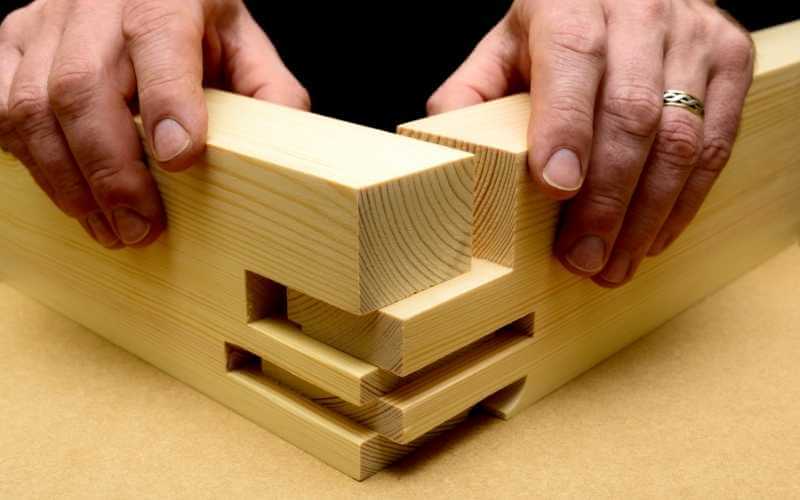
A well-crafted wood joint is the foundation of a strong piece of furniture. It distinguishes cheap furniture from a high-quality set.
There are many types of wood joints, but some are stronger than others. The best wood joint varies by project needs. Ease of making, aesthetic appeal, and functionality are some important factors to consider. But strength and sturdiness come first for most DIYers.
Luckily, you have an array of options to pick from if you’re after the strongest wood joint.
This post explores the 20 most popular wood joints, plus their strengths and uses. We’ll also share tips on choosing the strongest woodworking joints for your projects.
Top 10 Strongest Wood Joints
- Mortise and Tenon
- Miter Joint
- Dovetail Joint
- Biscuit Joint
- Dowel Joint
- Dado Joint
- Bridle Joint
- Finger Joint
- T-Joint
- Butt Joint
What is Joinery?
Wood joinery combines wood pieces to create an angle, form a shape, or achieve a longer piece.
Joints allow us to blend different wood pieces into a single complete piece. There are many different types of wood joinery, and the best one(s) depends on your project, plus many other factors, e.g., whether you need to use mechanical fasteners.
Read: How to glue metal to wood
20 Strongest Wood Joints
Discover 20 wood joinery techniques to employ in small and large carpentry projects.
1. Mortise and Tenon Joint: Strong 90 Degree Wood Joints
This is one of the oldest and strongest joints. You can create the mortise and tenon by cutting a mortise/hole into one plank and a tenon/tongue into another and then gluing them together.
The mortise and tenon joint is super-strong and useful for various applications.
Tip: Always cut a tight-fitting tenon if you want to achieve a sturdy piece. Plus, do not sand the plank before pinning the joint.
Uses
- The joint’s square grooved slot is common in furniture construction
- It can also be used in cabinetry,
- This groove joint is ideal for building large frames and log homes.
Pros
- The mortise and tenon joint is very versatile– can be adapted to many different situations
- The groove joint can be adjusted so that it is tight or loose, depending on project needs
- The square grooved slot and tenon form a durable joint that can go decades
- Gives a clean finish as the tenon hides within the mortice
- Mortise and tenon joints are difficult to pull apart
2. The Miter Joint: Strong 3 Way Corner Joint
You can join wood pieces at 45-degree angle to create miter joints by gluing and nailing them together. This joint is very strong because the angle leaves ample surface area for the adhesive.
Another benefit of miter joints is that they are very easy to create. You just need to cut the pieces of wood at a 45-degree angle and then glue and nail them together.
Tip: A stronger way to create miter joints is to reinforce them with dowels or screws.
Uses
- Best for forming perfect right angles
- Miter joints are perfect for intricate moldings and trim
- Decorative skirtings
- Photo frames
- Windows and door frames
Pros
- They hide unsightly end grain in woodworking projects
- The joint leaves no gaps if you cut the 45-degree angles accurately
- It offers a large surface for gluing
- You can increase your miter joint’s strength with a dowel or screw.
3. Dovetail Joint: Best Joints for Cabinets
A dovetail joint is a type of joint that is commonly used in woodworking. It is a strong joint with an alternating tongue and groove dovetail design.
The joint is made by interlocking two wood planks at an angle, similar to a puzzle. The most common dovetail joint application is connecting two planks at right angles.
Tip: You can also use a dovetail joint to connect a piece of wood to a metal plate.
Uses
- Building cabinets and drawers
- Used in other woodworking projects such as boxes, chests, and furniture.
Pros
- Dovetail joints are aesthetically pleasing and can add a lot of visual interest to furniture.
- It is strong and durable and can withstand wear and tear
- Dovetail joints provide a very tight and secure fit.
- Easy to measure and cut with a dovetail jig
4. Biscuit Joint
The biscuit is a woodworking joint used to connect two pieces of wood together.
You make it by cutting a groove in each piece you plan to join, then inserting a small piece of wood into the groove. The small piece of wood, called a biscuit, is held in place by the pressure from the two wood planks. Biscuit joints are very strong and suit various use cases.
Tip: You can make biscuit joints using different biscuit sizes depending on the thickness of the planks you’re joining.
Uses
- Used in cabinets and other furniture
- Fits both end-to-face and end-to-end joinery work
- The biscuit joint attaches timber pieces into a tabletop
Pros
- It is a cheap point for low-budget joinery work
- The biscuit joint is very easy to make as the biscuits are premade
- The biscuits are invisible, creating a clean finish
- The speed up the joinery process
5. The Dowel Joint
Dowel joints use small pieces of cylindrical wood (dowels) to connect two wood planks. The dowel is inserted into a pre-drilled pilot hole. Next, the joint is glued and clamped together until it dries.
The dowel should be:
- the same diameter as the hole.
- long enough to extend past the hole by at least 1/2 inch.
Once the dowels are in place, apply wood glue and clamp the joint until the glue dries.
Tip: If you cut to precision, you won’t need to glue the piece. Dowels are the strongest wood joint, without adhesives or fasters.
Uses
- The dowel joint is best for large woodworking projects, e.g., a wooden house
- Excellent for reinforcing the butt joint
- The dowel joint is also perfect for cabinetry
- Dowels pegs can help create wheel axles in wooden toys
Pros
- The dowels stabilize the joint
- You won’t need screws or nails for dowel joints
- The dowel joint creates a neat, uniform finish
- No special equipment or skills needed
6. The Dado Joint: Best Perpendicular Wood Joints for Different Board Sizes
This woodworking joint binds two planks by cutting a notch into one wood plank and fitting another plank into that groove.
The dado joint is sturdy and is often used to construct cabinets and other furniture. One reason dado joints are so strong is that they have a large surface area for the glue to act on.
Another reason this joint is so strong is because of its “interlocking” design. When you join two pieces with a dado joint, they essentially create a right angle. This gives the joint a lot of strength and stability.
Uses
- Perfect for different board sizes (provided they have the same thickness)
- Dado joints are commonly used in shelving projects
- Used in large wooden constructions
Pros
- Dado joints give timber room to expand and contract
- Offers a clean finish on both sides, unlike the half-bind dovetail joint
- Strong and resilient
- Dado joints are easy to create
7. The Bridle Joint: Best round wood joints
The bridle joint resembles a mortise and tenon joint, in which a mortise is cut completely, and the tongue can easily fit from the top of the groove.
The bridle creates a stronger joint than a butt joint and is often used in framing. The one con to using this wood joint is that it easily jerks apart if not installed properly.
Uses
- Used to join a rail to a stile (vertical member) in a frame, as in a door or window.
- Bridle joints are also used to reinforce the miter joint and butt joint.
- You can also use them in table legs
- The bridle joint is common in benches
Pros
- A simpler option to mortise and tenon joint
- Best for building a narrow frame
- The bridle is easy to cut
- Fits various applications
8. Finger/Box Joint
A finger joint is a woodworking joint made by cutting a set of rectangular slots across the wood grain of one board, usually at the ends, and then inserting a complementary board with fingers that fit into the slots. The resulting wood joint is super-strong and can be used for various projects.
Tip: Measure both planks before cutting the fingers to get a straighter and tight-fitting box joint.
Uses
- The box joint connects two wood planks at right angles to one another
- You can also use it in small projects like drawers, chests
- The finger joint is an excellent choice for strong cabinets
- Finger joints are useful in large furniture projects
Pros
- It is very easy to assemble
- Finger joints produce little timber waste
- The box joint forms a straight joint
- You can apply wood glue to make a finger joint sturdier
- The box joint does not require special tools or materials.
9. T-joint
T joints are one of the most versatile and commonly used types of joints in woodworking. Their basic design consists of two interlocking pieces of wood held together with nails, screws, or bolts.
T joints are incredibly strong and can be used to create a wide variety of different structures. Their versatility makes them an excellent choice for amateur and professional woodworkers.
Tip: Choose the correct screw length for your wood planks. Also, remember to drive the screw heads or nail all the way into the wood plank.
Uses
- Joining two wood planks together
- Attaching hinges (You can paint the hinges your desired color).
- Installing door and window frames
- Creating shelves and other wooden fixtures
Pros
- Suits multiple use cases
- Sturdy
- Easy to make with only a saw and fastener/adhesive
- Easy to disassemble
10. The Butt Joint
This is the simplest type of joint and involves two wood planks butting up against each other. It’s often used for framing or construction work, as it’s not very strong and isn’t suitable for anything other than basic applications.
Now, the thing about the butt joint is that it’s only as strong as the glue or screws that are holding it together. So if you’re going to use a butt joint, make sure you use a high-quality adhesive or fastener.
Tip: A mitered butt joint can make your piece sturdier and improve its appeal.
Uses
- The mitered butt joint is common in picture frames
- It’s also perfect for building a wooden wall
- Best for joining two wood planks of the same thickness.
Pros
- You can choose between wood glue or screws
- Butt joints are the simplest wood joint to make (does not require much work)
- The mitered butt joint is versatile–it can be used for small and large woodworking projects
11. Pocket Hole Joint: Best Joint for Table Top
One of the most popular types of joints used in woodworking is the pocket hole joint. It is a simple wood joint to make and is very versatile, making it ideal for various applications.
You can make pocket holes by drilling planks of wood at an angle. Next, join them together using pocket hole screws.
Alternatively, you can insert a dowel into the pocket holes and secure the pieces with glue. And then, drill a hole through both dowels, then insert the screw head into the pilot hole.
Uses
- Pocket hole joinery connects two wood planks that are not flush with each other
- It can help you join different materials, including plywood, hardwood, and softwood
- You can use it to reinforce a T joint
- A quick way to assemble a tabletop from timber pieces
Pros
- Pocket hole joinery does not require wood glue
- Easy to make with a pocket hole jig. The kreg jig costs around $50.
- Drilling a pocket hole is time-saving than building most joints
- The screws make your pocket hole joint sturdy
12. The Lap Joint/Half Lap Joint
Lap joints or one of the most popular and commonly used joints in woodworking. They are also sometimes called scarf joints. Lap joints are formed by overlapping two planks at an angle and then securing them together with screws or nails.
The wood overlap in a notched lap joint can be as small as 1/4″ or as large as half the plank’s width. The strength of the full lap joint depends on the size of the overlap and the mechanical fasteners used.
Tip: You can make notched lap joints in many different ways, i.e, create a full lap joint, mitred lap joint, or half lap joint.
Uses
- Full lap joints can help you abutt two pieces of trim or molding
- A notched lap joint connects two pieces at right angles
- Half lap joints are ideal for lattice work
Pros
- Lap joints are relatively easy to make
- You can connect planks to increase their length using notched lap joints
- The half lap joint is also attractive
- Lap joints serve various applications.
13. Mitred Lap Joint
A mitred lap is a woodworking joint that binds two pieces of wood to form a right angle. It is usually used when one piece of wood is much thicker than the other.
The mitred lap joint is stronger than a butt joint. It is a staple in cabinetmaking and other woodworking projects where two pieces of wood need to connect at a right angle.
And if you like, you can modify it into a mitred half lap joint.
Uses
- Useful for both structural and decorative purposes.
- Mitred lap joints are commonly used to create frames, boxes, and cabinets
- Used to make short pieces longer
Pros
- Easy to prepare and assemble
- Perfect for framing
- A better alternative for a butt joint
- A mitred half lap joint is excellent for joining pieces to form corners
- Can be reinforced with mechanical fasteners or adhesives
14. Sliding Dovetail Joint
The sliding dovetail joint differs slightly from the dovetail; its tenon can slide along the mortise. Besides joining two pieces of wood, it can also be used to create decorative elements.
The joint is made by cutting a notch into one plank and a matching tenon on the other piece. The two pieces are then glued together and clamped until the glue dries. The resulting sliding dovetail joint is extremely strong and useful for various applications.
Uses
- It helps you attach adjoining surface areas from the top and bottom
- You can use it for drawers, shelves, and other furniture components
- This wood joint can also be used to create decorative elements
Pros
- Easy to cut with a machine
- It is mechanically sturdy
- Provides ample surface for adhesive
- You only need a few tools to cut it– a router, a dovetail joint bit, and a router bench
See also: What router bit for door hinges?
15. Rabbet joint
A rabbet joint is a straightforward, relatively strong, and versatile groove joint. You can make them by cutting a notch into the end of one board and fitting it into the other.
You can make rabbet joints in many different ways, but the most common is the half-lap rabbet joint, which involves cutting half of the thickness of each board away. This leaves a protruding tongue on one board and a recess on the other, which fit together to form the wood joint.
Uses
- Rabbet joints are best for building strong corner joints
- They are also common in cabinets and window frames
- Rabbets are often used to join plywood panels together since the tongue and groove create a strong mechanical bond between the two pieces.
Pros
- This joint aligns with a little effort
- Rabbets are resilient and can bear heavy weight
- Rabbets fit perfectly
- They leave a large surface for adhesives
Want to learn more? Here is how to make dresser drawers slide easier.
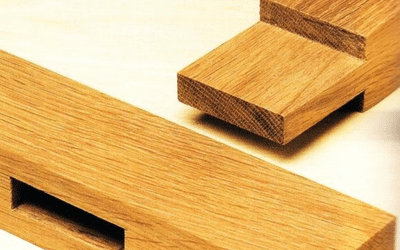
16. The Tongue and Groove Joint
There are two main parts to a tongue and groove joint: the tongue and groove.
The tongue is a thin piece of wood that protrudes from one board. The groove is a similar piece of wood that is cut into the other board. The tongue fits into the groove, and the two boards are then held together by friction and glue.
Tip: The tongue and groove joint is best for connecting planks to build table tops and hardwood floors. If you are looking for tips on how to join two boards together, then this is a great option.
Uses
- The tongue and groove joint is ideal for wood flooring projects
- It helps you connect ceilings together
- The best way to connect adjoining surface areas
Pros
- The tongue and groove joint gives space for seasonal expansion and contraction
- It is relatively easy to assemble
- They interlock wood planks forming strong wood joints.
- The tongue and groove joint is versatile and effective for various applications.
You might want to learn more about the best finish for pine tongue and groove for natural aesthetics.
17. Japanese Wood Joint
Kumiki is a Japanese wood joinery technique that has been used for centuries. Kumiki uses no nails or screws, instead relying on interlocking wooden joints to hold the pieces together.
This makes for a very strong and durable joint, which is why Kumiki is still used today in the construction of traditional Japanese buildings. Kumiki joints are also very attractive, and can add a unique touch to any woodworking project.
Uses
- Constructing wooden houses
- Building roofs
- Creating artistic pieces
Pros
- Best if you love artistic furniture
- It makes a firm joint if cut accurately
- You only need a couple of chisels to create it
- Does not require fasteners/adhesives
18. Birdsmouth joint
The birdsmouth joint is a type of woodworking joint that is commonly used in the construction of roofs. It is so named because the grooved piece resembles the beak of a bird. You can create the joint by cutting a groove across the length of one wood plank and then fitting another piece of wood into that groove.
But the birdsmouth joint is limited to only a few uses– often playing a major role in roof support. Still, it balances the roof ensuring the logs underneath do not crush to the excess weight.
Uses
- The birdsmouth is the ultimate joint for roof trusses
- A birdsmouth can also support a garden shade
- You can use the birdsmouth on a kennel’s roof.
Pros
- It is the easiest joint to create
- It forms a sturdy joint
- Does not require fasteners/adhesives
19. Cope-and-stick joint
The cope-and-stick joint is one of the most versatile woodworking joints. It is strong and relatively easy to make and serves multiple uses.
There are two main types of cope-and-stick joints:
- the through joint
- the stopped joint.
The “through joint” is the most common and is used with planks of the same thickness.
The stopped joint suffices if one piece of wood is thinner than the other and is generally used for decorative purposes.
Uses
- Cope-and-stick joints are most commonly used in cabinetmaking
- They can also help you join two pieces securely
- Can be used to bind two planks of different thickness
- They are also often used in furniture making
Pros
- It forms sturdy joints
- Can be used for decorative joinery
- Easy to construct with only a few basic tools
20. Beadlock joint
A beadlock is a type of groove joint used to bind two pieces of wood.
Carpenters make the groove using a beadlock machine– a specialized tool that cuts a groove into one piece of wood. Next, the carpenter locks the two pieces together with a bead of adhesive.
The main advantage of this type of joint is that it is very strong and much more difficult to pull apart than other types of fasteners.
Uses
- Ideal for applications where a high degree of strength is required, such as in furniture or cabinetry.
- Beadlock joints are also very resistant to vibration and impact, making them ideal for use in areas where these forces are present.
Pros
- The wood joint is machine-cut, hence accurate
- The bead joint machine speeds up joinery
- Produces a few wastes
Also Read: How to Make Rounded Edges on Wood
Benefits of Wood Joints
Not only are wood joints incredibly strong, but they also offer a number of benefits that you might not be aware of. Let’s look at a few of them:
- Wood joints help us create sturdy and functional furniture. Plus, they hide unsightly wood grains.
- You can use wood joints to create unique designs on your furniture or shelves and make a statement about your style/ taste.
- Joints help us repair damaged furniture instead of throwing it away.
- Wood joints are easy to disassemble and reassemble, making them perfect for DIY flat-pack furniture.
- Joints make your furniture last longer.
- Wood joints make it easy for you to change the layout of your furniture or shelving units so that they fit together more easily
Lastly, wood joints add value to furniture, as they are seen as a sign of quality craftsmanship.
Read also: How to attach legs to a table without apron.
Factors to Consider When Choosing a Joint
Different woodworking joints have their unique uses and benefits. Here are the top points to note when choosing joints for your carpentry project:
- Strength of the wood joint: Choose a joint that is strong enough to manage your project’s weight. Try the mortise and tenon joint if you want a solid and sturdy piece.
- The appearance of the wood joint: Go for a joint that is aesthetically pleasing and matches the style of your project.
- The type of wood you’re using: Some joints require stronger woods than others, so you’ll want to use the right joint depending on the wood type.
- Tools and time at hand: You must also consider the machines/ tools you have at hand, plus the timeline of the project.
- The intended use of the furniture: If you’re making something that will be used frequently or placed under a lot of stress, use a strong joint that will withstand that. You also want to use a joint that covers the end grain for your indoor furniture.
- Whether or not you’re using wood glue: If you don’t have a budget for glue or do not need it, go for wood joints that do not require glue.
Lastly, consider the ease of making. Some woodworking joints– e.g., the butt joint– are easier to make than others, so if you’re not experienced in woodworking, you’ll want to choose something relatively easy to make.
Common Mistakes in Wood Joint Making
DIYers make some common blunders when creating wood joints. Watch out for these 5 pitfalls.
Not using the proper size or type of wood
One of the most common mistakes is not using the proper size or types of wood for the joint. The size and type of wood will affect the strength of the joint. If you use the wrong sizes or types of wood, the joint will be weaker and more likely to break.
Not cutting the pieces of wood to the correct size.
The wood must be cut at the proper angle and with the correct size bit. For instance, if you don’t cut your half blind dovetail joint correctly, it will fit loosely or fail to fit at all.
Not clamping the pieces of wood together correctly.
Clamping binds together the wood pieces in a joint. Plus, it aligns the structure, ensuring accurate squares and rectangles. Poor clamping or failure to do so leads to weak joints.
Not using the correct tools for the wood joint
For example, using a saw instead of a chisel to make a dovetail joint will likely result in a messy and unsuccessful attempt. Groove joints like dovetail joints require great accuracy.
Sanding the pieces of wood before assembly.
Your mortise and tenon joints should fit tightly. Sanding before assembly can eat away part of your tenon, causing it to fit loosely into its mortise. The same is true for dovetail joints.
If you avoid these common mistakes, your wood joints will be much stronger and more durable.
How to Make Wood Joints Stronger
Strength is perhaps the most important quality in a joint. Weak joints can affect the final piece’s overall functionality. Here are some ways to make your strong wood joint even stronger:
- Use a strong adhesive: If you’re using an adhesive like glue, make sure to use a strong one that’s designed for wood. Super Glue or epoxy resin are both good options.
- Clamp the joint after gluing: Reinforcing your glued joint for a few hours guarantees a stronger tenon joint.
- Use more than one fastener: Use more than one screw or nail when you’re joining two wood planks. This will distribute the weight better and help keep the joint from coming apart.
- Use dowels: Dowels are small wooden plugs that you insert into holes drilled in the wood. They help keep the joint from coming apart and make it sturdier.
Lastly, you can use metal brackets. You can find these at any hardware store. They’re easy to install and will reinforce your wood joint, making it much stronger.
FAQs
What is the Strongest Glue for Joints?
The strongest glues for wood and wood joints are PVC types like Gorilla Wood Glue. But other non-PVC glues also offer a strong joint. The best glues for a strong wood joint include:
- Titebond III Ultimate Wood Glue
- Weldbond Multi-Surface Adhesive Glue
- Elmer’s Carpenter’s Wood Adhesive
- Glue Masters Instant Wood Glue
What is the strongest wood joint?
The mortise and tenon joint remains the strongest wood joint. It is made by cutting a mortise/hole in one wood plank, a tenon (tongue) in another, and then joining the two. Mortise and tenon joints are extremely strong, can withstand a lot of force, and are difficult to pull apart once assembled.
Conclusion
We may have rated mortise and tenon joints as the strongest, but the bottom line is; the best wood joint is the one that best suits your project.
There are various types of wood joints, each with its unique uses, advantages and disadvantages. The most important thing is to pick the right wood joint based on your needs.
Lastly, remember to stick to all wood joinery practices and use the right tools to achieve a sturdy joint.
Find out the weight of 1 cord of wood as you discover more woodworking tips on our blog.