Have you been brave enough to use a thick pasty stain only to find that it wasn’t as powerful and the color was darker than you expected?
I’ve been there, and thankfully, there’s a way around it. Read on to learn how to thin wood stain and get desired results.
How to Thin Wood Stain
To thin wood stain, you can use compatible solvents like water, mineral spirits, or lacquer thinner. Depending on the type of stain, use water to dilute water-based stains, mineral spirits for oil-based and lacquer thinner for lacquer-based stains. Add the wood thinner in small increments and stir thoroughly to dissolve.
Types of Wood Stains
Your stain will directly affect the outcome of your completed project. There are several types of stains.
- Water-based wood stain
- Oil-based wood stain
- Lacquer wood stain
- Gel wood stain
- Metalized dye stain
- Varnish wood stain
- Water-soluble dye stain
Out of the seven, only four are pigmented stains— those are; water-based stains, oil-based stains, lacquer wood stain, and gel stains.
Water-based stains resemble the thinned latex paint though they have their pigments suspended in a water/resin mixture.
They are generally semi-transparent and commonly used in exterior wood projects. If you’re not sure whether the wood stain is water-soluble, the word latex indicates that it’s not.
Oil-based stains have pigments suspended in a solvent/resin mixture, just like the thin oil-based paint. In addition, most oil-based pigmented stains have mineral spirits, typically referred to as petroleum distillates.
The pigments in gel stains are suspended in a paste that can change from a solid to a liquid state as it’s wiped on the surface.
Varnish stains are naturally thicker than traditional oil-based stains and contain mineral spirits; hence, you can use mineral oil or mineral spirits to dilute the wood stain.
If your stain has a strong odor, toluene, xylene, or methyl ethyl ketone (the main ingredients in lacquer thinners), that’s a clear indication that you’re using a lacquer-based stain or non-grain-raising stain.
Fortunately, wood stains are easy to apply but much easier when thinned. Wood stains can be diluted using water, mineral spirits, or lacquer thinner based on the type of stain.
Generally, mineral spirits thin gel and oil-based wood stains while water thins water based stains. Likewise, lacquer-based stains are diluted by lacquer thinners.
Learn More: Semi Transparent Stain Vs Transparent Deck Stain
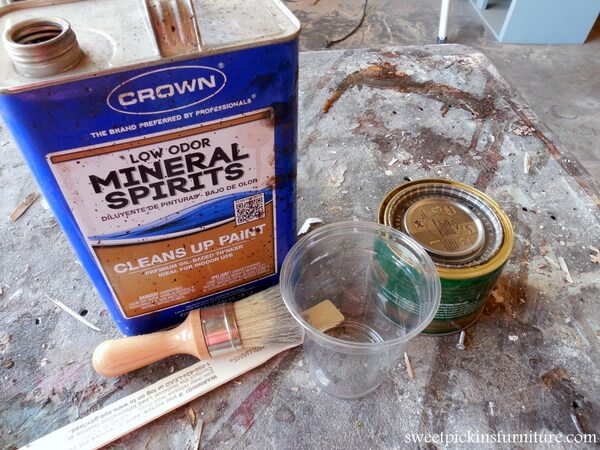
Tools You Need
- Paintbrush or airless sprayer
- Thinning agent (based on the wood stain being used)
- Funnels
- Mixing can or bucket
- Mixing stick
- Clean rags/pieces of cloth
- Gloves
- Respirator
How to Thin Wood Stain (Step-by-Step Process)
Thick wood stains can give you heartache to get an even coat. Moreover, they cause a buildup of residue and take longer to dry. As such, thinning the stain will help avoid such problems.
I will use this part to explain the process of thinning wood stains based on the type of stain.
Thinning water-based stains
The most effective way to thin water-based stain is to use clean water. Usually, water-based wood stains create lighter shades, so you may have to use multiple coats to get desired results.
Water-based stains can also be thinned using alcohol. Though less common, this method is effective. The two types of alcohol used in thinning water-based stains are denatured alcohol and rubbing alcohol.
Denatured alcohol is expensive and very effective. Rubbing alcohol is cheaper and not quite as effective.
- Step 1: Pour the amount of wood stain to be thinned into a can. Start with about half a cup if you’re staining a small project.
- Step 2: Add the thinner to the thick stain in small amounts using a tablespoon and stir the solution thoroughly with a mixing stick. Remember that a water-based stain is excessively thinned and creates a chalky texture after it dries.
- Step 3: Using small scrap wood, test the thinned stain for pigmentation and consistency. You can thin your water-based stain further by adding some water and repeating the test until you achieve the right shade.
Whether you’re using water or alcohol, the steps applied are similar. What is important is to remember to start with smaller amounts and increase as need be.
Note: You should keep in mind that the water based stain lightens as it dries but soon after drying, it resumes its original color.
Thinning lacquer-based wood stains
A lacquer-based stain isn’t your everyday varnish stain but is commonly used in production or commercial projects and diluting it is as easy as pie.
The best thing about these stains is that they dry faster and are easy to apply, especially when multiple coats are required quickly.
Here’s how they are thinned.
- Step 1: Wear gloves and put on a respirator (to protect against dangerous fumes) before you start mixing the lacquer-based wood stains.
- Step 2: Pour the right amount of thinner and wood stain into a bucket and mix thoroughly. Remember that lacquer-based wood dyes can’t be thinned using water, alcohol, or mineral oils.
- Step 3: This step involves diluting wood stains using one or two ounces of your thinning agent. For large projects, pour the thinning wood stain into a new can or gallon and add the right amounts of the thinner. Use a mixing stick to stir thoroughly. If you choose to stain using the lacquer-based varnish, use a spray gun and shake the spray bottle well. We recommend using a lacquer thinning stain specially manufactured for that wood species.
- Step 4: After mixing the stain and thinning stain thoroughly, use a small scrap of wood to test its color, evenness, and consistency. Ensure the mixture is silky but not extremely liquid.
Thinning oil-based wood stains
An oil-based stain is a conventional wood stain that is thinned in three ways:
Mineral spirits – Mineral spirits are the most common way to thin oil-based stains. Mineral salts are categorized as petroleum-based solvents and are quite inexpensive.
Linseed oils – This method is less common but is very effective.
Paint thinner – Paint thinner is the least common way of thinning stains though it is effective. Paint thinner is a petroleum-based solvent that’s expensive but the most effective than mineral spirits.
When thinning stains using paint thinner, it’s recommended that you use a 1:1 ratio of stain to paint thinner.
When diluting any wood stain, thinning of oil-based stains depends on the amount of stain to be thinned down. Be careful because mineral spirits and oil-based stains emit highly toxic fumes that harm your health.
You should always wear protective gear and be in a well-ventilated area.
Steps of how to thin oil-based wood stain
Step 1: To produce a consistent liquid, stir the stain inside its container so that any clumps or sunken pigments mix up. Then, pour the right quantity of stain into another container or bucket. Note the volume of stain being diluted to reconstruct a similar shade if needed.
Step 2: Pour some mineral spirit into the stain in one tablespoon to one cup of wood stain. Add accordingly at a time. Keep a proper count of the amounts you’re mixing to ensure a similar color is created when repeating the process. Then, thoroughly mix the mineral spirit and wood stain.
Step 3: Before applying your thin oil-based stains to your finished project, test applying it on a small piece of scrap wood to ensure it gives the desired oil-based tint. If you’re looking for a lighter stain color, you can dilute wood stain further using mineral spirit. However, remember that over-diluting wood stain can make it even lighter, runny, and challenging to apply.
When using paint thinner, pour the stain and thinner into a can, then stir well until it’s evenly mixed. Don’t exceed the recommended ratio of 1:1, as this may result in poor color saturation, and you won’t get the ideal thin oil-based stain.
Gel Stains
I’ll be candid: thinning gel stain is such an awful idea. So instead, gel stain is made to be thicker than conventional wood stains to serve their purpose rightfully by allowing less stain to soak into the plank, making the surface less blotchy.
I can’t deny that gel stains are great and versatile, so if you’re not going to listen to me and choose to thin it anyway, resist the urge to add at most 10% of mineral spirits; otherwise, it will be too thinned and significantly reduce its color intensity.
The steps used in thinning gel stains are the same process as thinning oil-based satin:
Step 1: Stir the gel stain in its container to dissolve any clumps or sunken pigments. Measure the right amount of stain and pour it into a separate bucket. Take note of the volumes being diluted, so there’s consistency if you have to reconstruct a similar shade.
Step 2: Pour at most 10% of the mineral spirit into your gel stain. Add a small amount at a time. Note the amounts of stain used to ensure the same shade is achieved when repeating the process. Next, thoroughly mix the mineral spirit and wood stain.
Step 3: Before you apply your thin gel stain to your finished wood project, test it on a small scrap wood to ensure it gives the desired gel-based tint. If you’re looking for a lighter shade, you can thin the stain further with more mineral spirit. However, remember that over-thinning wood stain will make it extremely drippy and hard to work with.
Safety Tips to Follow When Thinning Wood Stain
If you’re using water-based stains, there are a few safety rules to remember;
- Water-based stains are less toxic than oil-based stains, and their ingredients are not flammable.
- Oil-based stains, gel stains, and mineral spirits can be hazardous. They emit highly toxic fumes that are dangerous when inhaled. Always work in a well-ventilated area when thinning stains. These stains are also flammable, so use them away from heat or ignition sources.
- After thinning and applying the thinned stain, dispose of all used rags carefully. Dry the rags outside first and ensure they’re not bunched or folded.
- Rags saturated with oil-based stain can combust spontaneously—no kidding! So let them dry first before disposing of them.
- Finally, if there are excess stains that you must get rid of, avoid tossing them into the trash. Any liquid wood stain is considered hazardous and must be disposed of with care.
- One of the best ways to avoid making trips to the hazardous material center would be to use the excess stain to paint any cardboard or scrap wood lying around. Then, after applying, let it dry completely. The stain will be less dangerous at this juncture, and you can then throw the scrap wood or cardboard away.
Reasons Why You Need to Dilute Wood Stain
If you’re not working with gel stains or water-based wood stains, then you’re using lacquer or oil-based stains. So why should you thin them in the first place? Here are 5 reasons why you should thin wood stains.
1. Control color
More often than not, I embarked on a wood staining project with the desire for a specific result in mind but crashed at the end when the stain I used didn’t come out as I envisioned it.
Diluting wood stain is a fantastic way to control your plank’s ultimate color better. By thinning wood stain, you’ll be able to apply several lighter coats that will slowly make the wood stain darker and eventually create your desired color.
Notably, this process can prove difficult when staining large surfaces such as a backyard deck. Large surfaces take more time to stain, especially when multiple coats of thin wood stains must be applied.
Again, it can be daunting to consistently thin huge amounts of stain to achieve the exact shade.
2. Easier application
A thinned stain is easier to apply than a thick one. This reason is quite true when staining wood with a large surface area. In addition, a well-thinned stain helps to ensure an even coat without cracks or streaks.
Furthermore, a thinned stain reduces the risk of having residue buildup. This is a common problem when the stain is thicker or when multiple coats are applied. Not so with a thinned stain.
3. Thinning wood stain for spraying
Most wood stains come thinned; however, some sprayers demand thinner stains to work efficiently. Diluting wood stain becomes the best way to prepare the stain that should be sprayed on your piece of wood.
Please note that thinning stain changes the original color of your varnish; hence, if you’re thinning the stain just for easy spraying, consider this when choosing a color.
Be sure to add your thinner stain incrementally, keeping in mind that it’s easier to add a thinner when the stain clogs the gun during spraying, but it’s hard to thicken a wood stain that’s excessively thinned.
4. Speed up drying and improve coverage
Typically, a thick stain takes longer to dry than a thinner stain. Therefore, if you’ve limited time to stain, consider thinning it to reduce the time-consuming process of drying.
On the other hand, a thinned stain delivers better coverage than a thicker one. This is simply because a thinner stain deeply penetrates the wood, leading to nice color saturation.
When thinning your stain, take note of the pigment clumps at the bottom of the can. Sometimes they fail to dissolve in the stain completely, so when you apply stain, it may look fine, but when it dries, it becomes chalky.
Ensure the clumps are completely dissolved from the get-go.
5. Saving money
Thinning wood stain eventually saves money as you can make your wood stain look more like the more expensive and exquisite wood stains. For instance, almost all Varathane’s 1-quart wood stains have the same price regardless of color.
Yet, you can thin your Dark Walnut stain to make it look and feel pretty close to Special walnut. And if a quart of Dark Walnut is thinned, you can end up with a lot more special walnut than having to purchase the quart.
After diluting your stain, you’ll get better coverage, meaning you won’t need to buy that much. This is a great option, especially if you’re looking for a ‘standard wood’ color for your small project and can’t use a dark stain.
On several occasions, I’ve avoided spending on a new can of wood stain by just thinning the wood stains I already have.
Can You Mix Stain and Polyurethane?
Yes, you can mix stain with polyurethane to create a colored finish. By mixing stain and polyurethane, you come up with your desired finish.
There are products available, such as stain and polyurethane combinations, that are designed for this purpose.
Alternatively, you can mix a compatible wood stain into clear polyurethane to achieve the desired color.
However, follow the manufacturer’s guidelines and perform a test on a small area to ensure compatibility and achieve the desired color intensity before applying it to the entire project.
Also read, can you mix stains together to learn more.
FAQ
How to thin wood stain for concrete use?
To prepare wood stain for staining concrete, add a suitable solvent like mineral spirits or acetone gradually until the desired consistency is achieved. Stir thoroughly to ensure even mixing. When staining concrete with wood stain, proper thinning helps achieve a smooth application and enhances color penetration for optimal results.
Conclusion
Having a proper understanding of how to thin wood stain can be rewarding when it comes to enhancing your wood’s aesthetics and natural tones and adding a preferred color to your finished projects.
However, choose a stain that suits your needs, and always use a clean rag or brush to apply the stain to your wood properly.