After staining wood, do you have to seal it? If you are new to woodworking, you could battle this question like many DIY enthusiasts.
When it comes to enhancing the natural beauty of wood, staining is a popular choice.
However, many DIY enthusiasts and woodworkers often wonder whether sealing the stained wood is necessary.
After all, sealing provides an added layer of protection against moisture, UV rays, and general wear and tear. This article will explore the importance of sealing wood after staining.
Whether working on a furniture project or sprucing up your wooden floors, understanding the significance of sealing stained wood will help ensure its longevity and exquisite appearance.
After Staining Wood do You Have to Seal it?
Sealing wood after staining is essential to protect it from damage and discoloration from foods, liquids, human touch, and piercing objects. While wood stain may seal the pores and offer some protection from moisture and water damage, its primary purpose is to color natural wood.
Check out our recommendations on deck sealers for pressure-treated wood.
Why Seal Your Wood After Staining
Sealing may mean extra work on your wood project, but the benefits outweigh the disadvantages.
1. Sealing offers protection against wear and tear
As already mentioned, wood stains offer little protection to the wood. Its primary role is to color the wood and enhance its natural grain.
The stain will also enter the wood pores and close them, offering some protection against moisture and water damage.
Unfortunately, the pores on stained wood remain partially open because the stain does not form a film on the wood surface.
As a result, water and other liquids can still damage the wood, especially when the stain begins to wear out.
Sealing provides a protective finish impervious to water, moisture, and other liquids, including chemicals. The hard surface also forms a scratch-resistant buffer on the wood surface.
2. A sealer helps prevent discoloration
Exposure to constant spills, foods, human touch, and pet activity can leave marks on the stained wood surface. A sealer can prevent that.
A protective sealer forms a hard coat that acts as a barrier between the piece of wood and the outside. With this layer of protection, outside elements will not reach the wood and taint it.
The glossy sheen on the wood surface is also easy to clean. The slickness means much of the dust, grease, and grime coming in contact with it will not stick. As such, you can maintain the wood surface in a completely clean and tidy condition with simple routine wiping and dusting.
3. Sealing protects against fading
A sealer helps lock in the color of the stained surface. This means the wood can keep its color even with exposure to weather elements as long as it is sealed.
4. Sealing can enhance the wood aesthetics
A clear coat helps make the wood look better by providing a polished look. And since the wood is safe from scratching and denting, this pristine look can remain for long.
If you want an alternative method for protecting your wood, try powder coating wood.
How Long to Let the Stain Dry Before Sealing It?
Various wood stain brands have different drying times. Often, the manufacturer will indicate the time to wait between coats before sealing it. Usually, this time can be as little as four hours or 24 to 48 hours.
You’ll usually wait 8 hours or overnight before applying a clear coat over stained wood. Consider touching your stained surface to check if it’s ready.
You can proceed with a clear coating if the wood no longer feels tacky to the touch.
Also Read: How Long Should Stain Dry Before Rain
What influences wood stain drying time?
Even stains with quick drying times may take longer to dry based on the stain type, substrate moisture content, and environmental conditions such as the weather.
You can expect your stained wood to take longer to dry if the weather is cold or humid or if the wood’s moisture content is high.
Consider the weather and follow the manufacturer’s specific recommendation. It is better to err on the side of caution and wait for as long as 72 hours than seal the wood before it is fully dry.
If you’re patient enough, you can learn how to dry wood stain faster and more effectively.
Dangers of sealing stained wood before it is dry
There’re two dangers to sealing a stained surface before it is completely dry. First, if you use a foam brush, tack cloth, or pad, you risk wiping or streaking the stain while applying your clear coat.
Second, the sealed surface will likely take longer to cure due to the wetness beneath it.
Of course, spraying the clear coat can help you avoid the first risk (streaking or wiping out the stain), but you still might have to wait much longer for the sealed wood to cure. And you could end up with a blotchy surface.
How many coats of sealer should I apply over stained wood?
Two coats of sealer are usually sufficient to close the pores on the wood and offer adequate protection for a sealed wood.
However, you can apply more coats if you prefer more protection and a solid layer on your wood.
In any case, ensure you let each coat of sealer dry completely before adding any subsequent coat. The amount of drying time for the sealer should be available on the product label.
Do You Have to Put a Clear Coat Over Stain?
Coating over stain is not obligatory, but it’s necessary to protect the stained wood. While staining wood creates richness and depth of color, it provides no long-term protection.
Regular contact with water, chemicals, food, or sharp objects could damage stained wood if it does not have a topcoat.
The Best Clear Coat to Use Over Stained Wood
Several options are available for clear-coating stained wood. This section looks at the best choices based on considerations like top coat for kitchen cabinets.
Polyurethane
Poly is an oil- or water-based plastic resin that exists as a liquid and dries to form a super-tough protective film over wood or other substrates, including concrete and metal.
It consists of specially formulated molecules that bond tightly when the product dries, creating a waterproof layer on the substrate exterior. This formulation makes a wood finish much more resistant to moisture, solvents, abrasion, and other kinds of impact.
Related Read:
Can You Mix Stain With Polyurethane?
Pros and cons of polyurethane
Pros
- The product is easy to apply by spraying.
- Polyurethane offers the best gloss and protection compared to the other clear coats in this guide.
- The product is durable and reliable.
- Water-based poly retains its clear coat without yellowing over time.
- New DIYers can achieve a professional-looking finish with a spray-on poly.
- There’re numerous types of polyurethane to choose from, so customers have more options.
- Poly is great for outdoors, unlike lacquer or polycrylic.
Cons
- Polyurethanes, especially the oil-based versions, take longer to dry since the constituent plastic polymers take time to harden.
- Oil-based poly tends to yellow over time.
Minwax Polycrylic
Polycrylic Protective Finish is a water-based, crystal clear topcoat. It is an excellent product to use over a water-based wood stain. I
t can also go on paint or bare wood.
Pros and cons of Polycrylic
Pros
- The product is easy to clean since it is water-based.
- It has no smell and is ecologically friendly, with no toxic fumes.
- It is ultra-fast-drying, helping you save on application time
- Polycrylic is easy to apply using a paintbrush, lint-free rag, or spray gun.
- It remains crystal-clear without yellowing over time. This makes it perfect for clear coating over tinted and light-colored wood stains.
Cons
- Since Polycrylic dries quickly, it can be challenging for larger woodworking projects.
- It has a loose consistency can make its application challenging unless sprayed on the surface.
- It is unsuitable for use outdoors.
Lacquer
Lacquer is a popular wood finishing product across the woodworking community. It is comprised of shellac dissolved in synthetic substances or alcohol. The product dries to form a hard protective finish on substrates such as wood or metal.
The product is available in various forms for use via different methods. Like the other clear coating products in this list, you can apply lacquer or spray it on your project using a paintbrush.
Since the finish dries almost instantaneously, spraying is the most commercially viable way to apply it on large projects. Brushing lacquer on is challenging, even on small projects.
Related Post: Can You Stain Wood After Sealing It With Shellac?
Pros and cons of lacquer
Pros
- Lacquer dries faster than polycrylic. This can help you save time on the application.
- It’s priced, and only a few spray cans should be adequate to complete a mid-sized project. It’s relatively inexpensive if you buy the larger tin cans.
- It forms a durable finish for indoor projects.
- Unlike polyurethane which takes several hours to dry and can trap dust, lacquer dries almost instantly. This leaves no room for dust to get trapped during the drying process.
Cons
- Lacquer dries pretty fast. Unfortunately, this means it can be extremely challenging to use a brush-on lacquer on a large project.
- Lacquer has a strong odor that may be difficult to handle without a respirator. You also need that protection when using lacquer because it produces fumes that can be toxic to inhale.
- Lacquer does not hold too well to direct sunlight. Therefore, you can only use it on indoor projects.
Read Also: Is Sanding Required Between Stain Applications
Considerations before applying wood sealer after staining
Selecting the most suitable clear wood finish requires understanding what to look for in a product and whether it is compatible with your stain.
You want to pay attention to the sealer’s drying time, ease of application, toxicity, and yellowing. Let us look at these factors in detail.
Your project size
The first thing to determine the clear coat to use and its application method is the project size. If you are working on a large project, using a brush-on lacquer or polyacrylic will be a bad idea.
So while this application option is on the table, it may not be viable.
Both sealers dry quickly, so keeping a wet edge as required while applying the product becomes difficult.
Keeping a wet edge, in this case, means ensuring the last roll does not dry before overlapping it with the succeeding roll.
This is necessary to achieve even coverage, whether painting or applying a sealer.
So, the viable option, especially if you are a new DIYer, is spraying. A paint sprayer for wood will allow you to apply the product much easier and quicker and keep up with its fast pace of drying.
Location of your project—indoors or outdoors
Do you have to seal a piece of stained furniture for outdoor use? If yes, you immediately rule out lacquer and polycrylic finishes; the two are not suited to the outdoor environment.
Exposure to direct sunlight can damage a lacquered or polycrylic coat much sooner than expected.
For example, if you are working on patio furniture, your best bet will be to use oil-based polyurethane. The product is resilient enough to hold well against weather elements.
It also offers better wood protection against sun damage.
The use of your project
Other than the location and size, how you intend to use the stained piece also matters.
For instance, you don’t want to seal a kitchen dining table top with polyacrylic. While the product forms a durable topcoat, it does not hold too well against heavy usage.
Polyurethane is ideal for heavy-use furniture like the dining room or kitchen table. It is not only durable but sturdy enough to withstand stress.
Ease of use
You do not want frustration while applying your sealer coat. You can apply slow-drying clear coat finishes like polyurethane using a brush or lint-free cloth for staining wood.
However, fast-drying options like lacquer require spraying.
If you want to finish the job quickly, consider lacquering it or using Minwax Polycrylic. If you prefer to take it slow and wait several hours between coats, opt for a slow-drying sealer like polyurethane instead.
Wood and stain color
Light-colored stains will require clear thin coats that are not yellow. Water-based products such as polyurethane and polycrylic are the winners in this case.
Lacquer or oil-based poly may turn yellow over time, tinting the color of your finished surface. If you mind that amber tint, then consider using a water-based poly or polycrylic finish for your project.
Water-based or oil-based stain
Water is non-compatible with oil. So, you may want to seal a water-based stain with a corresponding water-based sealer and an oil stain with an oil-based sealer.
On the other hand, lacquer should work for both types of stain and gel stain as long as you clean and prep the surface before sealing it.
How to seal stained wood
Supplies needed for sealing wood stain:
- Clean, lint-free cloth or brush
- Sandpaper (220-grit or higher)
- Wood sealer or varnish (water-based or oil-based)
- Stir stick
- Paint tray or container
- Paintbrush or foam brush
- Painter’s tape (optional)
- Drop cloth or newspaper (to protect the work area)
Step-by-step process to seal wood stain:
- Prepare the surface: Ensure the wood stain is completely dry before proceeding. Lightly sand the stained wood using 220-grit sandpaper to smooth out rough areas or imperfections. Clean the surface using a clean, lint-free cloth to remove dust or debris.
- Choose the sealer: Select a wood sealer or varnish suitable for your project. Consider the desired finish (matte, satin, or glossy) and the type of wood you work with. Water-based sealers dry faster and have less odor, while oil-based sealers provide a more durable and long-lasting finish. Here is some wood that stains well.
- Prepare the sealer: If using a liquid sealer, stir it thoroughly with a stir stick to ensure proper mixing and consistency. Follow the manufacturer’s instructions for any specific preparation steps.
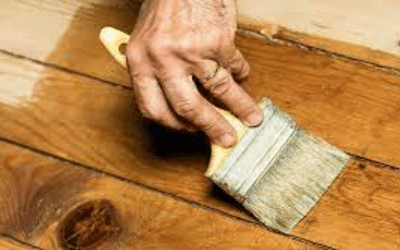
- Apply the sealer: Pour a small amount into a paint tray or container. Dip a paintbrush or foam brush into the sealer, removing any excess by gently tapping it against the container’s side. Apply a thin and even coat of sealer onto the stained wood, working in the direction of the wood grain. Start from one end and move steadily to the other, maintaining a smooth and consistent application.
- Repeat and dry: For optimal protection, apply a second coat of sealer after the first coat has dried according to the manufacturer’s instructions. Allow the sealer to dry completely between coats, typically for the recommended drying time specified on the sealer’s packaging.
- Optional: If you wish to protect specific areas from sealer, such as adjacent surfaces or hardware, use painter’s tape to mask them off before applying the sealer.
- Clean up: After sealing, clean your brushes or foam brushes with water (for water-based sealers) or the appropriate solvent (for oil-based sealers). Dispose of any used materials properly.
Interesting Read: Do I Need to Remove All Stain Before Restaining Deck?
Woodworking Tips for Applying a Sealer Over Stain
Here are some essential woodworking tips you will want to keep in mind to help seal stained wood.
- Always use a clean, high-quality brush or paint roller when working with a brush-on sealer. Tiny particles of dirt or lint on the sealed surface can become noticeable when the surface has dried.
- Always use a paint sprayer when working with a fast-drying sealer like lacquer. And work quickly and carefully to ensure every inch of the surface is uniformly coated.
- Always apply thin layers of finish. They will dry quicker and look more even than thick layers. In other words, you expect fewer complications and imperfections when you use thin coats.
- When selecting your finish, buy a reputable brand with a decent track record of manufacturing quality products. The chances of surprises are minimal that way.
- Always practice on a scrap piece of wood before your project.
- Always let the stained wood dry completely before sealing it. Work with the manufacturer’s recommended drying time or longer if the weather is not ideal.
- Always brush the sealer or wipe it with the grain. Following the direction of the grain helps hide any brush marks or streaks that might slip through the cracks.
Related read: Can you seal MDF?
After Staining Wood, Can You Have it Painted?
Can you paint over stained wood? If you’ve already stained a piece of wood and now want to change its color or apply a new coat of paint, the good news is, yes, you can.
However, there are some essential steps to follow for the best results. First, ensure the stained wood is clean and dry. Then, lightly sand the surface to provide better adhesion for the paint.
Applying a primer designed for painting over stained wood can also improve the paint’s durability and appearance. Finally, proceed with your desired paint color, using smooth and even brush strokes.
Related Post: Applying Tung Oil Over Stain
FAQs
Does oil based stain need to be sealed?
Sealing oil-based stain is not mandatory but highly recommended. Oil-based stains penetrate the wood, enhancing its color and grain. However, they may not provide sufficient protection against moisture or wear. Applying a protective sealant, such as varnish or polyurethane, over the oil-based stain helps seal the wood and prolong its beauty while adding an extra layer of defense against potential damage.
Does stain seal wood?
No, wood stain is not a sealer and therefore does not seal the wood. Instead, its role is to darken or tint wood by adding pigments to it. When you use stain on wood, it will soak into its pores and bring out the grain pattern in a clearer and more enhanced way, giving the wood a more dramatic appearance. Any excess stain will be wiped off to let the stain dry.
What happens if you don’t seal stained wood?
If you leave stained wood without a sealer on top, it will gradually lose its moisture content and dry out. Over time, the wood may look dull and lifeless as the stain wears out due to the lack of wood sealing and protection.
Do you have to use polyurethane after staining?
You don’t necessarily have to seal stained wood with polyurethane. There’re several other sealers and clear coats for stained woods, such as lacquer and Minwax Polycrylic, that you may use over the stain. A polyurethane topcoat is one of stained wood’s best protective clear coats. In any case, it should be top of your list when considering a sealer for outdoor wooden furniture or other exterior projects.
How long after staining can I polyurethane?
Generally, you need to wait between 24 and 48 hours for the stained wood to dry before sealing it with polyurethane.
However, the stained wood might require more time to dry completely if the weather is chilly or humid. So as a general rule, always consider the weather and touch the surface to ensure you’re not applying polyurethane over tacky stain.
When should I use stain sealer?
Consider using a stain sealer when your wood stain has dried and you have smoothened the surface by scuff sanding it. Wood stain is designed to color or darken the wood and not to protect it. So, any wood stain should go with a pre-stain wood conditioner and then sealer for protection.
Related read: What is the difference between polyurethane and sanding sealer?
What is the best way to seal stained wood?
The best way to seal stained wood is to use a compatible sealer. First, prepare the surface by scuff sanding it, then apply a thin layer of the compatible sealer by brushing or using a sprayer. Let the coat dry completely before adding another sealer coat. Repeat the same steps if you wish to apply multiple coats of the sealer, allowing adequate drying time between each layer.
How long after staining wood can I seal it?
The wait time for the stain to dry before sealing varies based on the weather. You should wait one to two days if the weather is warm and dry. However, if cool or damp, you might have to wait up to a week or ten days. Alternatively, you can seal stained wood with de-waxed shellac after 2-3 hours to shorten the wait before applying a water-based poly.
Do you have to poly over stain?
Polyurethane is not always required over stain, but it is highly recommended. Polyurethane provides a protective layer that enhances the durability and longevity of the stained wood. It helps guard against moisture, UV damage, and everyday wear. Applying polyurethane over stain ensures a beautiful and long-lasting finish.
What is the best sealant for stained wood?
The best sealant for stained wood is polyurethane. The product is durable and can withstand heavy usage and high traffic areas such as a stained wood deck. Additionally, polyurethane finishes hold well against weather elements like UV rays.
After staining cabin home, do you have to seal it?
Yes, after staining a log cabin home, it is essential to seal it for added protection against moisture and UV rays. A high-quality sealant will enhance the stain’s durability and longevity. To apply the sealant efficiently, consider using the best stain sprayer for log cabins, ensuring an even and professional finish.
So, Do You Have to Seal Stained Wood?
You have probably struggled with whether you should put a sealer over stain. And we hope this article helped answer your question- “after staining wood do you have to seal it?”.
Well, the stain is only meant to color the wood, hence the name.
Sealing is necessary to ensure your wood is protected against water and other damaging elements.
Great article! Thanks for taking the time to write such an instructive and comprehensive piece. Definitely going to do a polyurethane on top of a twice stained deck. Actually two decks. Love to see the woodgrain coming through the Cabot semi transparent new cedar I applied. Again many thanks for your efforts. You sold me on sealing!
Welcome; depending on where you live – find out if you need poly or spar here – Search for spar-urethane vs polyurethane here on our site