Carving chess pieces without a lathe requires patience and determination. You’ll want all the pieces to look like their corresponding set. Subsequently, you’ll want to be consistent.
Whether you are an expert at wood carving or getting started, this article offers a detailed guide on how to carve chess pieces.
While we’ll focus mostly on the ideas you need for whittling entire wooden chess sets, you’ll also find tips for power carvers.
Before everything else, here’s what you should know before carving wooden chess pieces.
Tools Needed
- Knife
- Pull saw
- Sealant
Best Wood For Carving Chess Pieces
When whittling wooden chess pieces, ensure that you use the right types of wood for carving. Besides allowing for a seamless carving project, quality woods guarantee aesthetic and long-lasting chess pieces.
Here are some recommended material suitable for wooden chess pieces;
1. Boxwood
Besides suiting wooden chess pieces, this light-coloured wood is perfect for making squares on chess boards. However, I shy from using them to make the entire chess set. This robust wood is dense and ages nicely.
Since they come in varying grades, wooden chess sets made from boxwood vary in price and quality. If you’re looking for good wood options for your black pieces, but are running low on budget, consider working with Ebonized Boxwood.
This is a stained variety of the Boxwood Tree that provides a cheaper alternative to real Ebony. With ebonized boxwood, you can achieve a convincing ebony effect for a more attractive deep black chess piece.
2. Walnut
This wood comes in rich red, yellow, and purple tones. I use it to make the squares and borders on chess boards. While they’re renowned in the furniture and construction niche, you can also use them for your chess pieces.
Walnut features a tight grain with attractive figure disparity for any chess piece. Although they come in such a vast selection, the American Walnut is the most popular option. It’s robust and features a medium density, making it a suitable choice for a chess piece.
3. Wenge
This is a very dark wood that closely resembles natural Ebony. However, in certain lighting conditions, it gives off an almost purple hue. Therefore, Wenge, which I use for black chess pieces construction exclusively, is more sustainable and cost-effective.
Moreover, it shows an intriguingly tight grain with a geometric appearance. Unfortunately, many enthusiasts mistake the natural wood for a printed or manufactured effect. This leaves you with an aesthetic chess piece.
In the wood triangle, Wenge closely resembles the dark Indian Rosewood. This makes the wood perfect for making wooden chess sets that accompany Rosewood, Ebony, and Sandalwood wood options.
4. Ebony
Regarded by many as the black wood, Ebony ranks as a luxury wood. Natural Ebony gives off an almost dark brown hue, with noticeable light streaks in the grain. However, it is through a chemical process that it turns completely black.
Since it’s attractive even in its natural form, you’ll easily come across chess boards made from semi-treated Ebony. Semi-treated Ebony retains the effect.
However, since this is not your typical wood, the fine hardwood is only used in high-end chess pieces. You’ll also find the materials in luxury violins and guitars.
5. Rosewood
Here is yet another luxury wood. Rosewood is a dark wood that gives off a slightly red tinge. You’ll mostly find this wood in medium and high-end chess pieces.
Besides being one of the perfect materials for chess boards and folding sets, it offers an excellent effect on most guitar fingerboards.
Bud Rosewood, sourced from the Rosewood tree’s base, features a higher quality than normal Rosewood. As a result, you can expect to see Bud rosewood on glamorous chess pieces.
6. Red Cedar
While it resembles Rosewood in several ways, Red cedar gives off a stronger red tint and shows much grain. Moreover, I consider it more durable than Rosewood.
While it is common to use them interchangeably, the confusion lingers due to the adulteration of the term Rosewood.
Unlike with Rosewood, seldom will you find Red cedar on chess boards and cabinets. Nevertheless, they’re only suitable for making a first-class chess piece.
Point to note: White or red cedar can be used to carve chase pieces due to their workable nature, fine grain, and suitability for intricate carving designs, ensuring exceptional craftsmanship and aesthetics.
See also: Can you make a cutting board out of cedar?
7. Red Sandalwood
Besides being a versatile wood, red sandalwood is valuable. Traditionally, it worked as herbal medicine, and powdering it turns it into a dye. It’s also used to make attractive and stunning chess pieces.
It has a lovely rich red color and a dense grain. You’ll only find it on expensive and high-end chess pieces. Its superior quality and high demand make red sandalwood expensive to source.
Thus, carving a wooden chess piece out of Red sandalwood comes with numerous advantages.
8. Maple
Maplewood, which can be almost white in some cases, is often used to create white squares. The hard wood’s light color sharply contrasts with black Ebony, creating a stunning chess set.
Besides being stable, this wood is abundant in most parts of the world. However, the popularity of boxwood makes chess pieces made from Maplewood rarer.
In this case, Erable- a variety of maple-provides a suitable alternative for this type of wood carving. Although it is light, Erable has a rich and quilted grain.
This allows you to stain the wood in various colors. As a result, most colored chess boards and pieces consist of Erable wood.
How to Carve Chess Pieces
Here are the fundamentals of carving each piece in the entire chess set.
Step 1: Prepare Your Wood
Using your saw, cut a length of wood from a log or tree. Next, measure equal pieces and cut using a knife. I recommend green wood, especially for beginners, since they’re softer and easier to carve.
Alternatively, you can buy wood carving blocks from your local arts and craft store or an online retailer like Amazon. Go ahead and work on the decoration if you’re familiar with what type of paint is best for wood crafts.
For the more seasoned carver, you can use harder wood types such as maple, Ebony, or Rosewood. When cutting your pieces, add an extra size, about 20%, that you’ll carve away. For example, if you want a 6 by 5 pawn, get a 7 by 6 block.
I can’t emphasize the importance of consistency when carving your chess pieces. This means you must strive to achieve a similar size, design, and look on all your pieces.
For instance, if you’re carving a Balinese-styled queen and king, you can’t have modern-looking knights and medieval bishops in the same chess set. The same is true for their sizes.
Depending on your knowledge of wood carving, you may want to seal your carved pieces to make them more durable. In this case, you can use beeswax or polyurethane to finish your chess set. The finish also gives a shiny look to your pieces.
Finally, before commencing, set your expectations depending on your expertise level. A good rule for beginner and intermediate woodcarvers is to avoid using the most difficult patterns.
With this rule, you’ll be better off with a simple yet identical chess set than follow a grim pattern that leaves you with 16 dissimilar pawns. Keeping this in mind, and with all the materials in place, you are set to begin carving your pieces.
Check out our article on the downsides of beeswax finishes for coating wood to gain better insights.
Step 2: Carving the pawn
Your pawns’ design will vary depending on the chess style you want to carve. Even so, regardless of your chess style, consider drawing and marking your carving. This ensures that you achieve a rather precise design.
With the drawings, you can better understand the points you need to deepen before making the carving wider to outline the shape.
When carving a traditional chess design, use the push cut technique to round off the top of the pawn’s head. I use stop cuts when carving out the deep lines separating each section.
Afterward, you can work your way downward. When making the drawings, mark the deepest part on every layer. This includes under the pawn’s head, under the collar, and the start and end of its skirt.
For more exotic chess designs, such as the Balinese chess style, use chipping techniques similar to chip carving. Since pawns are generally small, consider carving small pieces to achieve a detailed look.
After carving the pawn, sand it and apply a suitable finish. Depending on your preference, you can make the piece super smooth. Doing so removes the visual knife cuts that make the pawn appear far too simple.
Step 3: Carving the knight
In my entire wood carving career, I’ve found knights as the most complicated piece to carve. In many hand-carved chess sets, it takes a lot of practice and experience to achieve 4 neat-looking knights that are identical.
To cut the disparity, I often start by carving both white knights first before proceeding to their black counterparts. You’ll notice that your technique betters with time, especially after making the same carving many times.
However, this doesn’t mean that your first knight should look rushed and less impressive. It’s the fourth knight that’ll look more detailed and leisurely.
While it isn’t always the case, I don’t recommend alternating between carving the black knight and white knight, then repeating the sequence. If you do so, there’ll be a larger difference which will be more noticeable.
Moreover, when carving the knight piece, consider giving it a thick base. You can achieve this by carving away more wood from the top and middle parts. The challenge is that the knight will look weak and poor if you carve off too much wood.
On the other hand, if you cut too little, you’ll end up with a smaller base, making the knight appear disproportional. So, in this case, it is vital to strike a balance.
Moreover, remember that the knight’s anatomy isn’t round like all the other pieces. Instead, it sports a more oval shape.
Subsequently, thinning out this piece makes the two opposite sides thinner. This leaves the other opposite sides thicker, such that you can see the oval shape if you look from the top.
Similar to carving the pawn, push cuts to shape the knight’s head and add detail. Also, when shaping the head, begin with one of the thicker opposite sides. This way, you can highlight the knight’s mane.
Ensure that the knight is symmetrical. To confirm thi, check whether the head starts to lean on either side. While achieving identical knights isn’t a walk in the park, strive to make them similar. This ensures that you end up with an aesthetic chess set.
For example, use a v-cut to create an outline of the knight’s ears and stop cuts from marking the base area. For more creativity, you can add pointy ears and a round base.
Step 4: Carving the Bishop
With the right idea, you’ll realize that bishops aren’t half as hard to carve. If you know what your bishop should look like, then you have an idea of what you’re about to carve.
It is typical, especially for beginner woodworkers, to remain undecided on how their bishop should look like. Keeping this in mind, remember not to undermine the queen by whittling a complex bishop.
Strive to achieve more than a thinly carved stick. If you are carving certain styles of chess, then you’ll find it even harder to get the inspiration for your bishop.
Generally, carving a bishop encompasses the same technique as you’d carve a pawn. First, use push cuts to achieve a rounded head. Next, use stop cuts to mark different areas of the bishop as you work your way downwards.
In medieval carved chess pieces, there is a particular element that most people fail to notice. The cut, which is usually on the right side of the piece’s head, is what would differentiate the bishop from the queen and pawn.
Ensure to incorporate the cut in your design since it is an important detail that looks so much in place. However, not many people notice it. To make the design, use a V cut and go as deep as you think is appealing.
Also, all bishops include a small ball on the top of the head. If you want to have it in place but find it challenging to carve, work on it separately and stick it on later using glue.
Step 5: Carving the Rook
Despite being a valued piece in chess, the rook is one of the easiest pieces to carve without a lathe. For beginners, attempt to achieve anything with a smaller cube on top of a larger cube and some thinning outlines at the center.
For expert and intermediate carvers, you’ll find it seamless to add details and make the rook more intriguing. This includes adding about 4—6 castle walls at the top of the rook. To go about this:
- Hollow out a few inches off the rook.
- Chip the outer circle, leaving a distance between each space to attain the castle-themed walls.
- Adding a few cuts below the area highlights the castle walls.
Since the rook is worth a lot, you’ll want this to be evident. Therefore, you can make it larger than the knights and bishops or highlight its anatomy more using the best wood lathe available for precise carving.
The rook can have up to five depths, which you can make using stop cuts. Also, the depth of the wood is different between each stop cut.
With more depth, your rook will possess more assertiveness, which should also be your state whenever you whittle chess pieces.
Also Read: Beginner Wood Lathe Projects
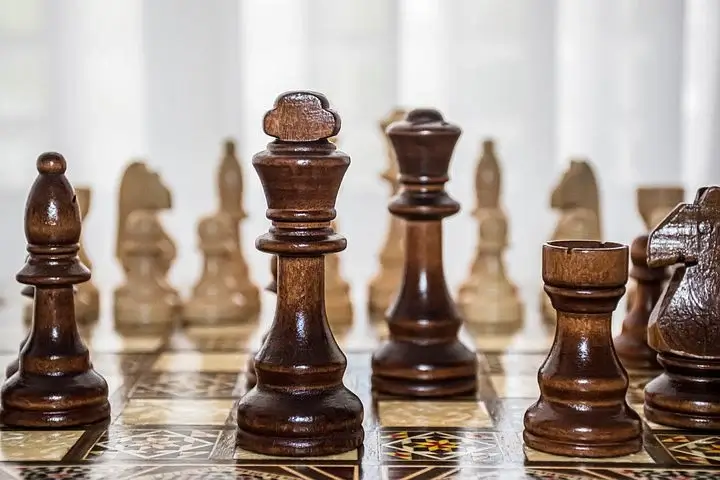
Step 6: Carving the King & Queen
Like their titles, the king and queen of your carved chess set ought to be special. If you wish to kill your chess set, try making a queen that resembles the bishop or a king shorter than the knight. They are the most valuable pieces on the chessboard, and this must show.
Firstly, you’ll have to decide whether the king or not the queen should be taller. Some arguments support and oppose the queen being the taller of the two. However, this will depend on your appeal.
The anatomy of the king and queen are similar in many ways. Yet, you’ll notice a major difference at the top of their head. Also, remember to give a lot of depth when carving these two pieces.
Finally, carve the king and queen in relief, unlike the rook where you used to stop cuts from making each layer flat. This way, you achieve a wavy shape from one stop cut to another. (See: What is relief carving)
To start carving, you’ll have to round off the wood piece. Rounded edges are more durable and won’t break easily compared to sharper edges.
Like the rook, I recommend carving the king and queen from a larger wood block to give more priority. After achieving two round blocks, make one shorter to avoid giving the queen and king the same height.
You can add layers by thinning some areas. However, avoid making the areas too thin since they’ll break with time. Next, draw a small circle at the top of your wood block and carve it into a sphere. This is what will be the queen’s crown.
For the king, add a little cross on the crown using stop cuts to narrow down the wood block from two sides. You can then proceed to carve out the cross.
When designing the upper quarter of the king and queen, be creative since it’ll determine the style of your chess pieces. However, take caution when adding detail at the top of the king and queen. Using high pressure will break or cut them off.
How To Carve A Wooden Chess Board
As an early Christmas gift, I’ve decided to provide a mini-guide on how to go about carving your chessboard. Carvers tend to forget this vital feature often.
Firstly, you’ll have to carve enough wood to leave space for carving letters and numbers on the side, as is typical with all standard chess boards.
I remember one time when I mistakenly multiplied the size of one square by 8 to determine my board’s dimension. Consequently, I lacked enough space for denoting the letters and numbers.
When cutting and shaping your wood block, a good rule of thumb is to leave a minimum space, half the size of your square, on all four sides of the board. You can find various ways to carve the board.
My all-time best is coloring with pyrography. Moreover, wood burning offers several useful features, such as shading the board and writing letters and numbers.
How To Carve Faces On Chess Pieces
Sometimes, you may want to add more detail to your chess pieces to make them more authentic. You can do this by carving spirits and faces in pieces. Whittling faces on wood is a seamless endeavor that you can undertake regardless of your wood carving skills.
Moreover, you only need basic tools, including a sharp pocket knife for whittling wood pieces and a bigger knife to split the wood blocks into the needed pieces. I prefer to use my hand-forged knives when practicing this hobby.
If you are yet to acquire the best wood carving pocket knife, I recommend purchasing a flex cut or Pfeil pocket knife. I started with these brands, which were amazing during my tenure as a beginner.
Moreover, they are great with softer woods, which are easy to carve once it dries. Now, make rough cuts on any chess pieces to carve the face to represent the bears.
Afterward, you’ll determine the shape of your figure’s face. Ensure to use coarse cuts in this step. Next, find your hairline and make straight cuts to denote the hair.
Finally, you’ll want to use fine cuts to smoothen the square impression of your chess pieces. Then, use your whittling knife to add details like eyes, nose, and mouth. Do this on all the pieces and finish with a suitable sealant.
Read Also: Best Bowl Lathe
FAQs on How to Carve Chess Pieces
What Are High-Quality Chess Pieces Made Of?
Wood chess pieces are classical and give your board a sense of sophistication. Their price may vary depending on the wood type used. However, carve the pieces using marble, granite, or crystal if you want to send an air of luxury to your chess set.
What Are The Sizes Of Chess Pieces?
Here is the recommended height of all the pieces In a chess set
- King – 9.5 cm
- Queen – 8.5 cm
- Bishop – 7 cm
- Knight – 6 cm
- Rook – 5.5 cm
- Pawn – 5 cm.
Ideally, the diameter of the base of the chess pieces should measure about 40- 50% of their height.
How Heavy Should A Chess Set Be?
Chess experts recommend an average weight of about 50 ounces for a standard chessboard. Since a typical chess board comes with 34 pieces (16 pcs for every play and 2 extra queens to be used in case a pawn is promoted), each wood piece should weigh 1.47 ounces on average.
What Makes A Chess Board Expensive?
Carving chess pieces is a complicated process, particularly if you’re starting. Making them requires more time, effort, and precision. The in-depth effort and the time consumed in the process make it more expensive to come by a chess set.
Conclusion
While it may seem impossible, completing an entire chess set is achievable and rewarding. Moreover, the more you practice, the more seamless you’ll find going about it.
If you’ve done a carving project of your own, leave a comment telling us how it went and what you’d do differently next time.