Wood carving is a time-honored tradition, and it’s a great way to create beautiful pieces of art from simple materials.
Whether you’re a beginner or an experienced carver, this article will show you a simple wood carving face procedure. We’ll walk you through the process step by step, and we’ll give you tips along the way.
Let’s get started.
How to Carve a Face in Wood
Like engraving letters in wood, carving faces requires patience and a keen eye for detail. This ensures you capture all features that construct a complete face. Here is everything you need to carve a face in wood
What tools do you need?
Here are some of the wood carving tools best for beginners:
- Chip Carving Knives
- Whittling Knives
- Detail knife
- Bench Knife
- Carving Chisels
- Carving Gouges
- V Carving Tools
- Veiners
- Wood Carving Mallet
Steps by Step Instructions for Wood Carving Face
Step 1. Preparing Wood for Carving
Interestingly, you can bring a face out of any piece of wood provided it is of the right size. I recommend using a soft, low-cost piece of wood that doesn’t show much grain for beginners .
However, you’ll be more inclined to use sturdier, stronger, and more colorful wood with enough effort and time. Use a clamp to hold larger pieces of wood in place or pin them down to a flat surface or workbench with a vice.
For smaller pieces, grip the wood block firmly and ensure the tools used are at a safe distance from your body. Next, if your wood features an outer bark, use a drawknife to strip it.
Clamp smaller and lighter pieces of wood beforehand to prevent accidents. Alternatively, go for a premade wood block if you don’t wish to refine your wood. Find one at your local art and craft store.
If you opted for the unrefined option, your piece of wood likely has a thin ring of sapwood. Sapwood is a soft and light part covering the heartwood that you should remove before commencing your project.
Use an ax or wood carving knife to shave off the sapwood to reveal the harder heartwood. Wood from younger trees tends to have more sapwood.
Step 2. Crafting Facial Features
Face carving ensues in different forms, including round carvings of the head, creating relief carvings, and gnome statues. This post focuses on the best type of face carving for beginners.
Different carving types incorporate face carving techniques. Subsequently, it is important to pick a style that concentrates on facial features. This will enable you to improve at face carving.
Planning is the first step for beginners who whittle when carving faces on wood. However, as you get more seasoned, you may skip the planning and drawing phase before you start carving.
When marking out your plan, use a marker or pencil to make the process easier. If your wooden surface is aligned, your work is made simpler. However uneven surfaces, you may opt best paint pens for rough wood surfaces to avoid brushing back and forth multiple times.
Here are the basic steps when carving faces for the first time without emphasizing much in detail.
- Plan out the rough ratios of where you wish to position the piece’s eyes, mouth, and nose. Take your creativity to the next level by adding a mustache. You can use a pencil or marker to mark the rough sketches.
- Measure and draw an accurate outline of the face, accommodating the eyes, mouth, eyebrows, and nose. They form a major part of your carving. Two semicircles are enough to denote where the eyes should be.
- Next, with the help of your outline, round off the edges at the top of the piece of wood to form the head. Shave off layer after layer until you attain your desired shape. When rounding out the face, keep your plans for the hair in mind.
- Remove excess wood while estimating the space required to form the hairline for whatever hairstyle you have in store for the face.
- Use a chisel or knife to shave away a gradual amount of excess wood from the top of the wood until it is about the level of the ears. Use a V-tool to achieve more depth when cutting lines in the hair area. Continue shaving off the excess wood until it forms a general shape for the hairstyle.
- Using your carving tools, make several small vertical lines that run from the head to the top of the hair. This will give an impression of individual hair strands. However, you don’t need your hair to be super long or detailed.
To indicate that the hair exists, you can add a few lines above the hairline or work your way up to the top of the wood. You can also use the v-tool to add lines down the side of the wood or around the ears to give an impression of long hair.
Follow the above wood carving steps to get your first face. While it will be a basic and simple face, it’ll familiarize you with little and simple things such as ratios and outlines of faces.
This provides a solid foundation before you can carve faces that require extra attentive details.
Read: Best Dremel bit for cutting wood
Step 3. Eyes, mouth, and nose shapes
When carving faces, most people struggle to create the eyes, mouth, and nose shapes, especially during their initial attempt. Perhaps it’s because they’re too hyper-realistic in the wood carving.
You’ll later realize that achieving perfect round eyes and a triangle nose typical to a human face with wood carving is quite difficult.
Nevertheless, if your artistic intuition allows you to illustrate perfect facial features on your first try, go for it. For the rest of us, here is a simple guide to help you come up with the best pair of eyes, mouth shapes, and nose for your carving.
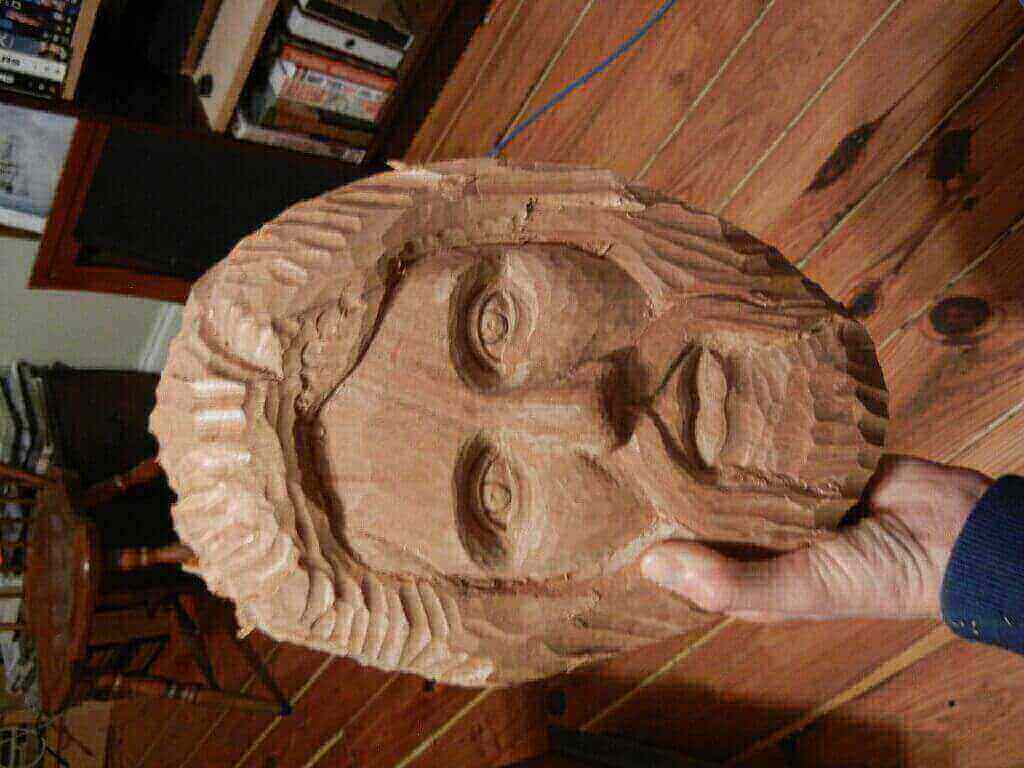
1. Eyes
- Following your initial outline, use a gouge to make an accent on the pencil lines, denoting the eyes, and ensure to give them a lot of depth. A good rule of thumb is making the accents 2 to 3 times deeper than the rest of the face.
- Since we are carving open eyes, make sure that the eye area is raised slightly. You can achieve this by leaving the material inside the carved semicircle intact.
- Use a 3mm gouge or carving knife to make scooping cuts that run downwards while minding the top edge of the tool to give depth to the corners of the eye. Do this on both eyes. Take caution not to remove the material in the eyeball area.
- Use a smaller fishtail gouge to round out the eyeball. A skew chisel should work fine if you don’t have a fishtail gouge.
2. Nose
In your outline, you should’ve identified where the tip of the nose will be located and drawn a circle representing the nose. With this foundation, you are ready to proceed.
- Use your V parting tools underneath the nose and define a line representing the bottom of the nose.
- For greater definition, use one of the larger 3-20 mm carving chisels to shave away the material underneath the nose gradually.
- Next, you can get to carving the angle of the nose.
- With either the Plunge cut or sweeping cut, mark and define where you’ll locate the bridge of the nose.
- With the sweeping cut, you can learn how to bring the nose bridge forward seamlessly. This type of cut leaves a smooth and clean transition out on the other side of the cut.
- When using the plunge cut to achieve a nose bridge, insert the corner edge of your tool and cut along the nose line. Next, using a 9mm u-shaped gouge, clean up the plunge cut.
3. Mouth
Using a V-tool, trace a line across the mouth to differentiate the lips. It would be best to smooth out the chin area before adding extra detail such as facial hair.
Shave wood from the lower area to ensure that the lower chin and beard area are beneath the mustache. After carving out all the facial features, you can add the desired details by adding extra depth and volume.
I suggest experimenting with different eyes, nose, and mouth variations to achieve the most suitable shapes for all your carvings.
Step 4. Detailing the Face
When carving faces from wood, you can add smaller details such as eyebrows and wrinkles for a detailed finish. Check where you need to deepen existing lines and use a chisel or knife to scrape away excess wood where necessary.
You can add wavy lines on the forehead and marks around the eyes to indicate aging using a gouge or V-tool. You can do the eyebrows similarly to other types of hair. Use a V-tool to carve lines up from the eye to indicate them.
Before concluding your piece, look out for areas where you can improve the definition of the face. You may need to check it over several times before achieving your envisioned look.
If you wish to drop rough edges, you can sand your piece using 220-grit sandpaper. While sanding isn’t obligatory, it will remove splinters that tend to prick fingers when handling finished pieces.
Since V-tools and gouges feature sharp edges, consider paying close attention to the areas you apply them. Wear off the sharp edges around the face cuts for a softer and more natural look.
Best Wood For Carving Faces
Often, you are more inclined to pick the wood piece for your carving based on its availability. While face carving doesn’t require a special type of wood, some wood kinds work better than others.
That aside, here are the best wood for carving a face;
- Butternut and Basswood are popular options for beginners. They often come in premade blocks.
- Seasoned wood carvers prefer oak, cottonwood, and black walnut. They offer strong, sturdier wood with their noticeable grain. They are also a favorite option for commercial products.
- Cedar is also popular since it comes in various intriguing colors, such as red and green. While they can be nice to carve, they come in different types.
- Like birch, face carving out of apple wood is rare and harder. They are mostly used for spoon carving. However, nothing should stop you from carving a face out of apple wood if it is the only available option. Interestingly, pieces carved from applewood tend to change color with time.
- Finally, pine works as the best alternative to cedar and apple. While pine might require a seasoned face carver, white pine is relatively easier to carve.
Wood exists in various forms, sizes, and shapes. Fortunately, you can carve a face into an unrefined piece of lumber provided you have the right tools.
However, wood blocks are easier to work with, especially if you practice with smaller details such as eyes, nose, and hair.
Read also: Best pocket knife for whittling.
How To Finish a Face Carving
Face carving doesn’t require you to use a finish. However, applying a suitable finish can make a carved face last longer and shiner. Here are the best finishes to use for your face.
- Beeswax
- Deft Spray
- Paint
The deft spray is my favorite option since it delivers a glossy finish to your carving. It is a sprayable lacquer that doesn’t affect the fine details and shadows of your finished piece. Use it to increase the lifespan of your face carving.
Read also: Hand carving chess pieces.
FAQs
Which Wood Should I Use For Carving?
Basswood or lime wood is the most popular wood type for carving. This soft and crisp wood is perfect for intricate carving, regardless of your experience and skill levels. It is also easy to use with hand tools.
How Do You Improve Face Carving?
- Learn to sharpen edges
- Learn ratios and proportions
- Perfect at carving the eyes
- Learn to add highlights
- Use wood burn to add texture
- Line up the eyes
Can You Carve Pine?
Pine is a relatively soft resinous wood and features a pronounced grain. However, it is brittle and includes knots that are hard to carve. Pine is ideal for beginner wood carving projects since it is inexpensive and readily available.
Wood Carving Face Summary
Carving a face in wood is an art form that takes time and practice to perfect. The steps we’ve outlined here will give you a good starting point.
But it’s important to remember that the more you practice how to carve a face in wood, the better your results will be. So get out there and start practicing!
Have you carved wood spirits or faces before? What tips would you add? Let us know in the comments.
Are you a beginner? Here is a guide on how to start wood carving.