Very few finishes can make furniture look sexy like polyurethane, but the danger of beauty is that it can easily be ruined. In this case, by air bubbles.
Learning how to put on polyurethane without bubbles is one of the most challenging skills to master. Kidding! It literally takes just a few minutes (hours), a bit of patience (a lot), and this article (+ some videos).
How to Apply Polyurethane Without Bubbles
Apply thin coats using a synthetic brush for water-based polyurethane. And a natural bristle brush for oil-based polys. Before putting the brush into the polyurethane finish, soak it in mineral spirits when working with oil-based polyurethane, or in water for water-based polyurethane. Use a sanding sealer before applying the first coat of polyurethane.
Tools and Materials
When putting polyurethane over paint, polished or stained wood, you would need:
- 180 grit sanding block
- 220 grit sanding block
- Steel wool
- Random orbital sander or any electric sander
- Superfine grit block
- You may also use 120 grit sanding block for a new project, or 80 grit for an old one
- Vacuum cleaner
- Tack cloth
- Bristle paintbrush (read the best brush for polyurethane review to choose one)
- Use a natural bristle paintbrush for oil-based polyurethane; or
- Use a synthetic nylon bristle paintbrush for water-based polyurethane application
- Thinner for polyurethane
- Use mineral spirits for oil polys; or
- Water for water-based polyurethane – ensure all the bristles are submerged.
- Polyurethane – it could be satin, semi-gloss, or gloss (I prefer using varathane water-based polyurethane over oil-based stain.)
Other items you would need are a storage container, a cleaning container, and a drop cloth. You may also need a sponge and lint-free rags.
Ideally, you should have a workstation in a well-ventilated room for your health and safety, but that’s not technically a tool.
Also, read our article on wipe-on polyurethane vs brush to make an informed choice about the ideal application technique for your project.
Bubble free Polyurethane: How to Apply Polyurethane in 7 Steps
Before you begin, you may want to put a drop cloth underneath the project to prevent stains on your floor or workbench. This is an optional first step, so I have listed it here separately.
Now, let’s get into the step-by-step on how to apply polyurethane without bubbles.
Step 1: Get Rid of Dust
The key to starting off right is to get rid of dust from the wood and work surface – not just some of it but all of it.
There are two ways to get this done. The first is with a vacuum cleaner. Slowly hover every inch of the piece of the surface you are working on until all the dust is gone.
You can also remove dust with the help of an air compressor, steel wool and a tack cloth. Note that you will also need to get rid of dust after step two.
Step 2: Sand the Surface
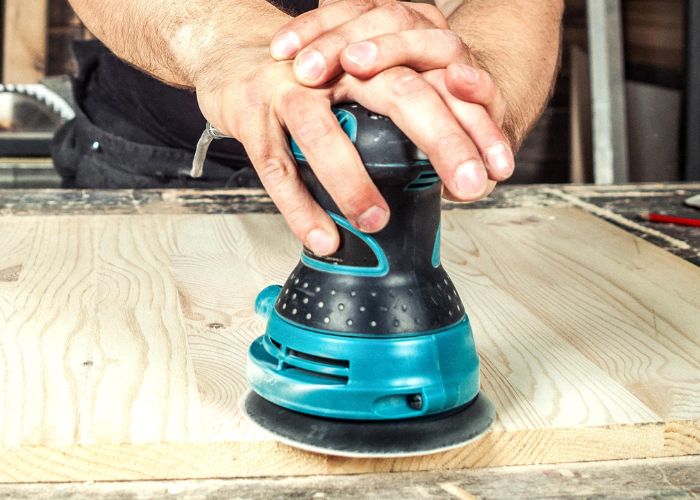
This is where the real fun begins. While it can be okay to start sandpapering before removing dust, you definitely should not try to apply your polyurethane without sandpapering.
The job of the sandpaper is to ensure that the piece of furniture is actually smooth, despite whatever the person at the DIY store said.
Sandpaper is measured in grit, which is how coarse the sheet is. The toughest and the first one you should use on old furniture is 80 grit.
This will handle all the stubborn rough spots on your DIY project until it is level.
Once it’s level, introduce 120 grit sandpaper and move on to 180 grit or 220 grit. 220 grit is the finest, or least coarse, leaving your woodwork smooth and splinter-free.
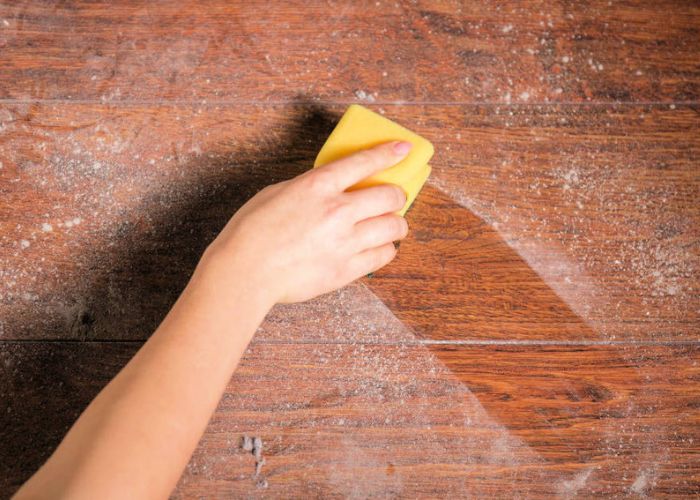
Step 3: Get Rid of Dust, Again
You then need to clean the sanded wood before applying the polyurethane. This serves a dual purpose: the first is to get rid of dust, but the second is to ensure that the surface is indeed smooth.
To get rid of the dust this time, use a tack cloth. The cloth should glide as you wipe down. If it gets snagged along the way, then you know your sandpapering isn’t done.
Step 4: Prepare the Polyurethane
After spending a long time on shelves, polyurethane finishes tend to separate in the can. So the first thing you need to do is mix it, but DON’T shake it.
Unlike spray paint, shaking the poly can create bubbles, which might be a recipe for other polyurethane problems.
Use a mixing stick or any stick to stir it slowly. Then, depending on how thick the polyurethane looks, you can either apply it as it is or thin it.
To get a professional finish, you need at least two thin coats, so thinning will prevent you from making thicker surfaces.
To thin the polyurethane, dilute three parts of it with 1-part solvent based product. Then, pour the poly and the solvent into a separate container and gently mix them.
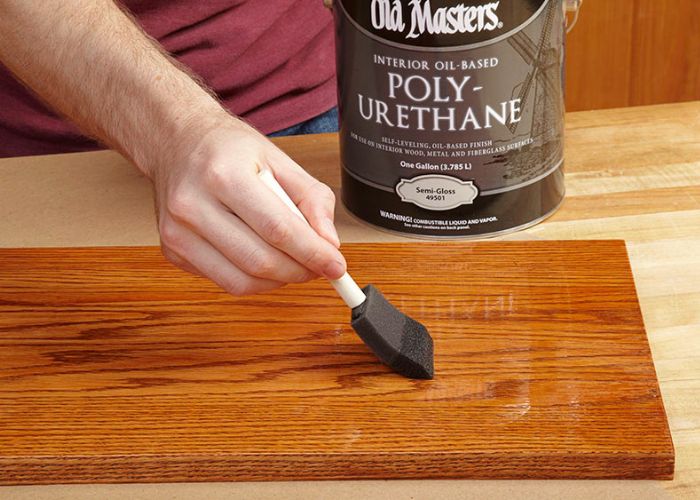
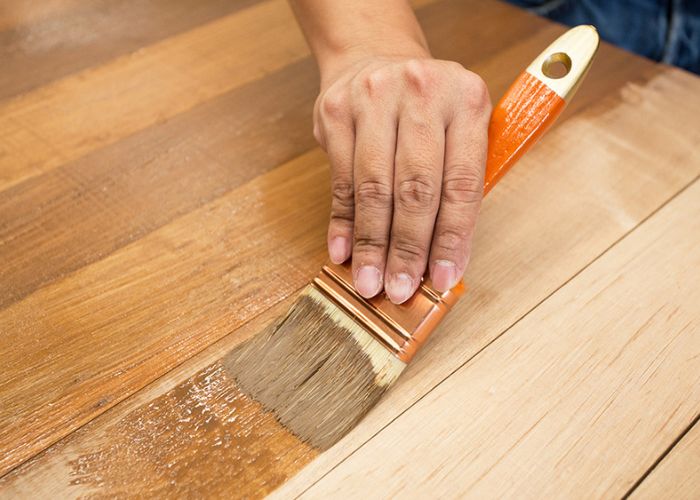
Step 5: Apply the First Coat
Dip the brush (natural bristle for oil-based poly and synthetic brush for water-based polyurethane) into the polyurethane mix gently, and allow the excess fluid to drip back into the bowl.
Do not splash the brush or wipe off the excess on the side of the container; otherwise, you will introduce polyurethane bubbles.
Start from one edge of the piece of furniture and gently stroke along the grain. You don’t need to apply pressure on the brush and only use a bit more than the tip, roughly ½ an inch so as not to leave brush marks.
Work the natural brush back and forth on each ‘row’ until you have coated the entire surface. Then, do the same with the sides and edges.
Once you are done, let the polyurethane dry. This may take up to 24 hours to completely dry.
Some manufacturers suggest that you may apply subsequent coats when the first one is still wet because it adheres better, but this may not give you the chance to get rid of the polyurethane bubbles. However, I tend to err on the side of caution.
Once the finish dries, we need to sand the surface.
Step 6: Lightly Sand Before the Next Coat
Yes, you have to sand between coats of polyurethane after the first coat has dried, use 220-grit sandpaper along the grain of the wood.
For tough and dried polyurethane use a high grit sandpaper or even steel wool. Sanding will help get rid of any air bubbles and make your surface have a smooth finish over any high spots.
You won’t need to press too hard on the dried polyurethane as you are not trying to get rid of the first coat. Check to see that the air bubbles are all gone, then use a tack cloth or washable sponges to get rid of the sanding dust and let the coat completely dry.
Find out what happens if you don’t sand between coats of polyurethane.
Step 7: Apply the Next Coats
For the second coat, you are going to apply the polyurethane a bit thicker than the first. So, again, apply with little pressure along the grain in a sweeping motion back and forth.
Some people recommend you only brush in one direction to avoid ugly polyurethane brush marks. But it’s unnecessarily tedious.
The dried polyurethane absorbs the finish and glistens, whether you stroke in one direction or two, as long as it follows the grain.
Repeat steps 6 and 7 – applying polyurethane in thinner coats until you achieve the desired look.
In case of any mess while adding more coats, you can learn how to deal with polyurethane that won’t dry using this quick guide.
How to apply water-based polyurethane without bubbles
To avoid bubbles in water-based polyurethane, apply multiple thin coats using a quality synthetic polyurethane brush instead of a natural brush. And before applying polyurethane, dampen the brush with water to avoid bubbling, puddling, or running.
Stir the poly and remember never to shake the can because it creates bubbles.
Also See:
How to apply water-based polyurethane to wood floors.
How to roll polyurethane without bubbles
When rolling polyurethane, use a high-quality roller with mineral spirits to prevent air pockets. Lambswool roller absorbs oil polyurethane effectively and does not create bubbles during application.
Foam rollers, microfiber, and mohair are all good for water-based polyurethane. Work in a well-ventilated area and don’t shake the polyurethane can.
How to apply polyurethane to wood floors without bubbles
For strip floors, use a damp T-bar. But for parquet and other complex flooring types, apply the polyurethane finish with a damp roller.
After the first coating, sand down with 220-grit sandpaper. Then tack the wood floor to eliminate dust and apply a second coat. Repeat the steps as necessary.
How to get rid of bubbles in polyurethane
Remove tiny bubbles from polyurethane through sanding. Try sanding with 320 grit sandpaper to smooth out bubbles in polyurethane. But large bubbles may be hard to pop.
You’ll need to sand down all the polyurethane with a high grit sanding sponge like 80-100 grit sandpaper to the bare wood, wipe the surface with denatured alcohol then start over.
You can also tip off the bubbles by running the brush stroke on the wood surface if it’s still wet. Dried polyurethane will probably force you to sand everything.
FAQs
How to prevent bubbles in polyurethane
To prevent polyurethane from forming bubbles, use a thinner or a flow additive. For oil-based polyurethane or varnish, use mineral spirits as your paint thinner. And flow additive in water-based polyurethane or varnish. Before applying polyurethane, do not shake the poly can.
What causes polyurethane to bubble
Shaking the can, using the wrong brush, and improper brush preparation are the main causes of polyurethane bubbles. It is never a good idea to put a brush into the finish unless it has been wetted. When using oil-based polyurethane, soak it in mineral spirit; for water-based polyurethane, use water. Also, water-based polys form fewer bubbles than oil polys since each layer is considerably thinner.
How to get bumps out of polyurethane finish
Clean any sawdust or dust particles off the wood’s surface to avoid bump. In case of bumps, brush lightly over the surface if you’re using a slower-drying polyurethane to break up any bubbles and bumps. A technique know as “tipping off.” Another option is to slow the drying process so that the bubbles have more time to pop on their own.
And the third option is sand the dried polyurethane bubbles on the affected area with a steel wool.
Can you use a sponge brush to apply polyurethane?
Yes, you can apply polyurethane using a sponge or foam brush. Unfortunately, it is not the ideal option for larger jobs. Because synthetic or natural bristle brushes spread polyurethane more effectively, it’s better to use one of these. A sponge brush is used to apply polyurethane to smaller projects.
Read Also: How to clean polyurethane off brush
Fix Polyurethane Bubbles
Now that you know how to apply polyurethane without bubbles, are you ready to begin your next project? I would love to see pictures or videos of how it turns out, as I hope this article was simple enough to follow so you can end up with an excellent finish.
Preventing or even getting bubbles out of your work surface shouldn’t be a nightmare if you use the right water based or oil based products and allow enough drying time before any additional coat. You will also appreciate using lacquer over polyurethane.
But if you were keen, you probably realized that we didn’t talk about using a roller extensively. This is because rolling on poly without getting bubbles isn’t easy. Check out our quick titled “Can You Apply Polyurethane With a Roller” to avoid bubbles if you want to go this route.
For starters I had an older can of water base polyclear it went on so nice just the way it should. No bells no whistles, wrong brush, used the side of the can, put it on heavy and it just flowed out the way it should.. Went and got a new can I’m not sure what Minwax changed but this stuff is poop. Even the sheen was different. The cans sat for days, the best I’ve found is using it on cold days to give it more flow time and even then theirs still bubbles….crap product min-wax…
please help me. I am putting in brand new wood patio doors. I want to used a waterbed varnish and them water based poly. is one coat of varnish good, before the poly? I’m stressing about doing this right.
Why do you want to poly over the varnish? If you are looking for waterproofing, varnish is waterproof. You will want multiple coats of the varnish, with time to dry in between coats. Keep in mind also that varnish takes weeks to cure fully.
I think the sentence “Repeat steps 6 and 7 – applying polyurethane in thinner coats until you achieve the desired look. Just keep in mind that you need to sand the final coat.” is wrong. The final coat dose not get sanded (it might get polished but certainly not sanded with 220)
Ya you end up blocking it with 1000 grit to try and get the bubbles out…and really if these products where any good you wouldn’t have to do that, they should just flow smooth like automotive urethane’s do. They did at one time.
Hi Goodall, read your article on wood flooring. I intend to do some repair on my worn out parquet. Is matt finish available, and how to check whether original polyethylene was oil or water base. Thanks
Absolutely, you can easily get a matte finish if you desire. I’ll be putting together an article about dulling polyurethane this week.
See my prior comment above, thanks
Thanks Goodall, Very helpful, doing window frames,inside, today and using oil based stain and water based poly, perfect message by you for me, thanks.CAS