Tables have a hard life! They go through a lot of abuse, and most of it is intentional (hands up if you’ve ever tried setting a table on fire).
That is why it is important to protect table tops with the most durable finish possible. Polyurethane is tough, water-resistant, and can protect your tables for as long as a decade.
Before we get into how to finish a table top with polyurethane, let’s talk briefly about the two types of polyurethane.
Different Types of Polyurethane for Table Tops
The two main types of polyurethane are water-based and oil-based. While they both do the same thing, oil-based polyurethane is usually more durable. It also gives the wood a nice glow not seen with water-based polyurethane.
Water-based polyurethane may not be as pretty, but it dries quickly, has low toxicity, and is the polyurethane that won’t yellow over time. On the other hand, oil-based poly has a yellowish tint, which gets more noticeable over time.
However, it is cheaper than water-based polyurethane and easier to apply.
Whichever finish you choose for your kitchen tabletop, the application process is nearly identical.
If you’re in a hurry, here’s a quick rundown of the steps;
How to Polyurethane a Table Top
- Sand the table top to remove old finished
- Clean the surface to get rid of dust
- Prepare the polyurethane by stirring
- Apply the first coat of polyurethane and let it dry
- Sand before applying the next coat of polyurethane
- Apply the next coat
Tools and Materials to Apply Polyurethane
To apply polyurethane to polished or stained table tops, you would need:
- 180 grit sanding block or lower, depending on the condition of the table
- 320 grit sanding block
- Vacuum cleaner
- Paint roller for polyurethane
- Tack cloth
- The Best brush for applying polyurethane
- Use a natural bristle paintbrush for oil-based polyurethane; or
- Use a synthetic nylon bristle paintbrush for water-based polyurethane application
- Thinning agent
- Use mineral spirits for oil-based polyurethane application; or
- Water for water-based polyurethane (Here’s our guide on thinning water-based polyurethane)
- Polyurethane – it could be satin, semi-gloss, or gloss.
Ensure that your workstation is well ventilated. Use a drop cloth to prevent stains or dust from falling on the floor.
When using oil-based polyurethane, wear a respirator, as the odor can be pretty pungent.
How to Finish a Table top with Polyurethane – (Quick Steps)
Step 1: Sandpaper
Before you apply polyurethane on any surface, whether old poly, stain, or paint, you should always sand it. Use 220 grit sandpaper to abrade the tabletop carefully. Ensure that you sand with the grain.
If the piece of wood is really old or had a previous finish, use 180 grit sandpaper or something even coarser. You can use an orbital disc sander with 150 grit paper for the first run, then use a sanding block to smoothen it out.
For tables that were painted on, sanding might not be enough.
In that case, you would need to use a paint stripper or a heat gun. As the paint bubbles up, use a scraper to remove the old finish.
After this, you would still need to sandpaper the table top.
However, if you don’t want to sand down and remove all of that pesky poly then there are some things that can be done to make it easier on yourself! So, read our article on getting rid of polyurethane on wood without sanding for more deets.
Step 2: Get rid of dust
When you are done sandpapering, you need to give it a proper wipe down with a tack cloth. However, to be safe and extra careful, I recommend that you use a vacuum cleaner before the tack cloth. This way, you would not need to wipe as aggressively with the cloth, and it also saves time.
And if you have any pesky heat rings on your table, you can learn how to get white heat marks off wood table before proceeding.
Step 3: Prepare the polyurethane
After spending a long time on shelves, polyurethane tends to separate in the can. The first thing you need to do is mix it, but DON’T shake it. Shaking adds bubbles, making your job a lot harder. (Here, learn how to fix bad polyurethane job)
Use a mixing stick or any stick to stir it slowly. Depending on how thick the polyurethane looks, you can either apply it as it is or thin it.
To get the best finish, you need at least two coats of oil-based polyurethane or three coats of water-based poly. When it comes to finishes, three thin coats are usually better than one thick coat.
This is because the thin coats will dry quicker, have fewer bubbles or brush marks, and you can easily sand it if you notice any problems.
To thin the polyurethane, dilute 3 parts with 1-part solvent. Pour the poly and the solvent into a separate container and gently mix them.
Read Also: How to Make Your Desk Higher
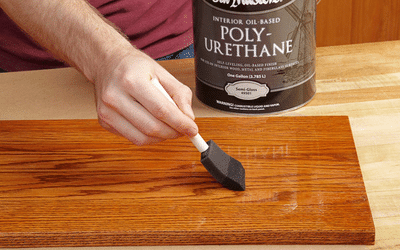
Step 4: Apply the first coat
Dip the brush (natural bristle for oil-based poly and synthetic nylon for water-based) into the polyurethane mix gently, and allow the excess fluid to drip back into the bowl. Do not splash the brush or wipe off the excess on the side of the container, or you will introduce bubbles.
Start from one edge of the piece of furniture and gently stroke along the grain. Don’t apply a lot of pressure on the brush, and only use a bit more than the tip, roughly ½ an inch.
Work the brush back and forth on each ‘row’ until you have coated the entire surface. Do the same with the sides and edges.
Once you are done, let it dry. This may take up to 24 hours for oil-based polyurethane and 6 hours for water-based polyurethane. You can begin to see why some people prefer water-based polyurethane for refinishing jobs.
The wait time is considerably shorter, usually no longer than 10 hours, if you use fast-drying oil-based polyurethane.
Quick sidebar – there is some debate about whether you should apply the next coat while the first one is still wet. Yes, it may adhere better, but it doesn’t give you time to inspect for imperfections.
If this is a personal job and you can afford slight imperfections, then please feel free to experiment. Experimentation will make you a better expert in the long run.
Step 5: Sand before the next coat
After the first coat has dried, lightly sand with 320 grit sandpaper.
Sanding between coats will get rid of any residual bubbles, dust nibs, or brush marks. Unfortunately, no matter how good you are, some of these things will show up in water-based and oil-based polyurethane.
Ensure you don’t press too hard with the sandpaper, as you are not trying to get rid of the first coat. Check to see that there are no bubbles, then use a tack cloth to get rid of the dust.
Take your time to clean the table top to prevent disasters later.
Step 6: Apply the next coat
For the second coat, you are going to apply the polyurethane a bit thicker than the first. Again, apply with little pressure along the grain in a sweeping motion back and forth.
Make sure you don’t forget the edges and crevices if any.
Repeat steps 5 and 6 until you reach the desired look.
Interesting read: Polyurethane finish for hardwood floors.
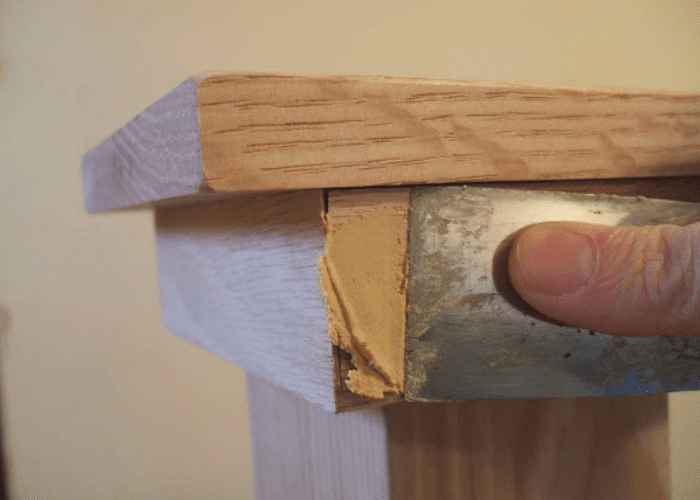
What do I do if There are Holes in the Table?
If there are serious cracks, holes, or broken seams in the table, you need to use wood filler to cover them before applying the polyurethane.
First, get rid of any debris in the cracks, then use a vacuum cleaner. Then apply the wood filler, making sure it goes all the way in.
Give it time to dry, then sand it using 220 grit paper.
How Many Coats of Polyurethane Should I Apply on a Table top?
Is one coat of polyurethane enough for table tops?
Well, if you are applying polyurethane on a previous finish (after sanding, of course), you only need two coats. However, if you stripped off the entire previous coat, then use three coats as usual.
When finishing a table top with water-based polyurethane, you might need about four or five coats. Water-based polyurethane tends to raise the grain of the wood, so you might not get a smooth finish with just three coats.
Apply enough water-based polyurethane to give it a smooth, even finish
Read also: Sealer vs polyurethane.
How to Finish a Table Top with Polyurethane Verdict
Now that you know how to polyurethane a table top, the next thing is to decide on the type of polyurethane you will use, the luster you want, and a camera to record whatever awesomeness you create.
If you have experience finishing table tops with polyurethane, let us know how it went and, if applicable, what you would do differently next time.
I have a new table, I think it is Formica, wood looking table with small little groves on some wood grain. I want to polyurethane the top to prevent any damage. Do I still have to sand down the table?
Thanks David
Yes
Ended up with 4 coats of water based poly, 3 coats with a bristle brush and the final with a foam brush. Excellent results. The foam brush eliminated the trouble I was having leaving brush marks with the bristle brush.
Thank you for these clear straightforward instructions.
Thank you for your simple and clear steps. My husband and I were very pleased with the results of our table.
Glad it worked for you.