If you have some wood paneling in your home that has lost its glamor, touching it up with a fresh coat of paint can help take several years off its age—visually speaking.
As a tradition, you always have to prep the surface of your workpiece by sanding it before painting. But what if you knew how to paint wood paneling without sanding?
This alternative means less work and avoiding dealing with messy sanding dust in your living space.
Keep reading to learn;
- How to prepare wood panelling for painting
- How to paint wooden wall panels without sanding
- How to paint wood panelling with grooves
- The best paint and primer in one on wood panelling
- The best paint for panelling
Can You Paint Paneling Without Sanding?
Yes, you can paint panelling without sanding it first. The trick is to clean the surface with soap and water to remove any dust and loose dirt, then apply a de-glosser to ensure the primer and paint adhere easily.
How to Paint Wood Paneling Without Sanding
The trick behind painting over wood paneling successfully is to use the right tools and follow the correct procedure. Thankfully, this guide has both. So read along to learn how to paint wood paneling.
The Supplies you Need for Painting Paneling
- Panel Paint
- Primer
- A pair of gloves
- Goggles
- Paint roller
- Paintbrush
- Liquid de-glosser
- Painting tape
- Soapy water
- A couple of clean rags
- Lint-free cloth
This section provides the step-by-step procedure to follow to paint solid wood paneling without sanding.
Step 1: The prep work
Painting requires space. You don’t want to get paint spills all over your carpet or furniture while you paint wood paneling.
So, the first thing to do is prepare the place by getting such items out of the way. Then, cover everything else that you cannot move with drop cloths.
After that, clean the paneling surface thoroughly using soap and water. You want to get rid of all the dust and accumulated dirt on the surface you want to paint.
The next thing to do is cover the edges of your panel with painting tape. The painter’s tape should run along the ceiling line and baseboards to keep you from accidentally getting paint where you don’t want it.
The tape will also help you achieve clean lines when you paint wood paneling. Eventually, your paint job will look professionally done.
Finally, protect yourself. Wear a pair of hand gloves to keep the paint off your skin. If you like to err on the side of caution or do not like the smell of fresh paint, you may also wear a protective face mask.
Step 2: De-glossing the paneling surface
The chances are that your wood paneling is treated with some kind of sealant. This smooth surface may hinder the adhesion of the primer and paint.
If your paneling comprises unsealed wood, it likely has accumulated oils and grease from human activity over the years of use. In addition, foods, fingerprints, and many other substances can make the surface pretty slippery over time.
Usually, you would get rid of this glossy layer by sanding. But the more straightforward method is to use a liquid de-glosser instead. It is easy to use, can save you hours of prep work, and gets the job done.
How to de-gloss the surface when painting wood paneling
To apply the liquid de-glosser, ensure the surface is clean and dry, and you have gloves and goggles on. Then, saturate a coarse lint-free cloth with the de-glosser and apply it to the wood paneling in a circular motion.
Re-saturate the damp cloth frequently until you have covered the entire surface. Let the surface dry completely before doing a second coat as indicated on the product label if necessary.
The liquid sander de-glosser will remove the gloss from the surface, dulling it for paint and primer to stick. It may leave a hazy or foggy residue on the surface when dry; that is okay; you can paint on it.
It works on lacquer, varnish, polyurethane, stain, and just about any wood finish.
Step 3: Priming the wood surface
Primer is the foundation of your paint job. Its role is to go on the surface before the paint to help it stick better. It can eliminate incidences of surface damage, cracking, or crumbling.
If you want the finish to last on your paneling, do an excellent job on priming. The suitable primer can make your paint job durable regardless of the paint you choose.
Consider applying more than one coat of primer with a paintbrush and roller to ensure better and more even coverage. You can use a paintbrush for the furrowed joints and a roller for the rest of the flat surface to do the job quicker.
Allow the first one coat to dry thoroughly before applying the second. Check the product label for the manufacturer’s recommended wait time between coats.
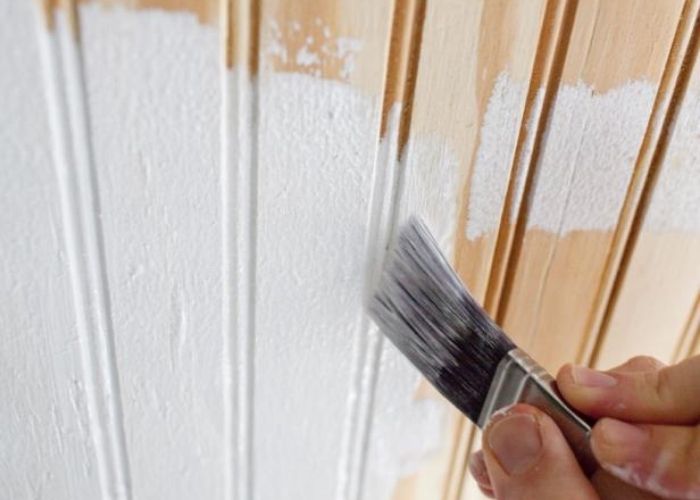
Step 4: Applying the panel paint
You can apply the paint the same way you do primer or use a furniture paint sprayer instead for painting wood paneling.
Whichever method you choose for painting paneling, ensure you do not get too much paint in the grooves. Having excess paint stuck inside the grooves on your wood panel can lead to drying problems.
In any case, apply at least two coats of paint and allow adequate drying time between coats.
While selecting your paint, you want to ensure it has the same base as your primer. For example, if you have oil-based primer, the paint needs to be oil-based too. The same rule applies to water-based primers.
Read:
How Do You Paint Wood Paneling with Grooves?
The procedure for painting wood paneling with grooves is the same as any wood paneling, except you will need to fill the grooves with wood putty to get an even surface.
Usually, you would apply the wood filler, let it dry, and sand the surface to make it sit flush. But since we are not sanding in this case, here is a simple procedure to use.
Step 1: Clean the surface with soap and water, then dry it with a clean, lint-free rag.
Step 2: Apply one coat or two of de-glosser to the surface you want to paint once it is completely dry.
Step 3: Fill nail holes and grooves in the paneling with wood filler. Use a plastic spatula for this purpose, and ensure you even it out flush on the surface with the putty knife. Let it dry completely before moving to the next step.
Step 4: Apply at least two coats of wood primer until you get the best coverage.
Step 5: Finally, apply two to three layers of paint with a roller or by using a paint sprayer.
Must I Prime Wood Paneling Before Painting?
Yes. Priming wood paneling before painting is essential in ensuring the longevity and durability of the paint. Painting without priming can lead to peeling of your painted wood flooring used on walls sooner than you expect.
Using a good quality primer will prevent the painted surface from flaking and cracking and creating unnecessary extra work for you.
It also helps protect the wall panels by creating a protective layer between the surface of your wood panels and the paint layer.
What are the Best Primers to Use on Wood Paneling?
The best primer is one that is compatible with your chosen paint. Since there are several options available, you will want to understand each type of primer to choose correctly. Here are the three main types you may want to consider.
Oil-based primers
Oil-based primers are often the most recommended for various projects, including wood paneling, painted surfaces, and steel.
They are pretty versatile and resistant to weather elements and stains. They are the best to use with enamel paint and are regarded as the industry standard.
Oil-based primers do an excellent job sealing wood surfaces, which can go a long way in ensuring better coverage and keeping the paint from cracking or peeling.
The main downside to using oil-based primer is their toxicity levels. The primers can contain a relatively high concentration of volatile organic compounds that may be toxic if you inhale for extended amounts of time.
They also have a strong odor that some people may find problematic during application. Therefore, you will need to keep the windows open when painting with an oil-based primer.
In any case, we recommend Kilz Original Multi-Surface Stain Blocking Interior Oil-Based Primer. It does a great job covering existing stains and odors while blocking new ones.
It also helps the true color of the paint to come out better.
Shellac primers
Shellac-based primers are quick-drying and highly resistant to stain. They are regarded as the best primers for stain blocking and form a highly durable coat.
If you are painting surfaces with issues of wood tannins, smoke, or water stains, you may want to consider buying a shellac primer.
Of course, the price may be slightly higher than latex or oil-based primers because of their superior quality.
On the downside, a shellac primer tends to emit more fumes than oil-based or latex primers. As such, you will need to wear a protective mask when applying them.
Additionally, this group of primers is the least versatile of the three. They strictly require denatured alcohol to clean. While at it, remember to wear gloves for your safety.
There are numerous top-performing shellac primers out there, but we liked Zinsser B-I-N Pigmented Shellac Primer the most.
It forms a highly durable coat that blocks practically any type of stain and offers the best support to the topcoat.
Latex-based primers
Latex primers are water-soluble. Therefore they form a good foundation for any water-based paint. You can use them with corresponding latex paints or acrylic paints.
The main advantage of latex-based primers is their eco-friendliness. They hardly have any odor and are easy to use.
Latex primers are easy to clean and can work with various surfaces, including wood, unlike oil-based or shellac primers.
However, latex-based primers do not hold too well against glossy surfaces and raw wood. The moisture content or raw wood can cause swelling, affecting the quality of your paint job.
Latex-based primers also rank below oil-based and shellac primers in sealing stains.
That said, we recommend the INSL-X Stix Acrylic Waterborne Bonding Primer. It is highly versatile, works well with hard-to-coat surfaces, including glossy tile, PVC, and plastic.
You can also use it with pretty much any type of topcoat.
The Best Paint to Use on Wood Paneling
Any type of paint can give the best results on wood paneling as long as you pair it with the right primer. As such, you have the liberty to choose any panel paint color or type that you find most appealing.
In our case, the best paint for wood paneling is always a high-quality latex paint. Specifically, we like to use Rust-Oleum Painter’s Touch Latex Paint on most wood painting projects.
The results are usually the same each time.
Common Mistakes to Avoid When Painting Panelled Walls
Now, sometimes you will do everything correctly and get the desired results, but something will go wrong at other times.
Knowing the common pitfalls to avoid can help increase your chances of success even if you are a rookie DIYer.
Here are the mistakes that people frequently make when painting panelled walls.
Buying the wrong paint
Saving a few bucks off your paint purchase may feel nice. But that feeling can vanish quickly once your painted surface starts to peel off.
Such a problem is easy to avoid: avoid cheap paints; they provide cheap results that are not desirable.
Some of the notable brands to consider are Sherwin Williams, Rust-Oleum, Benjamin Moore and aura. If the reviews are good, then chances are the product will not disappoint.
Not repairing cracks and holes before painting.
Some people assume that the paint will seal the cracks and holes in their wood paneling. So they just proceed to paint without sealing the holes first.
Sealing is not the work of paint; its work is to color your paneled wall.
When you paint without sealing the cracks, you end up with more paint lodged into those holes. Eventually, they take much longer to dry.
Always use wood putty to seal any holes and cracks before you paint.
Choosing the wrong color
The color is wrong when it does not match your décor or if it is not quite the one you had in mind.
There are numerous shades of each color you see out there. This means you can easily choose something close and not exactly what you want.
Usually, a professional painter can help you solve that puzzle. Even if you are a DYI enthusiast, asking for help can help you select the right color for your wood paneling.
Failing to use a primer
You might be tempted to go straight to painting without priming your surface if you are new to painting.
You can choose this alternative for many reasons, mainly for not knowing the purpose of priming or wanting to finish the job quickly.
You will complete the job sooner, but so will the paint. It will be vulnerable to peeling after staying on the wall for only a short time.
You need the primer to ensure adhesion and better coverage, making your paint durable.
Using the wrong primer
The only thing worse than not using a primer is using the wrong primer. It is worse because all the money you spend on the primer goes to waste.
A wrong choice of primer will do a lousy job on your paneled wall. Various primers are compatible with different surfaces.
Ensure you buy a primer that is compatible with the kind of material or wood type you have on your wall paneling. Also, check to ensure the primer is the same base as your chosen paint.
If the primer is incompatible with the paint, you may have to forget about durability. You will likely end up with poor results and a painted paneling that wears off in just a few months or less.
Painted Wood Paneling FAQs
Is it possible to whitewash paneling without sanding?
Yes, whitewashing a wood paneling can be an excellent way to restore worn panels and make them look as good as new ones. Whitewashing can also enhance the appearance of your panels by adding a rustic cottage charm to the boards. Consider using high-quality white paint to whitewash your wood panels and give them a facelift.
Is wood paneling outdated?
The traditional dark wood paneling is uncommon today as many homeowners have shifted in favor of brightly painted or neutral-colored drywall. However, wood paneling remains common in old homes that have not undergone remodeling. If you have one at home, consider making the wood paneling look like drywall by painting over it or bleaching the surface.
How do I paint over fake wood paneling?
To paint over fake wood paneling, follow the same procedure as painting over real wood paneling. Start by cleaning the surface using a degreaser and de-glosser, then scuff up the surface with 150-grit sandpaper to give the primer something to grip on.
Clean the wood after sanding with a clean rag and apply at least two coats of primer. Follow through with the recommended number of paint coats. Ensure you de-lint your paint roller before using it to remove any fluff that could potentially end up on your painted paneling.
What is the best color to paint a panel?
White is the best paint colour for wall panelling. It is currently considered the standard colour for painting all types of wall panelling. The reason behind this choice is to make the wood-panelled wall pop and stand out. You can pair the white backdrop with black, dark grey, or navy wall decor accents and furniture to achieve a modern look. The only concern is whether can you use interior paint on furniture in terms of durability and protection.
How can I make wood panelling look good without paint?
There are multiple ways to make wood panelling look great without painting the boards. For instance, you can paint the trim around the wood panels, introduce solid-coloured furniture, place eye-catching art on the wall, or use additions such as a lamp or fireplace to create multiple focal points. Check out our list of the types of paint for trim and baseboards you may want to select from).
How to Paint over Paneling Without Sanding Summary
Knowing how to paint wood paneling without sanding requires simple preparation and using the right supplies.
The important thing is to ensure the surface is clean and gloss-free. This involves removing all dust and dirt and applying a de-glosser before priming and painting.
We hope you find this article helpful in walking you through your wood panel painting project. Let us know your thoughts and observation in the comments section.
Read More: How to Cut Paneling Without Splintering
What to Do Next?
Are you looking to update your kitchen cabinets? It’s easy to do it yourself with our step-by-step guide on how to paint cabinets like a pro. We have all the necessary information, including what supplies you’ll need and how much time it will take.
Finally, be sure to know, when you paint cabinets, do you paint the inside?
Thank you for your help ! I’m a senior getting ready to paint paneling ! You helped so much !!
Me too! Just downsized and cash out a double wide. But…every wall has fake wood paneling! Feels like stepping right into the Partridge Family tour bus 😜 in 1978!