Say you have gorgeous cedar structures outdoors. But your recent pressure-treated construction project is disrupting the harmony of your backyard. A quick fix is to stain pressure-treated wood to look like cedar.
Pressure-treated wood is a sturdy material that can weather harsh elements without flinching. However, it has a green color that can appear misplaced among other colors.
The good news is that staining treated wood is easy. This article will show you how to stain pressure treated wood to look like cedar and some of the best cedar-toned stains you can use.
Without further ado…
How to Stain Pressure Treated Wood to Look Like Cedar
Cedar has a pinkish-red color or some subtle purple hues. You can get any wood to look like cedar using cedar-toned wood stain or paint.
Protecting pressure treated wood involves using chemically treated southern yellow pine, a softwood lumber. This safeguards the wood from weathering and extends its lifespan. The chemicals applied enhance resistance against insects and effectively thwart wood decay.
Stain wood to look like cedar if you’d like the lasting benefits of pressure treated lumber for outdoor use and a seamless blend with cedar used in your construction project.
The steps below will guide you.
What you’ll need
- Oil-based or water-based stain
- Moisture meter
- Stain pad or brush
- Paint can opener
- Scrub brush for cleaning the lumber
- Mild detergent
- Gloves
- Stir stick
Procedure
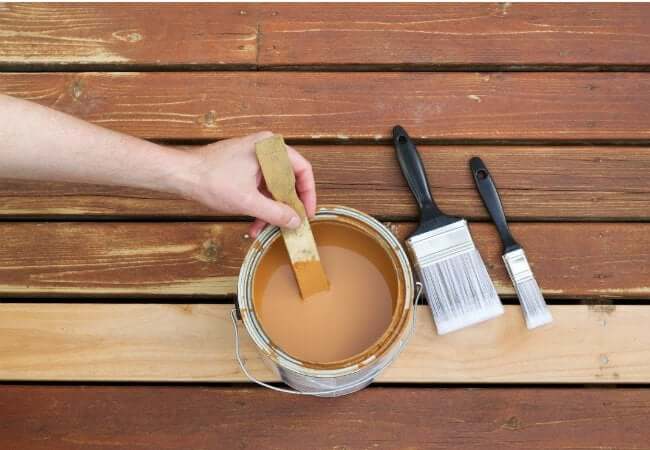
Step 1: Select the correct cedar-tone wood stain
Select a solid cedar-colored wood stain designed for outdoor applications. You can get excellent water-based or oil-based cedar-tone stains. Whichever you pick, keep the targeted surface in mind –horizontal or vertical.
Step 2: Check the moisture level in the treated lumber
Always check the moisture content of the pressure-treated lumber you plan to stain. Using a moisture meter, ensure the wood’s moisture level doesn’t exceed 17%. If it’s more, let the wood dry for a few weeks.
Alternatively, sprinkle a few drops of water on the wood: if it beads up, the wood isn’t ready for staining. But if the water drops are absorbed into the wood, stain away!
Today’s pressure-treated wood doesn’t require any waiting period to let chemicals leach out; test anyway to ascertain its dryness.
Step 3: Choose the perfect weather forecast
Check the weather forecast for the next 3-4 days from the day you plan to stain treated wood. Look out for warm weather with low humidity; your stain job will dry and cure efficiently.
Step 4: Prep the pressure-treated lumber for staining
You need to clean the pressure-treated wood and dry it to help the stain adhere easily. If you just had your pressure-treated lumber delivered, wipe it with a damp rag to remove dust.
However, if the treated lumber is older and has built-up grime, use mild detergents and a scrub brush to clean the wood thoroughly. Next, rinse the wood with water and wipe excess water with a dry rag.
After that, let the wood dry completely. How long it will take for pressure-treated wood to dry depends on the cleaning, climate, and weather conditions.
Step 5: Prep the cedar-colored stain
Prepping the cedar-colored wood stain is easy. First, carefully open the stain can using a paint can opener or a screwdriver.
Next, stir the contents using a stir stick to mix up the pigment that may have settled at the bottom. Don’t shake the stain can to avoid creating bubbles; a bubbly stain doesn’t apply smoothly.
Step 6: Test the stain on the treated lumber
Line a drop cloth on the surface beneath the treated wood to catch drips and splatters while protecting nearby plants.
Always test-brush the stain on an inconspicuous spot, whether you’re staining a pressure-treated fence, deck, or any other wooden application. Then, let the brushed stain dry fully.
From this test, you can tell if the stain is an excellent match or a disappointment. In addition, you can also estimate how long the wood stain would take to dry. Begin staining once you’re satisfied with the test results.
Step 7: Stain the treated wood with at least one coat
Apply stain using a stain pad or stain brush. Apply a light coat and slightly overlap to ensure the surface is evenly coated. However, avoid back brushing the wood because you risk double coating and altering the color you’re trying to achieve.
Begin applying stain from the top and work your way down; if you’re staining treated fence or any vertical surface. This allows you to conceal and even out any runs or drips.
Once the entire surface is evenly stained, let it air dry completely. Again, a single stain coat will suffice.
Read also: Can you seal cedar wood?
The Best Cedar Stain on Pressure Treated Wood
Here are some excellent cedar-toned stains you can try.
1. Best Rated – DEFY Extreme 1 Wood Stain, Cedar Tone
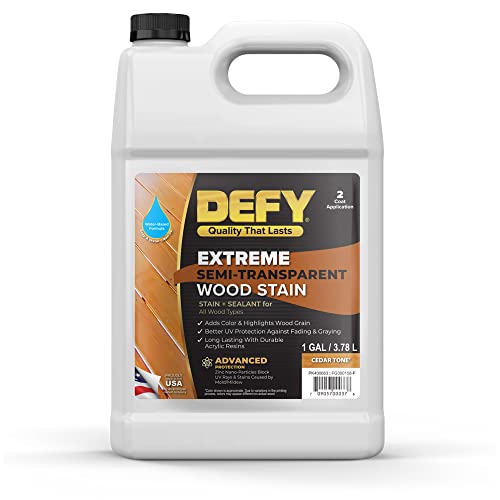
- Water-Based Semi-Transparent Wood Stain – This water-based deck stain allows the wood grain to show through with a beautiful semi-transparent, natural matte finish. It's great for staining wood decks, fences, siding, playsets, outdoor patio furniture, and more.
- Fortified With Zinc Nano-Particle Technology – It’s like sunscreen for your wood. Tiny zinc particles dispersed throughout the stain reflect damaging UV rays, preventing premature graying and color loss.
- Durable Quality That Lasts – DEFY Extreme wood stains are made with the highest quality resins available that have better resistance to fading and darkening.
Top of our list is the DEFY Extreme Semi-Transparent Cedar-Tone Exterior Wood Stain. This stain is best rated by users who’ve tried it, plus it’s a good value for your money.
This stain is water-based and VOC compliant, meaning you won’t have to deal with toxic fumes and chemicals. In addition, this brand offers seven 7 other wood tones; you can get what you’re looking for.
Again, it applies smoothly and doesn’t require thinning. Plus, it’s most suited for vertical exterior surfaces such as a treated fence or siding.
The shortcoming is that usage is exclusively on vertical surfaces.
2. Best Overall – Ready seal Natural Cedar Exterior Stain and Sealer for Wood
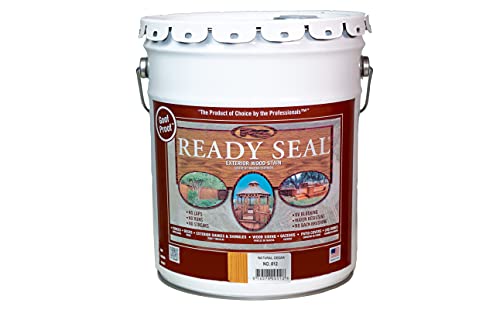
- Requires no primer. Ready Seal is darkest when first applied. It reaches its true color in approximately 14 days. Do not apply Ready Seal over painted or newly stained surfaces. Sealed surfaces inhibit penetration.
- May be applied using sprayer, roller or brush onto the woods surface.
- Requires no back brushing and will nerver leave runs, laps, or streaks.
This particular Ready Seal Natural cedar stain provides the benefits of a stain and sealer in one product. This oil-based stain will penetrate your pressure-treated wood and protect it from mold, mildew, and harsh UV rays.
This is one of the best exterior wood stain for outdoor furniture. It is perfect for vertical and horizontal surfaces like deck boards. It applies easily using a brush, sprayer, or roller, and you don’t need to back brush.
The caveat is that you may need to wait about a week or two for it to reach its true color.
3. Best stain for vertical surfaces – General Finishes Exterior Wood Stain, 1 Quart, Cedar
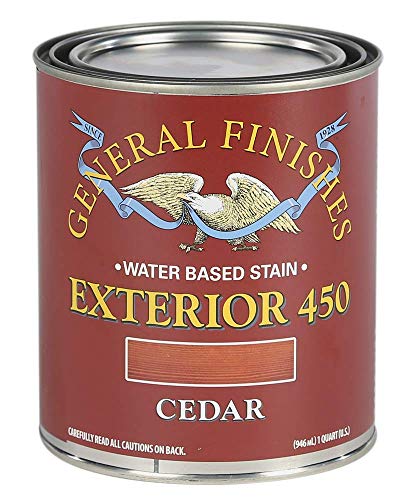
- PREMIUM, EXTERIOR WOOD STAINS, MADE IN THE USA - General Finishes Exterior 450 Stains are specifically designed for outdoor projects with vertical surfaces such as fences, patio furniture, garage doors, entrance doors, outdoor kitchens, and interior windows. These stains are not recommended for large horizontal surfaces such as a deck.
- CONTAINS U.V. ABSORBERS - The U.V. absorbers protect the integrity of the film, but will not prevent the wood from changing color in the sunlight.
- EASY APPLICATION AND CLEAN-UP - Exterior 450 Stains can be brushed, rolled, or sprayed. Clean hands and application tools with soap and water.
General Finishes Exterior cedar tone wood stain is water-based and best used on vertical pressure-treated surfaces. This stain is adequately pigmented to give you the exact color as natural cedarwood.
General finishes exterior stain applies pretty smoothly; you can spray, brush or roll it on the treated wood. Plus, you can clean it up with just water and soap if you make a mess.
The downside is that the stain doesn’t weatherproof the treated wood against the harsh outdoor elements.
Types of Green-Treated Lumber
There are three types of green-treated lumber available. Each of these dictates how soon you can paint or stain.
Wet treated wood: This type is literally wet and very heavy when you buy; liquid can splash out if you hammer a nail into it. It will take several months before the wood loses the additional moisture and be ready for staining.
Treated wood containing water repellant: This type has superior resistance to water damage. This type easily qualifies as lumber designated for ground contact.
Kiln-dried pressure-treated wood: As the name suggests, this type of treated wood is dry, lighter, and ready for use on a construction project. You can paint or stain it right away.
How Long Do You Wait Before Staining Pressure-Treated Wood?
If you’re working with kiln-dried pressure-treated lumber, wait at least 72 hours before you stain. However, if you’re handling wet, pressure-treated wood, let it dry for several weeks to 6 months.
What Happens if You Stain Pressure-Treated Wood too Soon?
If you stain pressure-treated wood too soon, it won’t absorb the stain, leaving it to peel and fall off prematurely. As a result, you’ll have to deal with ugly stain patches, surface cracks, and splits.
FAQs
Can I stain pressure-treated wood to look like cedar?
Yes, you can stain pressure-treated wood to look like cedar. This is an easy way to enjoy the lasting benefits of pressure-treated wood while matching the cedar-colored theme in your construction project.
Can you stain over pressure-treated wood?
Yes, you can stain over pressure-treated wood. Staining pressure-treated wood can help reduce surface cracking. However, ensure the wood is clean and dry before staining.
How do I make wood look like cedar?
- First, choose the right cedar-tone wood stain.
- Sand the new wood smooth and clean off the dust.
- Apply a pre-stain sealer and let it dry out.
- Apply the cedar tone stain with a stain pad.
- Let the first coat dry fully.
- Reapply the second or third coat if necessary.
What kind of stain do you use on pressure-treated wood?
You can use any stain formulated for exterior use on pressure-treated wood. Choose between latex, oil-based, and water-based stain. However, from experience and that of most homeowners, an oil-based exterior stain is more durable on pressure-treated wood.
Can I paint pressure-treated wood to look like cedar?
Yes, you can paint pressure-treated wood to look like cedar. Before painting pressure-treated wood, ensure you apply two coats of primer. Also, ensure that your artificial cedar finish is a shade lighter than the selected undertone.
Can you stain cedar tonewood?
Yes, you can stain cedar tonewood. Cedar tonewood is natural wood chemically treated to look like cedar and resist rot, insect attacks, and repel water. So stain it as you would, pressure-treated lumber.
Read also: Cedar vs. Pressure Treated wood.
How to make pine look like cedar
- Lay down a drop cloth.
- Sand the pinewood and clean up the sanding dust.
- Apply 2 coats of stain-blocking pine sealer.
- Apply the interior cedar tone stain from top to bottom or one end to end.
- Wait for the first stain coat to dry.
- Reapply another cedar stain if necessary.
If you’re interested in more detailed instructions and expert tips on how to stain a wooden pine door to achieve that authentic cedar look, explore our comprehensive guide.
Final thoughts
Would you have thought it would be this easy to stain pressure-treated wood to look like cedar? Well, it is if you follow the correct procedure. First, remember to ensure the treated wood is clean and completely dry.
The best part is that you only need one coat of stain. That’s how you can easily marvel at your desired uniform cedar color palette and the lasting structural integrity of pressure-treated wood.
If you enjoyed this article or have questions about the topic, talk to us in the comments section below.
Recommended read: How to seal pine for outdoor use